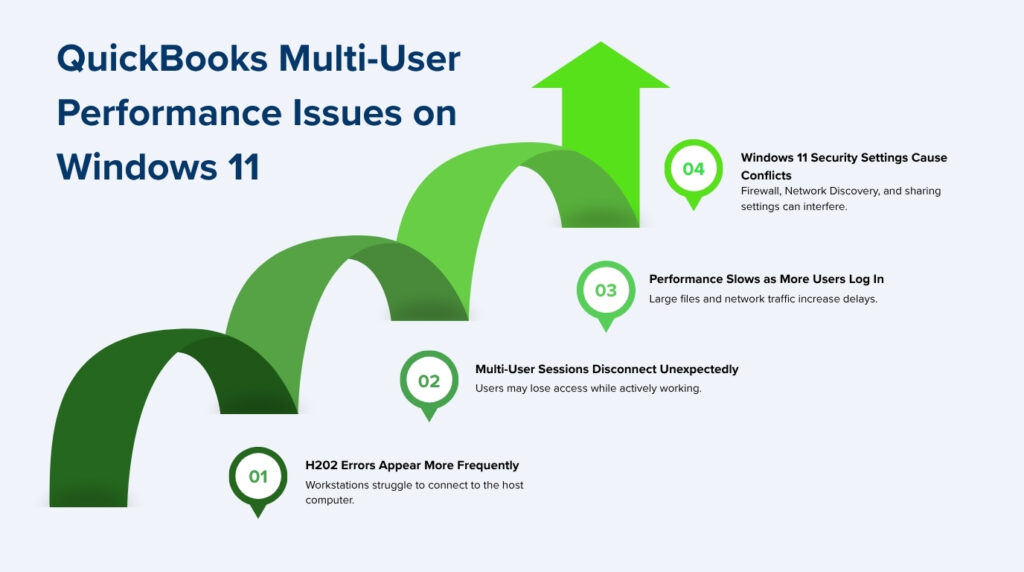
Windows 11 is the operating system Intuit officially recommends for QuickBooks Desktop 2024, and QuickBooks Desktop 2024 is specifically designed to work on 64-bit Windows 11 installed natively on the computer. Despite that compatibility, businesses that run QuickBooks Desktop in multi-user mode on Windows 11 report a consistent set of problems: H202 errors that did not exist on Windows 10, multi-user mode dropping connections mid-session, slow performance that worsens as more users log in, and workstations that revert to single-user mode without warning.
These problems have specific causes rooted in how Windows 11 handles network profiles, firewall rules, network adapter settings, and the Network Discovery feature that QuickBooks uses to find the host computer on the network. Windows 11 changed the default behavior of several of these settings compared to Windows 10, and QuickBooks Desktop’s multi-user mode depends on those settings being configured correctly to maintain stable connections between the host and each workstation.
This article covers every performance and connectivity issue that QuickBooks Desktop multi-user mode experiences on Windows 11 — what each problem is, what Windows 11 changed to cause it, and the exact steps documented by Intuit and confirmed in practice to restore stable, fast multi-user access.
Table of Contents
Windows 11 and QuickBooks: Compatibility at a Glance
Before addressing specific problems, check the version compatibility and confirm the setup meets Intuit’s requirements:
| Your Situation | What It Means for Windows 11 | Go to Section |
| Using QuickBooks Desktop 2021 or older on Windows 11 | These versions are not compatible with Windows 11 — multi-user mode will not work | Section 2: Version Compatibility |
| H202 errors appeared after upgrading the server to Windows 11 | Windows 11 changed network profile and firewall defaults that QuickBooks needs | Section 3: Network Profile and Firewall |
| Multi-user mode works on some computers but not others | Mixed Windows versions or NIC duplex mismatch between computers | Section 4: NIC Settings |
| QuickBooks is slow on Windows 11 — all users affected | RAM below Intuit’s formula, or competing programs on the host | Section 5: RAM and Competing Programs |
| Network Discovery keeps turning off after Windows 11 updates | Windows 11 update resets network sharing settings | Section 6: Network Discovery |
| QuickBooks reverts workstations to single-user mode randomly | QuickBooks services stopping silently on the Windows 11 host | Section 7: Service Stability |
Tip: Work through the sections in the order shown if more than one symptom matches. Windows 11 performance problems in multi-user mode almost always involve multiple interacting settings, and fixing one without the others produces partial improvement.
1. How Windows 11 Differs From Windows 10 for QuickBooks Multi-User Mode
What Windows 11 Changed That Affects QuickBooks?
Windows 11 introduced changes to how it assigns network profiles — Private or Public — to new network connections. A Private network profile allows file and printer sharing between computers, which QuickBooks multi-user mode depends on. A Public network profile blocks all sharing as a security measure. Windows 10 was more permissive in assigning Private profiles to established connections. Windows 11 is more conservative — it assigns a Public profile to new and unknown connections by default, which immediately disables the file sharing that QuickBooks needs without displaying any error message related to QuickBooks.
Windows 11 also tightened the default settings for Network Discovery — the feature that allows computers on the same network to find each other by name. On Windows 10, Network Discovery stayed on reliably across reboots once it was enabled. On Windows 11, Network Discovery can revert to off after certain update types and after power cycles on specific network configurations. QuickBooks workstations use Network Discovery to locate the host computer by name on the network, and a workstation on a Windows 11 machine where Network Discovery turned off after an update cannot find the host, producing H202 even when every other setting is correct.
Intuit’s system requirements document for QuickBooks Desktop 2024 confirms that Windows 11 is a supported operating system and notes: to ensure the best performance and data security, use a supported version of Windows, such as Windows 11 or Windows Server 2022, installed natively on your computer. The phrase installed natively matters — Intuit explicitly states that virtual environments, emulators, and Windows 10 S Mode are not supported. A Windows 11 installation running inside a virtual machine or a compatibility layer produces performance and connectivity problems that a native installation does not.
Which QuickBooks Versions Work on Windows 11
Intuit’s community documentation is clear: Windows 11 is not compatible with QuickBooks Desktop 2021 and older versions. QuickBooks Desktop 2022, 2023, and 2024 all support Windows 11 when installed on a 64-bit system. A business running QuickBooks Desktop 2021 or an earlier version on a computer that was upgraded to Windows 11 cannot use multi-user mode reliably — the multi-user services in those older versions were not tested against Windows 11 and do not function correctly on it. Upgrading to QuickBooks Desktop 2022 or later is required before any Windows 11 multi-user troubleshooting can produce stable results.
2. Version Compatibility: The First Check Before Any Troubleshooting
What Happens When an Older QuickBooks Version Runs on Windows 11
QuickBooks Desktop 2021 and older versions were designed and tested on Windows 10. The background services those versions use — specifically the QuickBooksDBXX service and QBCFMonitorService — rely on system components that Windows 11 modified or replaced. Running an unsupported QuickBooks version on Windows 11 produces multi-user failures that no amount of firewall configuration, service restarts, or network changes will permanently resolve, because the root cause is an incompatibility between the software and the operating system.
Intuit’s Intuit community support representatives have confirmed to users that QuickBooks Desktop 2021 and older are not compatible with Windows 11. The only supported path forward for these businesses is to upgrade QuickBooks Desktop to 2022 or a later version before attempting to restore multi-user functionality on Windows 11. After the upgrade, run the full Windows 11 configuration steps in this article — because even compatible versions require specific Windows 11 settings to be confirmed after installation.
The upgrade process requires installing the new QuickBooks version on the host computer first, converting the company file to the new format, then upgrading every workstation to the same version year before anyone opens QuickBooks on a workstation. After the upgrade, run a QuickBooks Database Server Manager scan on the host computer to rebuild the .ND file and restore the firewall permissions for the new version’s service account.

3. Windows 11 Network Profile and Firewall: The Most Common Cause of H202
How the Network Profile Setting Controls QuickBooks Multi-User Access
The network profile is a Windows setting that controls how much the computer shares with other computers on the same network connection. A Private profile allows file sharing, printer sharing, and Network Discovery — all three of which QuickBooks multi-user mode requires. A Public profile blocks all three. Windows 11 assigns a Public profile to network connections that it does not recognize as trusted private networks, and a freshly installed Windows 11 computer or a computer that had its network reset by an update will often be on a Public profile without the user being aware of it.
Confirming and correcting the network profile on both the host computer and each workstation is the single most impactful step for resolving H202 on Windows 11. On the host computer, a Public profile blocks QuickBooks Database Server Manager from sharing the company file over the network — every workstation gets H202 because the host refuses all sharing requests. On a workstation, a Public profile blocks the workstation from reaching the host — the workstation cannot send its connection request through the Public profile restriction.
How to Set the Network Profile to Private on Windows 11
Open the Windows Start menu on the host computer. Go to Settings, then Network and Internet. Click on the active network connection — either Ethernet or Wi-Fi. Find the Network Profile Type section. Select Private. Close the Settings window. Repeat this process on every workstation on the network. A Windows 11 computer set to a Private network profile enables file sharing and Network Discovery automatically, restoring the two capabilities that QuickBooks multi-user mode requires to connect the host with each workstation.
After setting the network profile to Private on all computers, open the Advanced sharing settings in the Network and Sharing Center on each computer. Go to the Start menu, type Network and Sharing Center, and open it. Select Change advanced sharing settings. Under Private network, confirm that Turn on network discovery is selected and that Turn on file and printer sharing is selected. Save the changes. These two settings must be active on both the host and every workstation for QuickBooks multi-user mode to function on Windows 11.
Firewall Resets After Windows 11 Updates
A Windows 11 update that patches the Windows Firewall engine can reset the firewall to its default state, removing the custom port and program exceptions that QuickBooks requires. The H202 errors that follow a Windows 11 update appear because the firewall update cleared the QuickBooks port rules — port 8019 and the dynamic port assigned to the installed QuickBooks version — and program exceptions for QBDBMgrN.exe, QBCFMonitorService.exe, and QBW32.exe. The fix is to run a Database Server Manager scan and run QuickBooks File Doctor from Tool Hub, both of which re-apply the firewall rules for the current network configuration.
Windows 11 Multi-User Network Settings Reference
| Setting | Correct Value on Windows 11 | Where to Find It |
| Network Profile | Private (not Public) | Settings > Network & Internet > active connection > Network Profile Type |
| Network Discovery | On (under Private network) | Control Panel > Network and Sharing Center > Advanced sharing settings |
| File and Printer Sharing | On (under Private network) | Control Panel > Network and Sharing Center > Advanced sharing settings |
| Windows Firewall QuickBooks ports | Port 8019 + dynamic port: Inbound and Outbound rules | Control Panel > Windows Defender Firewall > Advanced Settings |
| QuickBooks program file exceptions | All 14 QB executables: Inbound and Outbound rules | Control Panel > Windows Defender Firewall > Advanced Settings |
4. Network Interface Card Settings on Windows 11
What a NIC Is and Why Its Settings Affect QuickBooks Performance
A Network Interface Card — called a NIC — is the hardware component inside a computer that connects it to the network. The NIC sends and receives data between the computer and the router or network switch. Every NIC operates at a specific speed — measured in megabits per second, where 1,000 Mbps equals one gigabit — and at a specific duplex setting. Duplex refers to whether the card can send and receive data at the same time (full duplex) or must alternate between sending and receiving (half duplex). A mismatch between the NIC speed or duplex setting on the host computer and the network switch it connects to creates a condition where data is sent repeatedly due to errors — slowing down every QuickBooks session on the network without producing a visible error message.
Intuit’s official performance guide for QuickBooks Desktop specifically addresses NIC settings and provides Windows 11 steps for viewing and editing them. The guide states: if your computer’s NIC has different link speeds and duplex settings, the network may slow down. You can reset all NIC settings to automatic. When the NIC is set to Automatic, Windows 11 negotiates the correct speed and duplex with the network switch automatically, eliminating the mismatch that causes repeated data transmission errors and the QuickBooks slowdown that results.
How to Reset NIC Settings to Automatic on Windows 11
Open the Windows Start menu and go to Settings. Select Network and Internet. Click on the active network connection to see the link speed and duplex currently in use — this information appears in the connection’s Properties panel. Go back using the back arrow, then select Advanced network settings. Find the Network adapters section and click the dropdown arrow next to each adapter to expand its properties. Click Edit to open the adapter settings.
In the adapter settings, find the Speed and Duplex setting or the Link Speed and Duplex setting — the label varies by network card manufacturer. Change the value to Auto Negotiation or Automatic. Save the setting and close the window. Intuit’s guide also notes that Advanced network settings includes a Network reset option that restores all network adapters to their factory settings — use this option if the adapter settings screen shows values that are unclear, as the reset brings all adapters to Automatic and eliminates any manual configuration that may be causing a mismatch.
5. RAM Requirements on Windows 11 Host Computers
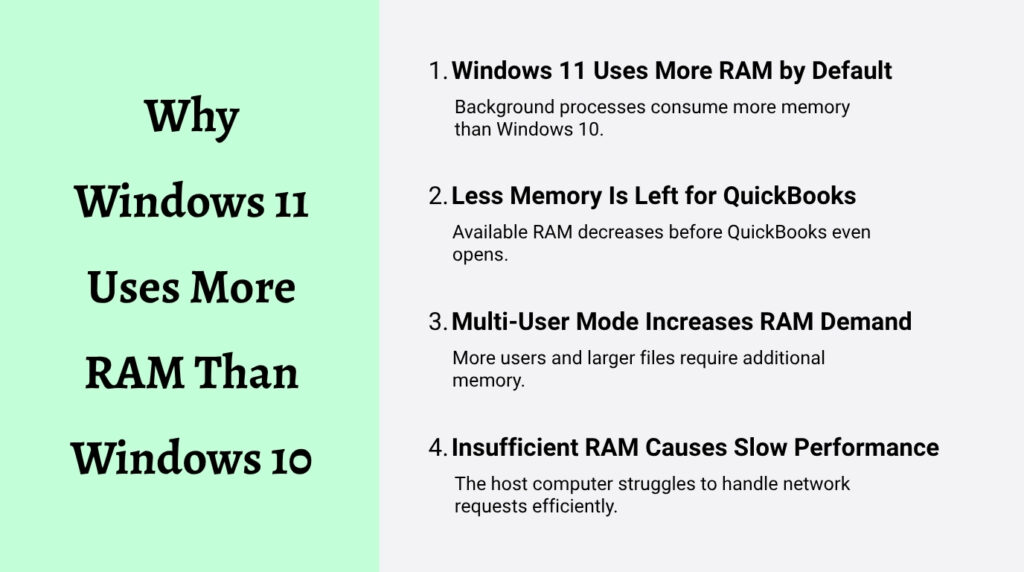
Why Windows 11 Uses More RAM Than Windows 10
Windows 11 has higher base RAM usage than Windows 10. Windows 11’s minimum RAM requirement is 4 GB, compared to Windows 10’s 2 GB minimum. In practice, Windows 11 uses approximately 4 to 5 GB of RAM for its own processes during normal operation — more than Windows 10 used at idle. A host computer that had enough RAM for QuickBooks multi-user mode on Windows 10 may no longer have enough after upgrading to Windows 11, because Windows 11 itself consumes more of the total RAM before QuickBooks even opens.
Intuit’s RAM formula for QuickBooks Desktop multi-user mode requires: multiply the company file size in gigabytes by the number of simultaneous users. A company file that is 500 MB (which equals 0.5 GB) with 6 users connected simultaneously requires 3 GB of RAM on the host computer for QuickBooks alone. On a Windows 11 host computer that uses 4 GB for the operating system, this means the host needs at least 7 GB of total RAM — 4 GB for Windows 11 and 3 GB for QuickBooks. A host computer with 8 GB of total RAM comfortably meets this requirement, while a host with 4 GB of total RAM will run out of working space and slow down every connected user.
Virtual Memory on Windows 11
Virtual memory — also called a page file — is a space on the hard drive that Windows uses as an overflow when RAM is full. Windows moves data out of RAM and onto the hard drive when it runs out of RAM, and then moves it back when needed. This process is called paging, and it is far slower than using actual RAM because a hard drive reads and writes much more slowly than RAM chips. Intuit’s performance guide recommends increasing virtual memory to 2 GB and adding 2 GB for each major application running on the computer. On a Windows 11 host computer running QuickBooks Database Server Manager alongside QuickBooks Desktop, setting virtual memory to 4 GB provides the overflow buffer needed when RAM usage spikes during peak multi-user sessions.
To set virtual memory on Windows 11, open the Start menu and go to Settings. Select System, then About. Click Advanced system settings. In the System Properties window, go to the Advanced tab and click Settings under Performance. Go to the Advanced tab in the Performance Options window and click Change under Virtual memory. Uncheck Automatically manage paging file size for all drives. Select the C: drive, choose Custom size, and set the Initial size and Maximum size to the values Intuit recommends — 4096 MB for the initial size and 8192 MB for the maximum size on a host computer running QuickBooks with 6 or more users. Click Set, then OK. Restart the computer for the new virtual memory settings to take effect.
6. Network Discovery on Windows 11: Keeps Turning Off
Why Network Discovery Turns Off on Windows 11
Network Discovery is the Windows feature that allows computers on the same network to see each other and communicate by name. QuickBooks workstations use Network Discovery to find the host computer when a user opens the company file in multi-user mode. Windows 11 treats Network Discovery as a security-sensitive setting and resets it during certain update types, specifically when a security update modifies the network stack or firewall engine. A workstation where Network Discovery turned off after a Windows 11 update cannot find the host computer by name and displays H202 — even if the network connection, the host services, and the firewall are all configured correctly.
The reset happens because Windows 11 separates Network Discovery into multiple sub-settings that must all be active simultaneously. The main setting — Turn on network discovery — can be on while the sub-setting Function Discovery Resource Publication, which advertises the computer’s presence on the network, is stopped. When Function Discovery Resource Publication stops, other computers can no longer see the computer even though the main Network Discovery toggle reads as on. This is why Network Discovery appears to be on but QuickBooks workstations still cannot find the host.
How to Keep Network Discovery Stable on Windows 11
Open the Windows Start menu and type services.msc. Open the Services application. Find Function Discovery Resource Publication in the list. Double-click it, set the Startup type to Automatic, and click Start if the status shows Stopped. Click the Recovery tab and set all three failure options to Restart the Service. Repeat these steps for DNS Client and SSDP Discovery — two other services that support Network Discovery on Windows 11. Setting all three services to Automatic with automatic restart prevents a Windows 11 update from leaving Network Discovery in a broken state after the next reboot.
Also pin the Advanced sharing settings to prevent Windows 11 updates from resetting them. Open the Network and Sharing Center, click Change advanced sharing settings, expand Private network, and confirm Turn on network discovery and Turn on file and printer sharing are both selected. Click Save changes. These settings are stored in the Windows registry and can be overwritten by certain update types — checking and resaving them after every major Windows 11 update takes less than two minutes and prevents the Network Discovery reset from causing the next round of H202 errors.
7. QuickBooks Service Stability on Windows 11
Why QuickBooks Services Stop More Often on Windows 11
QuickBooks Database Server Manager depends on two Windows services running continuously on the host computer: QuickBooksDBXX and QBCFMonitorService. Windows 11 introduced a feature called Efficiency Mode that reduces the CPU and RAM resources allocated to background processes that it identifies as low-priority. The Windows 11 Task Manager can assign Efficiency Mode to background processes automatically, and the QuickBooks database services are among the background processes that Windows 11 can deprioritize. A service running in Efficiency Mode has access to fewer computing resources, which slows down its response to workstation connection requests and can cause it to stop entirely under load.
Intuit’s community support documentation addresses the service stopping issue on Windows 11 by directing users to set both QuickBooks services to Automatic startup with Restart the Service configured for all failure types. A service set to Automatic with restart recovery restarts itself immediately if Windows 11 stops it, with no delay and no manual intervention required. Without this configuration, a QuickBooks service that Windows 11 stops during a memory management event stays stopped until someone opens services.msc and manually starts it — meaning every user loses multi-user access until the issue is noticed and fixed.
How to Configure QuickBooks Services for Stability on Windows 11
Open the Windows Start menu on the host computer and type services.msc. Open the Services application. Find QuickBooksDBXX in the list — where XX is the version number corresponding to your QuickBooks year: QuickBooks 2024 uses QuickBooksDB34, QuickBooks 2023 uses QuickBooksDB33, QuickBooks 2022 uses QuickBooksDB32. Double-click the service. Set the Startup type to Automatic. Click Start if the status shows Stopped. Go to the Recovery tab. Set the First failure dropdown to Restart the Service. Set the Second failure dropdown to Restart the Service. Set the Subsequent failures dropdown to Restart the Service. Set the Restart service after value to 1 minute. Click Apply, then OK.
Repeat the same configuration steps for QBCFMonitorService. Find it in the services list, double-click it, set Startup type to Automatic, and configure all three recovery options to Restart the Service with a 1-minute restart delay. Both services must have this configuration because they operate together — the QuickBooksDBXX service manages company file access and QBCFMonitorService monitors the live connections. If either one stops and does not restart automatically, every workstation loses multi-user access until the stopped service is manually restarted.
8. Competing Programs on Windows 11: Identifying and Removing the Load
How Competing Programs Slow QuickBooks on Windows 11
Competing programs are applications running on the same computer as QuickBooks that use RAM, processor capacity, and network bandwidth simultaneously. On a Windows 11 host computer, the operating system itself uses more RAM and processor resources than Windows 10, leaving less capacity available for QuickBooks Database Server Manager. Every additional program running on the host computer further reduces the resources available for QuickBooks to serve multiple users. Intuit’s performance guide identifies competing programs as a direct cause of QuickBooks Desktop performance issues and provides specific steps for managing them.
Intuit’s guidance on managing competing programs includes: close unused programs and processes on the computer to free up RAM for QuickBooks; if unable to close a program, move QuickBooks or the other program to a different computer; and note that some computers run too many programs, which makes it hard for QuickBooks to work well — in that case, move QuickBooks to a different server. The Task Manager on Windows 11 — accessible by right-clicking the taskbar — shows every running process under the Processes tab along with the RAM and CPU percentage each process uses. Programs that consume more than 5% of RAM or CPU while QuickBooks is running are competing directly with QuickBooks database services.
Choosing the Best Computer as the Windows 11 Host
Intuit’s documentation for businesses without a dedicated server provides criteria for selecting which workstation should serve as the host computer on a Windows 11 network. The host computer should have QuickBooks installed, store the company file to minimize data transfer, run the fewest other programs, have the most RAM of any computer on the network, have the fastest clock speed (processor speed measured in GHz), and have the least non-QuickBooks activity during business hours. Applying these criteria to the available computers in the office identifies the optimal host without requiring any hardware purchase.
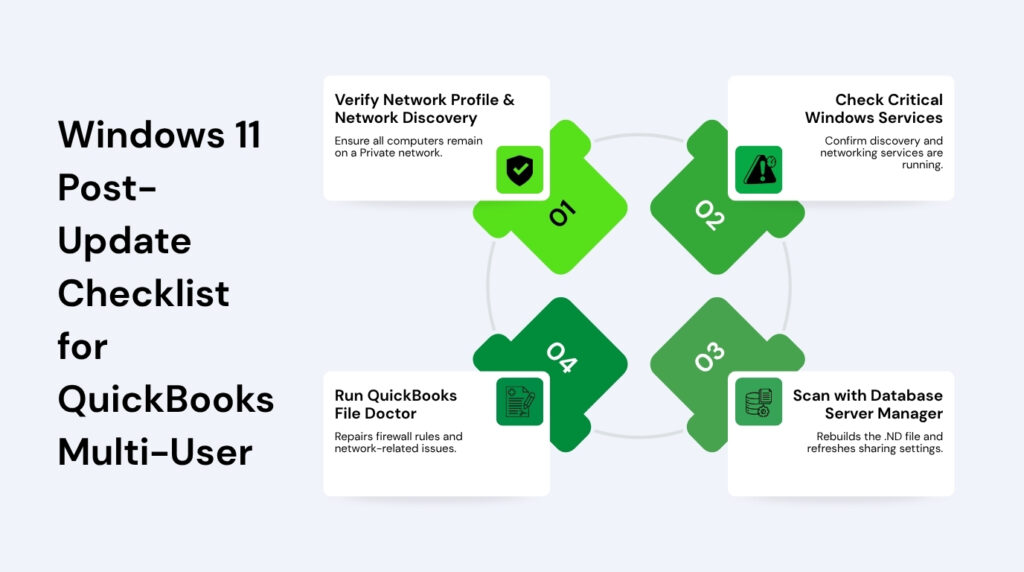
9. Windows 11 Post-Update Checklist for QuickBooks Multi-User
Windows 11 updates are the most consistent trigger for QuickBooks multi-user problems. Each of the settings below can be changed by a Windows 11 update, and checking all of them after every update takes under 10 minutes. Performing these checks immediately after an update — before the work day starts — prevents update-related errors from surfacing during payroll runs or month-end closing.
- Confirm the network profile is Private on the host and all workstations: Go to Settings, Network and Internet, click the active connection, and confirm the Network Profile Type reads Private. A Windows 11 update can silently reset this to Public, which immediately disables all file sharing that QuickBooks multi-user mode requires.
- Verify Network Discovery is on under Private network in Advanced sharing settings: Open the Network and Sharing Center, click Change advanced sharing settings, expand Private network, and confirm both Turn on network discovery and Turn on file and printer sharing are selected. Re-save these settings after every Windows 11 update even if they appear correct.
- Confirm Function Discovery Resource Publication, DNS Client, and SSDP Discovery services are Running and set to Automatic: Open services.msc and check all three. A Windows 11 update that patches the network stack can set these to Manual or stop them, which breaks Network Discovery even when the setting in Advanced sharing settings still reads as on.
- Run QuickBooks File Doctor from Tool Hub after every Windows 11 update: Download Tool Hub from Intuit’s official website. Open Company File Issues and run QuickBooks File Doctor. The tool re-applies firewall port rules and program exceptions that the Windows 11 update may have cleared and confirms the QuickBooks services are running.
- Run a Database Server Manager scan on the host computer: Open QuickBooks Database Server Manager, go to Scan Folders, and click Start Scan. The scan rebuilds the .ND file with current network information, restores firewall permissions, and confirms the host’s QuickBooks services are accessible from the network.
- Check NIC settings on the host computer for duplex mismatches: Go to Settings, Network and Internet, Advanced network settings, and confirm the network adapter is set to Auto Negotiation for speed and duplex. A Windows 11 update that resets adapter settings can introduce a duplex mismatch that slows every QuickBooks user session on the network.
- Update QuickBooks Desktop to the latest release after every Windows 11 update: Go to Help, Update QuickBooks Desktop, and install all available updates. Intuit releases QuickBooks updates that address compatibility changes introduced by specific Windows 11 patches. Running the latest QuickBooks release on Windows 11 eliminates issues that Intuit has already identified and resolved.
Conclusion
QuickBooks Desktop multi-user mode on Windows 11 is fully supported and reliable when Windows 11’s specific default settings are correctly configured. The network profile must be Private. Network Discovery and file sharing must be on. The NIC must be set to Auto Negotiation. The QuickBooks services must be set to Automatic with restart recovery. The firewall must have port and program exceptions restored after every Windows 11 update. Each of these settings works correctly on a freshly configured Windows 11 installation, but Windows 11 updates can reset any one of them without warning.
Businesses still running QuickBooks Desktop 2021 or older on Windows 11 must upgrade to 2022 or later before any troubleshooting will produce lasting results — the incompatibility between those older versions and Windows 11 is a fundamental architectural issue that configuration changes cannot overcome. Intuit confirmed this incompatibility in community support responses, and the upgrade is the only path to stable Windows 11 multi-user operation.
The post-update checklist at the end of this article is the fastest path to preventing Windows 11 from disrupting QuickBooks multi-user access after each update cycle. The entire checklist takes under 10 minutes to run and catches every setting that a Windows 11 update typically changes. Businesses that run this checklist after every update keep multi-user access stable through normal maintenance cycles and avoid the hours of troubleshooting that update-related resets otherwise require.
Frequently Asked Questions
Q1. QuickBooks worked fine on Windows 10 and broke the day the server was upgraded to Windows 11 — what changed?
Three Windows 11 defaults are different from Windows 10 and break QuickBooks multi-user mode immediately. First, Windows 11 assigns a Public network profile to the connection instead of Private, which disables file sharing. Second, Windows 11 turns off Network Discovery by default on new or reset connections. Third, Windows 11 may reset the NIC duplex settings during the OS upgrade, introducing a speed mismatch with the network switch. Fix all three on the same day: set the network profile to Private, turn on Network Discovery under Private network in Advanced sharing settings, and reset the NIC to Auto Negotiation. Then run a Database Server Manager scan and QuickBooks File Doctor from Tool Hub.
Q2. One workstation on Windows 11 cannot connect to the host — all other workstations work fine. What is different about that one computer?
A single workstation failing while others succeed points to a setting on that specific workstation, not a host problem. Check these three items on the failing workstation: confirm the network profile is Private in Settings, Network and Internet; confirm Network Discovery is on in Advanced sharing settings; and check the antivirus or security software on that workstation to confirm QBDBMgrN.exe and QBCFMonitorService.exe are not blocked. Also confirm the workstation runs the same QuickBooks version year as the host computer — a version mismatch on that single workstation is a common cause of one workstation failing while others connect.
Q3. The QuickBooks services on the Windows 11 host stop every few hours — how is that prevented?
Windows 11’s efficiency features can deprioritize background services and stop them under memory pressure. The permanent fix is to open services.msc on the host, double-click QuickBooksDBXX, set Startup type to Automatic, and on the Recovery tab set all three failure options to Restart the Service with a 1-minute delay. Repeat this for QBCFMonitorService. This configuration makes Windows 11 restart both services automatically the moment either one stops, without waiting for anyone to notice the problem. Also close any non-essential programs on the host computer to reduce the memory pressure that triggers the service stops.
Q4. Network Discovery keeps turning off on the Windows 11 host after every reboot — how is it kept on permanently?
The main Network Discovery toggle in Advanced sharing settings can appear on while the underlying services that power it have stopped. Open services.msc and find Function Discovery Resource Publication, DNS Client, and SSDP Discovery. Set all three to Automatic startup and configure the Recovery tab to Restart the Service for every failure type. These three services are what actually advertise the host computer’s presence on the network. When they are set to Automatic with auto-restart, Network Discovery stays on across reboots and Windows 11 updates without requiring manual intervention.
Q5. The host computer was upgraded from Windows 10 to Windows 11 and RAM seems low — how much is needed now?
Windows 11 uses approximately 4 to 5 GB of RAM for its own processes during normal operation, which is more than Windows 10 used. Add Intuit’s QuickBooks RAM requirement on top of that: multiply the company file size in GB by the number of simultaneous users. A 400 MB file (0.4 GB) with 5 users requires 2 GB for QuickBooks. Adding 4 GB for Windows 11 means the host needs at least 6 GB of total RAM for that configuration. Intuit recommends filling all available RAM sockets with the highest-capacity chips the motherboard supports. For a host running 6 or more users on Windows 11, 16 GB of total RAM provides a stable buffer above both the Windows 11 baseline and the QuickBooks formula requirement.
Anusmita is a seasoned content writer who brings perspective to words. As a writer, she enriches her work with a journalistic aptitude, utilising her training in Mass Communication and Journalism. She loves to travel and explore, which imparts a greater sense of understanding, maturity, and experience that are reflected in her content.
Beyond her professional work, Anusmita enjoys painting, singing, dancing, and spending time planting. She is also a self-proclaimed foodie who loves exploring different cuisines, an interest that further adds to her curiosity and perspective as a writer.
Leave a Reply