The QuickBooks Database Server Manager developed by Intuit, to simplify the process of generating network data files for every company file on the host system. Setting up or configuring this database server manager can be a common challenge for many QuickBooks users if they are using the multi-user mode.
Let’s explore a simple and effective method to download, install, set up, and configure the QuickBooks Database Server Manager. Whether you’re facing difficulties in the initial setup or need assistance in updating your QuickBooks, our guide provides the information you need.
What is QuickBooks Database Server Manager?
The QuickBooks Database Server Manager (QBDBMS) plays an important role in sharing your company files among different computers on the same network. When the QuickBooks users set up a network, they need to run QuickBooks Database Server Manager so the other users can access that company files. It also helps you monitor your multi-user network.
This tool is designed to manage the QuickBooks server folder for the multi-user mode, optimizing the experience of using this feature. It plays a crucial role in maximizing the benefits of the multi-user mode. Accessing multi-user mode becomes impossible without QBDBSM.
When should We use QuickBooks Database Server Manager?
When you need to host your company files over a network, enabling other users to access them from different computers within your network, then you can do it with the help of Database Server Manager Tool in QuickBooks Tool Hub.
Note: If you don't plan to have multi-users access, you don't need the QuickBooks Database Server Manager. You'll only need it so multi-users can access your file.
Main Features of QuickBooks Database Server Manager:
Below are some of the main features of QuickBooks Database Server Manager:
- Multi-User Access Features: QuickBooks Database Server Manager allows multiple users to access the company files simultaneously over the same network.
- Database Server Features: It streamlines connection between QuickBooks and the company data file stored on the server, ensuring seamless data access. You can view the number of users who logged into the QB file or Services Administrative option to modify the service status and configure the services QBDBXX.
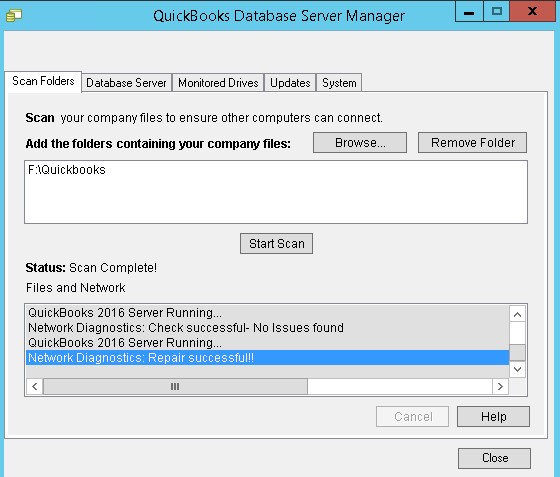
- Scan Folder Features: This allows users easy access in a multi-user network. Below are the steps to regulate the scanning procedure:
- On your server computer (the one that hosts your company files), open the Windows Start menu.
- Enter “Database” into the search and open QuickBooks Database Server Manager.
- Go to the Scan Folders tab.
- Select Browse. Then select the folders that hold your company files (QBW).
- Select OK when you’re finished.
- When you’re ready, select Start Scan.
Once the scan is complete, the folders will appear in the QuickBooks company files found section. You can now access the company files in these folders from other computers on your network.
- File Monitoring Feature: The QuickBooks database server manager tool constantly monitors QuickBooks company files for changes, including the local drives that you add, remove, and rename by ensuring that all users have access to the most up-to-date information.
- Database Server Updates Features: The tool provides updates for the database server, ensuring that it remains compatible with the latest QuickBooks versions and features.
- System Features: This feature will allow you to get information about the system where the tool is located. To get the information, you can move toward the procedure below:-
Follow these steps to get the information about the system:- Click the Start menu button.
- Select Programs.
- Locate and click QuickBooks.
- Open QuickBooks Database Server Manager.
- Navigate to the System tab.
- Choose System Information.
How To Download And Install The Quickbooks Database Server Manager?
Note: Database Server Manager is a part of the QuickBooks Desktop file. All you have to do is download and update the latest version of QuickBooks Desktop and the Database Server Manager updates automatically in QuickBooks 2020 or later versions. If you're using QuickBooks 2019 or prior version, You have to download QuickBooks Tool Hub separately, To do so, download it from QuickBooks Official Website or by Navigating to the Home Page of This Website (QuickBooksToolsHub.com).
To install QuickBooks, follow these steps:
- Go to the QuickBooks installer and open the installation wizard.
- Ensure your system is connected to the internet.
- Review and agree to the terms and conditions in the prompted agreement.
- Choose custom and network options in the following prompt.
- Select your preferred installation method in the next step.
- Allow time for the installation process. If you see a popup for a license number, provide it.
- Opt to allow access when prompted.
- Follow the on-screen instructions provided by the software.
- Wait for the installation to complete.
Install Database Server Manager:
Important: If you are an accountant or manage multiple versions of QuickBooks Desktop on your network, follow them in order wise: Begin with the oldest version and conclude with the most recent one.
- Close all open programs on your server computer, including QuickBooks.
- Open the downloaded install file named Setup_QuickBooks.exe.
- Follow the onscreen instructions. If you need help finding your product or license numbers, refer to the provided guide.
- When prompted to choose an install type, select Custom or Network Options. Avoid selecting Express.
Note: The Express option install QuickBooks Desktop over the previous version, which may be needed for comparison and troubleshooting. - Choose the best option for your network setup and select Next. Both options include installing the Database Server Manager, without overwriting existing company data if QuickBooks Desktop is already installed.
- If you want Database Server Manager and QuickBooks Desktop on your server computer, choose “I’ll be using QuickBooks Desktop on this computer, AND I’ll be storing our company file here so it can be shared over our network.” This option is strongly recommended.
- If you only want Database Server Manager on your server computer, select “I will NOT be using QuickBooks Desktop on this computer.“
- Follow the rest of the on-screen instructions. When ready, select Install. The windows may ask you for permission.
How To Scan Your File Using The Database Server Manager?
- First, open the Windows Start menu on the server system.
- Then type Database into the Search and click on the QuickBooks database server manager to open it.
- When it is opened, you will see a scan button. Click on that button.
- If you are unable to locate your desired file location, you can allow the server manager to scan the entire drive.
- For this, choose your local drive and again tap on the scan button.
How to Configure QuickBooks Database Server Manager?
- First, Open the Windows Start menu.
- Type Services in the search bar and open Services.
- Select and open QuickBooksDBXX (XX is the version number).
- Go to General and find Service status. If it’s Started or Running, select Stop.
- From a dropdown menu named “Startup type”, select the Automatic option.
- Go to Logon and select Local System account.
- Go to Recovery and select Restart the Service from each of these: First failure, Second failure, and Subsequent failures.
- Go back to General and select Start to restart Database Server Manager.
How to Update the QuickBooks Database Server Manager?
Remember that Database Server Manager is a part of the QuickBooks Desktop file. So by downloading and updating QuickBooks Desktop, the Database Server Manager will update automatically.
How to Uninstall the QuickBooks Database Server Manager?
- First, press the Windows key + R on your keyboard.
- The Run dialog box opens. Enter appwiz.cpl, then OK.
- Select the QuickBooks Database Server Manager.
- Select the Uninstall/Change option and follow the onscreen instructions to complete the uninstallation process.
What Are the Most Common Errors Can Occur If Quickbooks Database Server Manager Has Stopped Working?
Here is the list of most common errors and issues that can arise if QuickBooks Database Server Manager has stopped working:
- Error 1920: Service QuickBooks Database Manager (QBCFMonitorService) failed to start” during QuickBooks Desktop installation or update.
- “QuickBooks database server manager stopped” error message arises. An outdated QuickBooks Database Server Manager service can also lead to this error.
- No-Longer is able to switch into multi-user mode or QuickBooks multi-user mode not working.
- Workstations won’t have internet access.
- Updating Database Server Manager won’t be possible.
- You will not be able to access your company records from the server.
- Data won’t be saved if the company file is open during the error.
- Some users might encounter error code 6XXX when opening the company file.
- H-series errors, especially H202, can lead to QBDBMgrN not running.
- Essential QuickBooks services like Payroll and WebConnect may stop functioning.
- Syncing data through third-party software may be stopped.
- The Company files in various formats (.QBW, .QBB, .QBM, etc.) won’t be accessible.
- QuickBooks may exhibit performance issues, including lagging and frequent crashes.
- Messages about QuickBooks server not running may appear on the screen.
FAQ
What does QuickBooks database server manager do?
QuickBooks Database Server Manager allows you to easily share your company files with other computers on your network. Setting up a network requires running QuickBooks Database Server Manager, enabling users to access your company files. It also helps you monitor your multi-user network.
How do I set up a database server manager in QuickBooks?
- The folders and QuickBooks company files that need to be configured or set up for multi-user access are scanned.
- The local hard drives are used so as to automatically configure new company files.
- First of all Open QuickBooks database server manager and then scan the files that you want to use in multi user mode.
- Make sure that the files are configured properly so that you can give them access in multi user mode.
- You can use the mentioned drive features if you want to add the new company files to the server
- Finally ensure that the company files are connected to the server and users are logged into the company files.
How to remove the old QuickBooks database server manager?
- Press the Windows key + R on your keyboard.
- The Run dialog box will open. Enter appwiz.cpl, then click OK.
- Locate and select QuickBooks Database Server Manager.
- Choose the Uninstall/Change option and follow the onscreen instructions to complete the uninstall process.
How can I share my file over the network using Database Server Manager?
If you don’t have QuickBooks installed on your server and are sharing files over the network using Database Server Manager, follow these simple steps:
Step 1: Remove QuickBooks Database Server Manager
- Press the Windows key + R on your keyboard.
- The Run dialog box will appear. Type appwiz.cpl and click OK.
- Look for QuickBooks Database Server Manager in the list.
- Select Uninstall/Change and follow the onscreen instructions.
Step 2: Rename the installation folders
Notes:
- In case you can’t spot the Application Data or Program Data folder, ensure you unhide files and folders in Windows or employ the search feature to locate the required files.
- If you have other Intuit apps installed, concentrate on either uninstalling or renaming the QuickBooks version folder within the Intuit folder, usually situated at C:\Program Data\Intuit.
- Go to the installation folders. Refer to the chart below.
Windows 10/8/7
- C:\Program Data\Intuit
- C:\Program Data\Common Files\Intuit
- C:\Users\[Username]\AppData\Local\Intuit
- C:\Program Files\Intuit
- C:\Program Files\Common Files\Intuit
Windows Vista
- C:\Program Data\Intuit
- C:\Program Data\Common Files\Intuit
- C:\Users\\AppData\Local\Intuit
- C:\Program Files\Intuit
- C:\Program Files\Common Files\Intuit
- On your keyboard, type “Windows key + R” to open and the run command.
- Enter (or copy and paste) the location of the folder, then Enter.
- Right-click the folder, then choose Rename.
- Rename the folder to .OLD.