QuickBooks Desktop uses a saved file path — a stored address — to find and open the company file each time the software starts. The company file is the .QBW file that holds every transaction, invoice, payroll record, and account balance for the business. The saved path is stored in a file called QBWUSER.INI, which QuickBooks reads at startup to know where to look for the company file. A File Not Found error appears when QuickBooks follows that saved path and finds nothing there — either the file was moved, the drive was renamed, or the network connection to the server was lost.
An Access Denied error is a different problem with a different cause. Access Denied does not mean the file cannot be found — it means QuickBooks found the file but Windows blocked the access. Windows uses a permission system to control which user accounts and programs can read or write to files and folders. “Access Denied” appears when QuickBooks does not have the Windows permissions needed to open or modify the company file at the location it found. This can happen because the Windows user account running QuickBooks lacks administrator rights, because the folder on the server has not been configured to allow QuickBooks’ background service account to access it, or because Windows Firewall is blocking the network connection QuickBooks uses to reach the file on a remote server.
Both errors are documented and fixable without any data loss — the company file itself is intact in both cases. File Not Found means QuickBooks needs to be pointed to where the file actually is. Access Denied means Windows needs to be told to allow QuickBooks to access it. This article covers both errors, every documented cause of each, and every fix in the correct order. All fixes apply to QuickBooks Desktop Pro, Premier, and Enterprise on Windows.
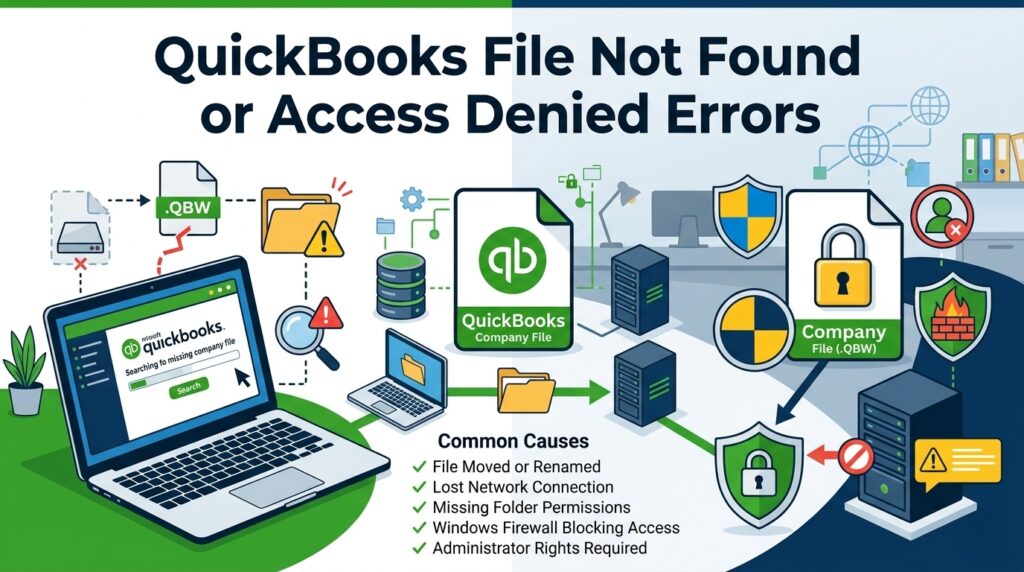
Table of Contents
Understanding the Two Errors: File Not Found vs Access Denied
File Not Found: What Breaks the Path Between QuickBooks and the Company File
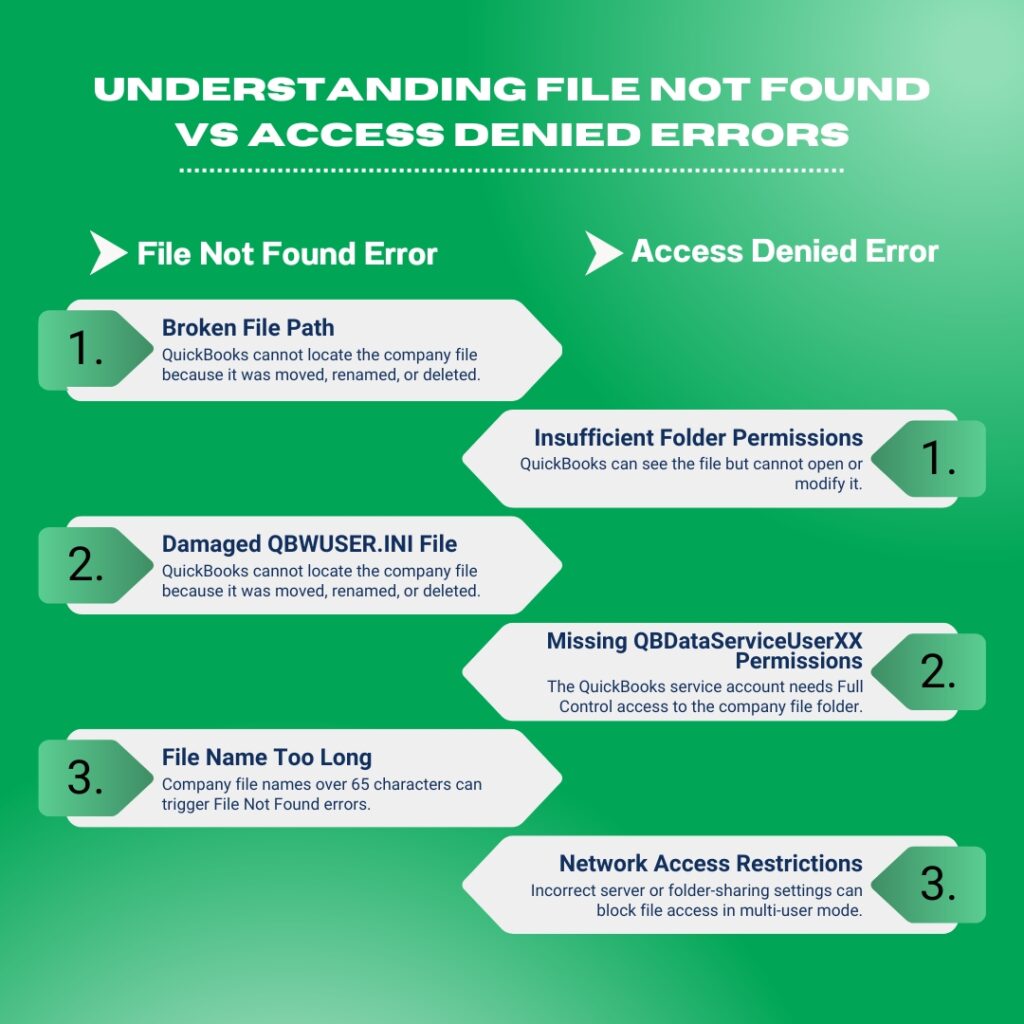
QuickBooks stores the location of the last-opened company file inside a settings file called QBWUSER.INI — short for QuickBooks Windows User Initialization file. This file is stored at C:\Users\[Your username]\AppData\Local\Intuit\QuickBooks [Year]. Every time QuickBooks opens, it reads the QBWUSER.INI file to find the saved path, then follows that path to the company file. The File Not Found error appears when the path stored in the QBWUSER.INI no longer leads to the file — because the file was moved to a new folder, the drive letter was changed, the server was renamed, or the company file was accidentally deleted. QuickBooks cannot search the entire computer for the file automatically; it only follows the saved path.
The QBWUSER.INI file also has a documented limitation: a company file name that exceeds 65 characters causes the QBWUSER.INI to fail to register the file correctly, producing a File Not Found error even when the file is exactly where it should be. The fix is to shorten the company file name to fewer than 65 characters. A damaged QBWUSER.INI file — one where the saved path entries have become corrupted — produces the same error. Renaming the QBWUSER.INI file to QBWUSER.INI.old forces QuickBooks to create a new, empty QBWUSER.INI on the next startup, which clears the corrupted path entries. The trade-off is that the list of recently opened files is cleared — the file must be opened manually through File > Open or Restore Company.
Access Denied: What Blocks QuickBooks from Opening a File It Can Find
Windows permissions are a security system that controls which programs and user accounts can read files, write changes, or run programs in a given folder. Every folder on a Windows computer has a permission list that names which accounts are allowed to do what. The company file folder — whether on a local computer or a server — must give QuickBooks read and write access. Without write access specifically, QuickBooks can see the file but cannot open it for active use, because opening a company file in QuickBooks requires writing a lock entry to the file to prevent another user from overwriting it.
Access Denied on a network server has a specific documented cause: the QBDataServiceUserXX account — the Windows service account that QuickBooks Database Server Manager uses to manage multi-user file access — does not have full-control permissions on the company file folder. Intuit’s multi-user documentation confirms this account must have full-control permissions set explicitly: “Choose the corresponding QBDataServiceUserXX for your version. Set the permission level of both users to Full Control and Share.” Without this permission, every workstation and even the server itself receives an Access Denied error when QuickBooks tries to open or write to the company file.
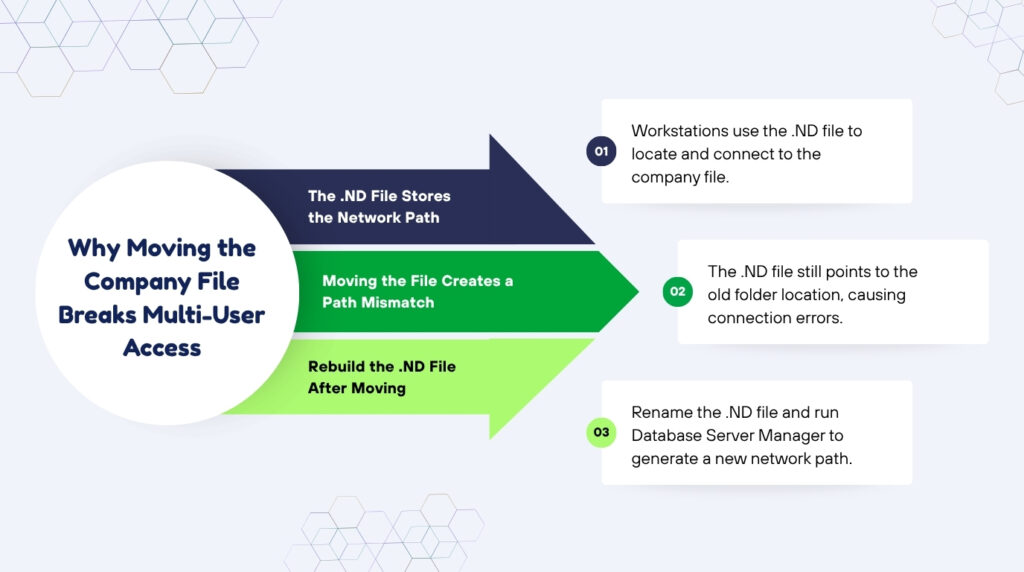
The .ND File: Why Moving the Company File Breaks Multi-User Access
Every company file has two companion files stored in the same folder: the .ND file (Network Descriptor) and the .TLG file (Transaction Log). The .ND file stores the network address — the specific server name and folder path — that workstations use to connect to the company file in multi-user mode. Moving the company file to a new folder or a new drive creates a mismatch: the .ND file still points to the old location, and workstations follow that outdated address and find nothing there, producing a File Not Found or Access Denied error depending on what the old path now resolves to. Renaming the .ND file to .ND.old and running a QuickBooks Database Server Manager scan rebuilds the .ND file with the correct new path.
The .ND file rebuild through Database Server Manager is an automatic process — no manual editing is needed. The Database Server Manager reads the company file’s actual current location, generates a new .ND file with the correct server name and folder path, and stores it in the company file folder. This rebuilt .ND file gives every workstation the correct updated address to connect to the file. After the scan, every workstation that previously received a File Not Found or Access Denied error for the moved file can connect successfully.
Quick Diagnosis: Match the Error to the Correct Fix
Find the description that matches the exact error message or situation before applying any fix. Both File Not Found and Access Denied have multiple distinct causes — starting at the correct fix avoids unnecessary changes.
| What the Error Says or Shows | Most Likely Cause | Start With This Fix |
| QuickBooks shows “The company file you selected could not be found” on the No Company Open screen | QuickBooks is looking for the file at an old saved path — the file was moved, renamed, or the computer was disconnected from the network location where the file was stored | Fix 1: Use File > Open or Restore Company to browse directly to the file’s current location |
| QuickBooks shows “Warning: Did you move your company file?” at startup | The QBWUSER.INI file — QuickBooks’ internal list of recently opened files — still points to the old file location after the file was moved | Fix 1: Browse to the new location through File > Open or Restore Company, then rename the QBWUSER.INI file to reset QuickBooks’ file list |
| QuickBooks shows “Access Denied” when opening the company file on a network server | Windows folder permissions on the server block QuickBooks from reading or writing to the company file — the QBDataServiceUser account does not have full-control access | Fix 2: Set full-control folder permissions on the company file folder for QBDataServiceUserXX, the current Windows user, and NETWORK SERVICE |
| QuickBooks shows “Access Denied” when the user tries to open the file on their own local computer | The Windows user account on that computer does not have administrator rights, so Windows blocks QuickBooks from writing to the protected company file folder | Fix 3: Run QuickBooks as administrator using right-click > Run as administrator, or grant the user account administrator rights in Windows user settings |
| The company file opens on the server but shows Access Denied on one specific workstation | That workstation’s Windows Firewall is blocking QuickBooks from reaching the server — a Windows update may have removed the QuickBooks firewall exception | Fix 4: Run QuickBooks Database Server Manager > Start Scan on the server to re-add firewall exceptions, then confirm the workstation can connect |
| The file was found and opens, but QuickBooks reports read errors or cannot save new transactions | The company file has the Windows Encrypt or Compress attribute turned on — these attributes prevent QuickBooks from writing to the file correctly | Fix 5: Open file Properties > Advanced, uncheck Encrypt contents and Compress contents, and remove any special characters from the file name |
| The file path was recently changed and the file cannot be found even after browsing to the new location | The .ND and .TLG files still point to the old file path — QuickBooks cannot build a correct new connection until they are rebuilt | Fix 6: Rename the .ND and .TLG files to .ND.old and .TLG.old, then run QuickBooks Database Server Manager > Start Scan to rebuild them |
Fixes for QuickBooks File Not Found and Access Denied Errors
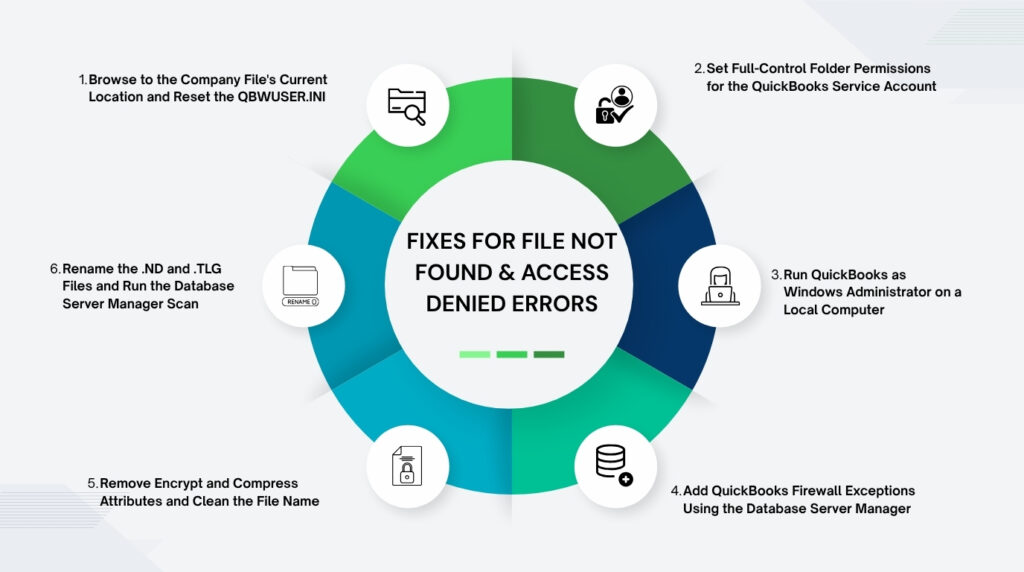
Fix 1: Browse to the Company File’s Current Location and Reset the QBWUSER.INI
The fastest resolution for a File Not Found error is to manually direct QuickBooks to the file’s current location using File > Open or Restore Company. This bypasses the outdated saved path in the QBWUSER.INI entirely and opens a standard Windows file browser where the user can navigate to wherever the company file is currently stored. Once the file is opened successfully through this method, QuickBooks updates the QBWUSER.INI with the new correct path automatically. The file opens normally, and future startups use the new saved path without any further action needed.
Resetting the QBWUSER.INI is required when the file is showing a File Not Found error even after the company file is confirmed to be at the correct location, or when QuickBooks freezes or behaves incorrectly at startup because the QBWUSER.INI is damaged. The QBWUSER.INI file is located at C:\Users\[Your username]\AppData\Local\Intuit\QuickBooks [Year]. The AppData folder is hidden by default in Windows — it must be made visible through File Explorer > View > check Hidden items before the folder can be accessed. Renaming the QBWUSER.INI to QBWUSER.INI.old does not delete the file — it just sets it aside so QuickBooks creates a fresh one. The company file name must be fewer than 65 characters for the new QBWUSER.INI to register it correctly.
Steps: Open QuickBooks Desktop without opening any company file — hold down the Ctrl key while double-clicking the QuickBooks icon to force the No Company Open window to appear. In the No Company Open window, click Open or Restore an Existing Company. Click Open a company file and then Next. Use the file browser to navigate to the folder where the company file is currently stored. The default location is C:\Users\Public\Documents\Intuit\QuickBooks\Company Files. Select the .QBW file and click Open. If the file opens successfully, QuickBooks has updated the saved path and the error is resolved. To also reset the QBWUSER.INI: close QuickBooks. Open File Explorer. Go to View > check Hidden items to show hidden folders. Navigate to C:\Users\[Your username]\AppData\Local\Intuit\QuickBooks [Year]. Right-click QBWUSER.INI and select Rename. Add .old to the end — the file becomes QBWUSER.INI.old. Restart QuickBooks and open the company file through File > Open or Restore Company.
Fix 2: Set Full-Control Folder Permissions for the QuickBooks Service Account
The QuickBooks Database Server Manager runs using a Windows service account named QBDataServiceUserXX — where XX is the two-digit version number of the QuickBooks installation (for example, QBDataServiceUser34 for QuickBooks Desktop 2024). This service account must have full-control permissions on the company file folder. Full-control permissions mean the account can read files, write changes, create files, and delete files in that folder. Without full-control permissions, the Database Server Manager cannot open the company file to serve it to workstations, and Access Denied errors appear on every computer that tries to connect. Intuit’s documentation confirms the required permission level: set QBDataServiceUserXX to Full Control and Share.
Steps: On the server, open File Explorer. Navigate to the folder that contains the company file — the default path is C:\Users\Public\Documents\Intuit\QuickBooks\Company Files. Right-click the folder and select Properties > Security tab. Click Edit. Click Add. Type QBDataServiceUser and click Check Names — Windows shows the full account name with the version number. Select it and click OK. Check Full Control in the Allow column and click Apply. Repeat for the current Windows user account and for NETWORK SERVICE. Click OK. Then right-click the folder again, go to Properties > Sharing > Share. Add QBDataServiceUserXX to the share list and set its permission level to Full Control. Click Share, then Done. Restart QuickBooks on all computers and retry opening the company file.
Fix 3: Run QuickBooks as Windows Administrator on a Local Computer
A Windows user account that does not have administrator rights on the computer cannot allow programs to write to protected folders. The company file folder at C:\Users\Public\Documents\Intuit\QuickBooks\Company Files is a protected location — writing to it requires administrator-level access. A regular Windows user account (one that is not set as an administrator in the Windows user settings) receives an Access Denied error when QuickBooks tries to open the company file from this folder, because Windows blocks the write operation before QuickBooks can complete the file open.
Running QuickBooks with “Run as administrator” forces Windows to grant the program administrator-level access for that session, overriding the standard user account restrictions. Intuit’s community support team confirmed this as the first step for Access Denied errors on a local computer: “Close the program and restart your computer. Then, right-click QuickBooks Desktop icon and select Run as Administrator.” This grants QuickBooks the write access it needs to open the company file. Setting QuickBooks to always run as administrator — through the program’s Properties > Compatibility settings — means the user never needs to right-click manually for each session.
Steps — Run as administrator for a single session: Close QuickBooks. Find the QuickBooks Desktop icon on the desktop or in the Start menu. Right-click the icon and select Run as administrator. Click Yes if Windows asks for permission to allow changes. Open the company file through File > Open or Restore Company.
Steps — Set QuickBooks to always run as administrator: Close QuickBooks. Right-click the QuickBooks Desktop icon and select Properties. Click the Compatibility tab. Check the box labeled “Run this program as an administrator”. Click Apply, then OK. QuickBooks will now always open with administrator rights without requiring a right-click each time.
Fix 4: Add QuickBooks Firewall Exceptions Using the Database Server Manager
A workstation that receives an Access Denied error when the company file opens correctly on the server is blocked by Windows Firewall — not by a permissions problem. Windows Firewall on the server controls which programs can receive incoming connections from the network. QuickBooks Database Server Manager listens for workstation connection requests on specific network ports — TCP port 8019 and ports in the range 55378–55382. A Windows update on the server can reset the firewall rules and remove the QuickBooks exceptions that allowed these ports to accept incoming connections, which causes every workstation to receive an Access Denied or connection error immediately after the update.
Steps: On the server, open the Windows Start menu and search for “QuickBooks Database Server Manager”. Open it. If the company file folder is not shown, click Browse and navigate to C:\Users\Public\Documents\Intuit\QuickBooks\Company Files. Click Start Scan. The scan automatically re-adds the QuickBooks firewall exceptions to Windows Defender Firewall. After the scan completes, open QuickBooks on the workstation that was receiving the Access Denied error and retry opening the company file. Run this scan after every Windows update on the server — Windows updates regularly reset firewall rules, and the Database Server Manager scan re-adds the QuickBooks exceptions in under two minutes.
Fix 5: Remove Encrypt and Compress Attributes and Clean the File Name
Windows allows files and folders to have two special attributes that can block QuickBooks: Encrypt contents and Compress contents. The Encrypt attribute scrambles the file’s data so only the specific Windows user who encrypted it can read it — QuickBooks, running as a different process or user, cannot read an encrypted company file and produces an Access Denied error. The Compress attribute reduces the file’s storage size on disk — QuickBooks cannot reliably write to a compressed file during active use, because the file’s size changes as each write operation is compressed or decompressed, which disrupts QuickBooks’ internal write-tracking. Both attributes must be turned off for the company file.
Special characters in the file name create a second documented access problem. QuickBooks uses a standard Windows file addressing system, and certain characters are not allowed in file names that are shared over a network — specifically: < > % & $ @ # ! * ( ) spaces at the start or end, and periods anywhere except before the file extension. A file name containing any of these characters causes QuickBooks to misread the file address, producing a File Not Found error even when the file is in the correct location. A company file name that exceeds 65 characters creates the same problem in the QBWUSER.INI file. Removing these characters and keeping the name under 65 characters resolves both issues.
Steps — Remove Encrypt and Compress attributes: Open File Explorer. Navigate to the company file folder. Right-click the company file (.QBW) and select Properties. Click the Advanced button under the General tab. Uncheck “Encrypt contents to secure data” and uncheck “Compress contents to save disk space”. Click OK, then Apply. If Windows asks whether to apply this change to the folder only or to subfolders and files, select “Apply changes to this folder, subfolders and files”. Click OK. Retry opening the company file in QuickBooks.
Steps — Clean the file name: Open File Explorer and navigate to the company file folder. Right-click the .QBW file and select Rename. Remove all special characters from the file name — replace them with plain letters, numbers, or underscores. Keep the name to fewer than 65 characters total. Make sure the file extension remains .QBW at the end. Press Enter. Open QuickBooks and use File > Open or Restore Company to open the renamed file. QuickBooks updates its saved path to the new name automatically.
Fix 6: Rename the .ND and .TLG Files and Run the Database Server Manager Scan
The .ND file (Network Descriptor) stores the exact network address — the server name and folder path — that QuickBooks uses to connect workstations to the company file. Moving the company file to a new location, renaming the server, or changing the drive letter creates a mismatch: the .ND file still contains the old address, and every workstation that follows it finds nothing at the old location. Renaming the .ND file forces QuickBooks to treat it as non-existent and prompts the Database Server Manager to build a fresh one with the correct current path when a scan is run.
Steps: On the server, open File Explorer and navigate to the company file folder. Find the file with the same name as the company file but ending in .ND — for example, MyCompany.qbw.nd. Right-click it and select Rename. Add .old to the end — it becomes MyCompany.qbw.nd.old. Find the file ending in .TLG — for example, MyCompany.qbw.tlg. Right-click it and select Rename. Add .old to the end — it becomes MyCompany.qbw.tlg.old. Important: do not delete either file — renaming them is the correct action. Open the Windows Start menu and search for “QuickBooks Database Server Manager”. Open it. Click Browse and navigate to the company file’s current folder location. Click Start Scan. The scan creates a new .ND file with the correct current path. Open QuickBooks on the server and confirm the company file opens. Then confirm each workstation can connect by opening QuickBooks on each and accessing the company file in multi-user mode.
All QuickBooks Fixes at a Glance
| Fix | What It Resolves | Time |
| Fix 1: Browse to the correct file location and reset QBWUSER.INI | Reconnects QuickBooks to the company file when the file was moved, renamed, or the saved path became outdated | 10–15 min |
| Fix 2: Set full-control folder permissions for the QuickBooks service account | Resolves Access Denied errors on network servers caused by missing Windows read/write permissions | 10–15 min |
| Fix 3: Run QuickBooks as Windows administrator | Resolves Access Denied on a local computer where the Windows user account lacks the rights to open or modify the company file | 5 min |
| Fix 4: Add QuickBooks firewall exceptions on the server | Resolves Access Denied on a specific workstation caused by Windows Firewall blocking the connection after a Windows update | 10–15 min |
| Fix 5: Remove Encrypt/Compress attributes and special characters from the file name | Resolves read errors and save failures caused by Windows file attribute restrictions on the company file | 10 min |
| Fix 6: Rename .ND and .TLG files and run Database Server Manager scan | Rebuilds the network path files when the company file was moved and the old path files cannot be updated any other way | 10–15 min |

QuickBooks Prevention: Stop File Not Found and Access Denied Errors Before They Start
- Keep the Company File at the Intuit-Recommended Default Location
Intuit’s documented default location for the QuickBooks company file — C:\Users\Public\Documents\Intuit\QuickBooks\Company Files — is the recommended path because Windows already has the correct permissions configured for this folder out of the box. This folder is accessible to all Windows users on the computer and is set up to allow QuickBooks’ service accounts to read and write to it without any additional permission configuration. Moving the company file to a custom folder, a desktop shortcut folder, or a personal user folder creates a permissions gap that the custom location does not inherit automatically. Storing the file at the default location eliminates the most common source of recurring Access Denied errors in both single-user and multi-user environments.
- Never Store the Company File in a Cloud-Sync Folder
Cloud-sync programs like Dropbox, OneDrive, and Google Drive designate a folder on the computer that they continuously monitor and sync to the cloud. A company file stored inside one of these folders produces two problems. First: the sync program treats the .QBW file as a regular document and attempts to sync it while QuickBooks is actively writing to it, interrupting the writes and creating File Not Found errors when the sync program temporarily locks the file. Second: after a sync, the file’s cloud path conflicts with QuickBooks’ local saved path in the QBWUSER.INI, causing QuickBooks to look for the file at a path that no longer matches the synced location. The company file must be stored at the local default path on the server, with backups sent to cloud storage — not the live file.
- Run QuickBooks Database Server Manager Scan After Every Windows Update
Every Windows update on the server can reset Windows Firewall settings and remove the QuickBooks port exceptions that allow workstations to connect. Running the Database Server Manager Start Scan immediately after every Windows update re-adds these exceptions before any workstation notices the change. The scan takes under two minutes and requires no manual firewall configuration — it adds the correct rules automatically. Setting a calendar reminder to run the scan on the first working day after each Windows Update maintenance window (which Windows runs on the second Tuesday of every month) ensures workstations never experience a connection-related Access Denied error from a firewall reset.
- Keep Company File Names Short and Free of Special Characters
A company file name should contain only letters, numbers, hyphens, and underscores — no spaces at the start or end, no symbols, and no name longer than 65 characters. The QBWUSER.INI file that stores the saved path has a character limit, and long file names with special characters cause the path entry to be stored incorrectly, producing File Not Found errors on subsequent startups. Documented causes of QuickBooks startup failures include: file names that are too long with more than 65 characters, or special characters in the name. Checking the company file name takes 10 seconds — renaming it correctly before problems start prevents the QBWUSER.INI and file path issues that generate File Not Found errors.
Conclusion
QuickBooks File Not Found and Access Denied errors are two separate problems with separate causes and separate fixes. File Not Found means the saved path in the QBWUSER.INI no longer leads to the company file — the file was moved, renamed, the drive letter changed, or the network server was renamed. The fix is to open the file directly through File > Open or Restore Company to give QuickBooks the current location, and to rename the QBWUSER.INI to QBWUSER.INI.old if the file is damaged. Access Denied means Windows found the file but blocked QuickBooks from opening it — because of missing folder permissions, insufficient Windows user rights, or a firewall rule blocking the network connection.
Access Denied on a network server has a specific documented cause: the QBDataServiceUserXX service account does not have full-control permissions on the company file folder. Intuit’s documentation confirms the required permissions level and the three accounts that need full-control access: QBDataServiceUserXX, the current Windows user, and NETWORK SERVICE. Setting these permissions through the folder’s Properties > Security tab resolves the Access Denied error for all users on the network. For workstations only, the QuickBooks Database Server Manager Start Scan re-adds the firewall exceptions that a Windows update removed, which resolves the connection-level Access Denied error without any permission changes.
Both errors are preventable. Keeping the company file at Intuit’s default location, never placing it in a cloud-sync folder, running the Database Server Manager scan after every Windows update, and keeping the file name under 65 characters with no special characters eliminate every documented cause of File Not Found and Access Denied errors before they appear. A company file that has never been moved from its default location, whose folder has the correct permissions, and whose server has current firewall exceptions will not produce either error under normal operating conditions.
Frequently Asked Questions
1. The company file was not moved and nothing changed on the network, but QuickBooks now shows File Not Found every morning at startup. What triggers this?
A File Not Found error that appears every morning without any file move points to a problem with the QBWUSER.INI file, not with the company file’s location. The QBWUSER.INI file can become damaged over time — particularly on computers that run Windows updates overnight — and a damaged QBWUSER.INI fails to read or write the saved path correctly. The fix is to rename the QBWUSER.INI to QBWUSER.INI.old, which forces QuickBooks to create a clean new one on the next startup.
After renaming, open the company file once through File > Open or Restore Company. QuickBooks writes the correct path into the new QBWUSER.INI and the error stops recurring. If the error returns the next morning, the overnight Windows update is resetting something in the QuickBooks installation — running Quick Fix my Program from the QuickBooks Tool Hub’s Program Problems tab repairs the installation components that the update is affecting.
2. The company file opens correctly in single-user mode on the server but every workstation shows Access Denied. The permissions on the folder look correct. What else could cause this?
A workstation that shows Access Denied while the server opens the file correctly indicates a network-level block — not a folder permissions problem, since the file opens on the server with those same permissions. The most likely cause is that Windows Firewall on the server had its QuickBooks exceptions removed by a recent Windows update.
The server itself bypasses the firewall for its own connections, which is why it opens the file without error. Workstations connect through the network, and the firewall blocks their incoming connections. Run the QuickBooks Database Server Manager Start Scan on the server — this re-adds the firewall exceptions for QuickBooks network ports. After the scan, close and reopen QuickBooks on each workstation to establish a new connection with the updated firewall rules in place.
3. The company file was moved to a new folder and Fix 6 was applied — the .ND file was renamed and the Database Server Manager scan was run. The server opens the file, but one workstation still shows File Not Found. What is different about that workstation?
A single workstation that still shows File Not Found after the .ND file was rebuilt has a cached old path stored in its own local QBWUSER.INI file. Each computer in a multi-user network has its own QBWUSER.INI file stored under its own Windows username — the server’s rebuilt .ND file updates the network path, but each workstation’s QBWUSER.INI still points to the old location.
On the specific workstation showing the error, rename the QBWUSER.INI file to QBWUSER.INI.old using the path C:\Users\[workstation username]\AppData\Local\Intuit\QuickBooks [Year]\QBWUSER.INI. Then open QuickBooks on that workstation, go to File > Open or Restore Company, browse to the new company file location on the server, and open it. QuickBooks writes the correct new path into the fresh QBWUSER.INI and the workstation connects successfully.
4. The company file name has no special characters and the file is at the default location, but QuickBooks still shows File Not Found. The sample company file opens fine. What does this tell us?
The sample company file opening correctly confirms that QuickBooks is installed and working — the problem is specific to the real company file’s registered path, not the software. The sample file has its own entry in the QBWUSER.INI that is separate from the real company file’s entry. The real company file’s QBWUSER.INI entry is what has the broken path. Open the company file directly through File > Open or Restore Company, navigate to the correct folder, and select the .QBW file.
After it opens successfully, check Help > About QuickBooks to confirm the file location shown matches the current folder. If the path shown is correct after opening, the QBWUSER.INI entry for the real company file was simply outdated and has now been corrected. No further steps are needed unless the error returns on the next startup.
5. The Access Denied error appeared after the company file was moved to a new server. Permissions are set correctly on the new server. What step is commonly missed when migrating to a new server?
Moving the company file to a new server requires two steps that are frequently missed together. First: the QuickBooks Database Server Manager must be installed on the new server and run a Start Scan pointed at the new company file location — without this, the new server has no active QuickBooks service managing connections, and workstations receive Access Denied because nothing is listening for their connection requests. Second: the hosting setting on the new server must be turned on through QuickBooks > File > Utilities > Host Multi-User Access — a fresh QuickBooks installation on the new server defaults to hosting off.
The old server’s hosting must simultaneously be turned off. With hosting on at both the old and new server at the same time, QuickBooks receives conflicting signals and produces H-series errors alongside the Access Denied messages. The correct migration sequence is: install QuickBooks and the Database Server Manager on the new server, copy the company file to the new server’s default folder, run a Database Server Manager Start Scan, turn on hosting on the new server, and turn off hosting on the old server — in that order.
Anusmita is a seasoned content writer who brings perspective to words. As a writer, she enriches her work with a journalistic aptitude, utilising her training in Mass Communication and Journalism. She loves to travel and explore, which imparts a greater sense of understanding, maturity, and experience that are reflected in her content.
Beyond her professional work, Anusmita enjoys painting, singing, dancing, and spending time planting. She is also a self-proclaimed foodie who loves exploring different cuisines, an interest that further adds to her curiosity and perspective as a writer.
Leave a Reply