The QuickBooks company file — saved on the computer with a .QBW extension — grows in size every day the business uses QuickBooks. Every invoice created, every payment recorded, every payroll run processed, and every edit made to any transaction adds data to this file permanently. QuickBooks does not automatically remove or archive old data — it accumulates everything in a single file that gets larger year after year. Intuit confirmed this directly on its official support page: there are no hard size limits on the company file, but performance decreases as the file grows larger.
The performance impact of a large company file is real and measurable. Intuit’s own community support team stated: “QuickBooks’ performance decreases as the size of the company file increases. If your network can’t manage large data files, performance might experience issues.” A company file that took 2 seconds to open a report in its first year can take 30 seconds or more once it has grown to several hundred megabytes. In multi-user offices where several computers share the same file over a network, the slowdown affects every user simultaneously. The size of the file, not the speed of the computers, is the primary performance constraint once the file exceeds the practical thresholds for each QuickBooks edition.
This article covers every documented way a QuickBooks company file grows, every tool Intuit provides to reduce its size, and the maintenance schedule that keeps the file within the practical size range for reliable performance in 2026. Each tip includes what it does, why it works, and the exact steps to apply it. The tips apply to QuickBooks Desktop Pro, Premier, and Enterprise on Windows — and each tip specifies which editions it applies to where the tools differ.
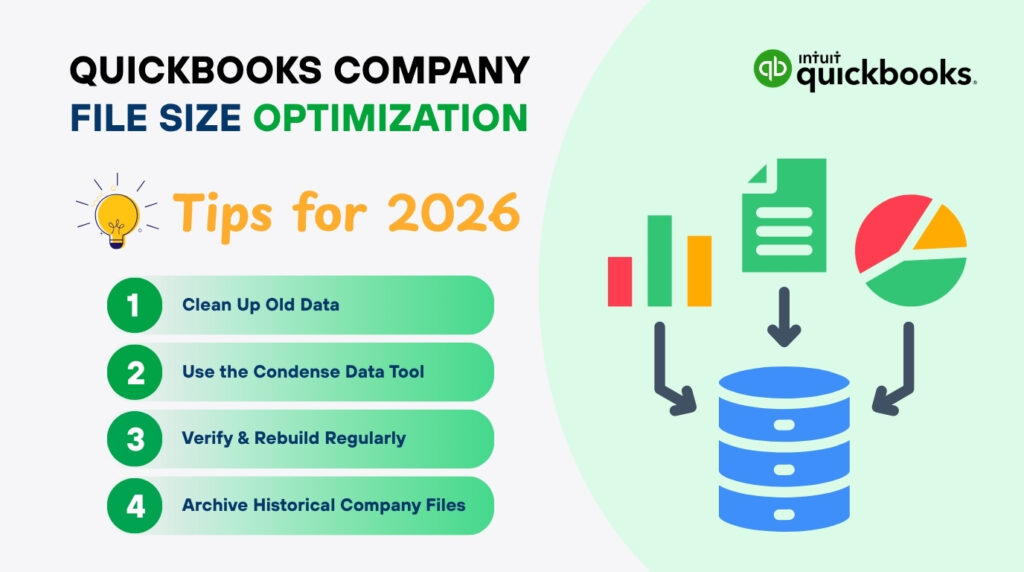
Table of Contents
Understanding Company File Size in QuickBooks: What the Numbers Mean?
How to Check the Current File Size Inside QuickBooks?
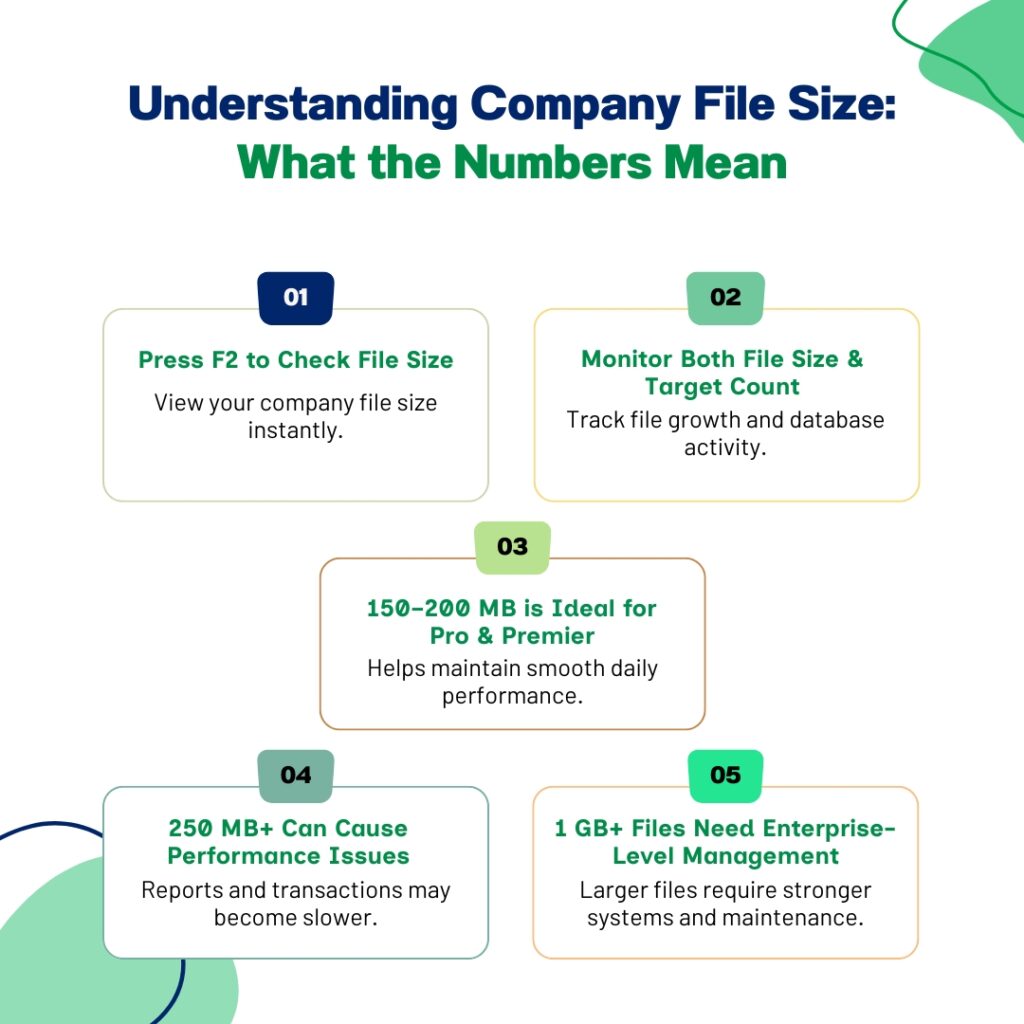
The fastest way to check the current company file size is to press F2 on the keyboard while QuickBooks is open with the company file loaded. This opens the Product Information window, which shows the file size, the number of database file fragments (pieces of the file scattered across the hard drive), and the total target count. The file size is shown in kilobytes (KB) — divide by 1,024 to convert to megabytes (MB) for comparison against the practical thresholds. A file showing 204,800 KB is 200 MB. The target count — a separate measurement from file size — counts the total number of individual line items across all transactions and list entries. Intuit uses the target count as the limit for migrating data to QuickBooks Online, with a maximum of 4,000,000 targets.
Checking the file size monthly takes 10 seconds and gives an early warning before the file reaches the size range where performance problems begin. Intuit’s performance documentation and its community support team both confirm the practical size thresholds: keep Pro and Premier files below 150–200 MB for reliable daily use, with 250 MB as the outer limit before slowdowns become severe. Enterprise handles larger files and remains stable up to approximately 1 GB with correct server hardware — but even Enterprise files above 1.5 GB produce errors that the standard tools cannot fully repair, as documented in Intuit’s Auto Data Recovery limitations.
What the Audit Trail Is and Why It Alone Can Double the File Size?
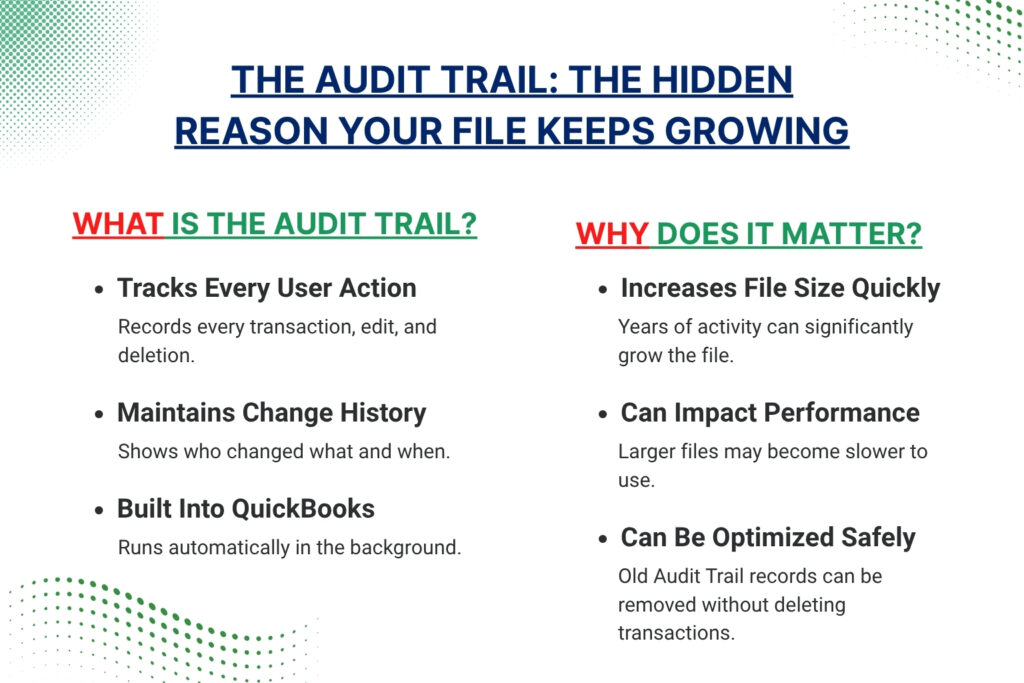
The Audit Trail is a log that QuickBooks keeps automatically inside the company file, recording every action taken by every user — every transaction created, every edit made, every deletion performed. The Audit Trail is a critical tool for accounting accuracy and for identifying who changed what and when. It is also one of the largest contributors to file size growth. Intuit’s own Data File Optimization feature was designed specifically to address this: the optimization removes the Audit Trail up to a selected date while keeping every transaction in full detail. Testing by QuickBooks ProAdvisors documented reductions of 25–54% of the total file size from the Audit Trail removal alone.
Intuit’s official name for the Audit Trail removal option in the Condense Data utility is “Data File Optimization” — because it keeps all transactions intact and only removes the behind-the-scenes log of edits and changes. The practical effect is that a 400 MB file can become a 185 MB file after removing the Audit Trail, with every invoice, payment, and transaction still fully accessible and correct. The Audit Trail starts building again from zero after the optimization, so the same option can be used again in future years as the log accumulates new entries.
File Size Thresholds by QuickBooks Edition
Check the company file’s current size by pressing F2 inside QuickBooks and reading the file size in the Product Information window. Use this table to confirm whether the current size is within the safe range for the edition in use.
| QuickBooks Edition | Practical File Size Guidance | Action to Take |
| QuickBooks Desktop Pro 2022 and newer | Keep below 150–200 MB for best performance. Above 250 MB, slowdowns become noticeable and data errors become more likely | Run Condense Data annually; keep file under 250 MB at all times |
| QuickBooks Desktop Premier 2022 and newer | Keep below 150–200 MB for best performance. Experts recommend no larger than 250 MB for reliable daily use | Run Condense Data annually and clean inactive list entries every 6 months |
| QuickBooks Desktop Enterprise 2022 and newer | Handles larger files than Pro/Premier. Performance remains stable up to approximately 1–1.5 GB with correct hardware | Run Condense Data when the file exceeds 1 GB; upgrade RAM if the file approaches 1.5 GB |
| Any edition — Target count limit for migration to QuickBooks Online | 4,000,000 targets maximum. Targets are individual line items across all transactions and list entries. Check via F2 > Product Information | Run Condense Data to reduce target count before attempting any migration to QuickBooks Online |
What Makes the QuickBooks Company File Larger — and How to Address Each Cause?
Every item in this table is a documented contributor to company file size growth. Addressing the largest contributors first produces the fastest size reduction.
| What Makes the File Larger | Why It Keeps Growing | How to Address It |
| Transaction history — invoices, bills, checks, payments, payroll | Every transaction adds records to the company file permanently. A business processing 50 transactions per day adds 18,000+ records per year | Run Condense Data annually to summarise transactions older than 2–3 years into journal entries |
| Audit Trail | The Audit Trail records every create, edit, and delete action on every transaction. In a busy file, the Audit Trail grows to 30–50% of the total file size | Use Condense Data > Remove Audit Trail info to date option to clear the Audit Trail while keeping all transaction detail |
| Attachments — PDFs, images, scanned documents attached to transactions | Each attachment is stored inside the company file, not as a separate file on the drive. A single PDF invoice can add 200 KB to 2 MB to the file | Store attachments in a separate folder on the server and link to them rather than attaching directly inside QuickBooks |
| Inactive list entries — old customers, vendors, items, accounts that were made inactive but not merged | Inactive entries remain in the company file in full — they are hidden from the active lists but still consume space in the file database | Clean inactive lists through Lists > Customer/Vendor/Item List > filter by Inactive, then merge duplicates or delete unused entries |
| The Search Index folder — a separate data index QuickBooks builds to power F3 search results | The .qbw.SearchIndex folder grows with the company file and can reach hundreds of megabytes for large files | Turn off automatic Search Index updates through Edit > Preferences > Search > Company Preferences > uncheck Update Automatically |
| DB File Fragments — pieces of the file scattered across the hard drive | As the file grows and is updated repeatedly, its data becomes spread across multiple non-adjacent locations on the drive — this increases read times without increasing the actual data content | Run Windows Defragment and Optimize Drives on the drive that holds the company file (HDD only, not SSD) |

QuickBooks Company File Size Optimization Tips: Complete Steps
Tip 1: Run the Condense Data Utility — the Primary Size Reduction Tool
The Condense Data utility is the built-in QuickBooks tool for reducing company file size. It is found at File > Utilities > Condense Data. Intuit’s documentation confirms what it does: “When you condense your QuickBooks Desktop file, you remove unused or inactive list entries in it. This decreases your file size.” The utility offers three main options: remove transactions before a selected date and replace them with summary journal entries; remove only the Audit Trail while keeping all transactions in full detail (Data File Optimization); or remove all transactions and keep only lists and preferences. Each option produces a different size reduction and has different effects on historical report detail.
Removing transactions before a selected date is the most aggressive size reduction option and is irreversible — once transactions are summarised into journal entries, the individual line items are no longer accessible in the condensed file. QuickBooks automatically creates an archived copy of the file (named with the current date) in the same folder before condensing, so the full transaction detail is always accessible by opening the archive. Removing only the Audit Trail is the gentler option: it keeps every transaction intact and produces a 25–54% reduction in file size without any loss of transaction accessibility.
Steps — Condense Data (remove Audit Trail, keep all transactions): Switch to single-user mode through File > Switch to Single-User Mode. Create a manual backup through File > Back Up Company > Create Local Backup — save it with a new name including the date, for example “CompanyFile_BeforeCondense_2026_01_15.QBB”. Go to File > Utilities > Condense Data. Select “Keep all transactions but remove audit trail info to date”. Click Next. Set the date — choose a date at least one full year in the past to ensure recent Audit Trail data stays intact for review purposes. Click Begin Condense. QuickBooks will ask to create a backup — create another backup if prompted. Wait for the process to complete. After condensing, press F2 to confirm the new file size and compare it to the size before condensing.
Steps — Condense Data (summarise old transactions): Follow the same backup and single-user mode steps above. Go to File > Utilities > Condense Data. Select “Remove the transactions you select”. Choose a cutoff date — all transactions before this date will be replaced with summary journal entries. A common choice is 3 to 5 years ago, which removes the oldest detailed data while keeping recent years fully intact. Click Next and follow the prompts. QuickBooks creates an archived copy of the original file automatically before proceeding. After condensing, verify the file with File > Utilities > Verify Data to confirm the condensed file has no errors.
Tip 2: Clean Inactive List Entries to Remove Hidden File Bloat
Inactive list entries are customers, vendors, items, accounts, and employees that have been marked as inactive in QuickBooks — they no longer appear in the active dropdown lists, but they still exist in full inside the company file and still consume space. A business that has been running for 10 or more years accumulates hundreds or thousands of inactive entries: former customers, discontinued products, closed accounts, and departed employees. Every one of these entries adds to the file size even though none of them appear in normal daily use. Intuit’s performance documentation confirmed this directly as a documented cause of file size growth: inactive list entries that are not deleted remain in the database and contribute to its size.
Steps — clean inactive customers and vendors: Go to Customers > Customer Center (or Vendors > Vendor Center). In the center, look for a dropdown at the top left that says “Active Customers” — click it and change it to “All Customers”. Scroll through the list to find all inactive entries (shown with an X beside their name). For each inactive entry that has never had a transaction: right-click and select Delete Customer. For inactive entries that do have transaction history and cannot be deleted: leave them inactive — they cannot be removed from the file, but running Condense Data will summarise their transactions and reduce the space they consume. After cleaning, re-sort the list through View > Re-sort List to remove them from active list positions.
Steps — merge duplicate list entries: Duplicate entries — the same customer or vendor entered twice under slightly different names — each occupy separate space in the database. Merging them combines their transaction history into one entry and removes the duplicate. In the Customer Center, identify duplicate entries (for example, “ABC Corp” and “ABC Corporation”). Open the duplicate entry (the one to remove). Change its name to exactly match the name of the entry to keep. QuickBooks will ask: “This name is already being used. Do you want to merge them?” Click Yes. The two entries merge into one, combining all transaction history. Repeat for vendors, employees, and items.
Tip 3: Stop Attaching Large Files Directly Inside QuickBooks
QuickBooks allows files — PDFs, images, scanned invoices, photographs of receipts — to be attached directly to individual transactions through the Attach feature on any transaction form. These attachments are stored inside the company file itself, not as separate files on the hard drive. Every PDF or image attached to a transaction increases the company file size by the size of that attachment. A business that routinely attaches scanned invoices and receipts to transactions can add 50–200 megabytes per year to the company file from attachments alone, without any increase in the number of transactions.
The documented alternative — confirmed in QuickBooks performance management guidance — is to store attachments in a named folder on the server, organized by year and transaction type, and to add a note in the transaction’s Memo field with the file name or folder path rather than attaching the file. For example, the memo on a bill payment might read: “Receipt: \\Server\Receipts\2026\June\VendorName_Invoice123.pdf”. This approach gives every attachment a retrievable location without adding a single byte to the company file. Existing attachments inside the file cannot be removed retroactively through QuickBooks’ standard tools — running Condense Data removes the attachment history along with the audit trail data, which reduces the space consumed by historical attachments.
Tip 4: Remove the Search Index Folder When It Grows Large
QuickBooks maintains a Search Index — a separate data folder used to make the F3 search function return results quickly. This folder, named [CompanyFileName].qbw.SearchIndex, is stored in the same location as the company file. Intuit’s performance management documentation confirmed: “You can find the .qbw.SearchIndex folder in the same location as your company file.” The Search Index folder grows as the company file grows and can reach hundreds of megabytes in a large file. Deleting this folder does not delete any transaction data — QuickBooks rebuilds the Search Index automatically the next time a search is performed. Turning off automatic indexing through Edit > Preferences > Search stops the folder from consuming resources during active QuickBooks use.
Steps: Close QuickBooks completely on all computers. Open File Explorer on the server. Navigate to the company file folder — the default path is C:\Users\Public\Documents\Intuit\QuickBooks\Company Files. Find the folder named [YourCompanyFile].qbw.SearchIndex — it has the same name as the company file with “.SearchIndex” added. Right-click it and select Delete. Confirm the deletion. Open QuickBooks. Go to Edit > Preferences > Search > Company Preferences tab. Uncheck “Update Automatically”. Click OK. QuickBooks will no longer automatically rebuild the Search Index during active use. The search function still works when F3 is pressed — QuickBooks searches the file directly rather than using the index, which is slightly slower for search results but removes the ongoing background indexing overhead.
Tip 5: Re-Sort All Lists Weekly to Remove Fragmented List Data
QuickBooks lists — the Customer list, Vendor list, Employee list, Item list, and Chart of Accounts — accumulate fragmented data as entries are added, edited, and deleted over time. A fragmented list is one where the internal order of entries in the database does not match the visible sorted order — QuickBooks must work harder to read and display the list each time it is opened. Intuit’s own performance management page confirmed the recommended frequency: “Resort your Primary Name List (customers, vendors, employees, and other names), your Chart of Accounts and your Item List. Do this to your lists weekly.” Re-sorting does not reduce the file size, but it reduces the processing time QuickBooks needs to read those lists, which improves the speed of every action that involves customer, vendor, or item lookups.
Steps: Go to Lists > Customer & Vendor Profile Lists > Customer Type List — or open the Customer Center directly. Click the Name column header to sort the list. Go to View in the menu bar and select Re-sort List. Confirm the re-sort. Repeat this process for: Lists > Chart of Accounts (Name column > View > Re-sort List), Lists > Item List (Name column > View > Re-sort List), and the Vendor Center (View > Re-sort List). The full re-sort of all four lists takes under 5 minutes and is recommended as a Monday morning task before the working day begins.
Tip 6: Reduce DB File Fragments by Running Windows Defragmentation on the Drive
DB file fragments are pieces of the company file that Windows has stored in non-adjacent locations on the hard drive — spread out across the drive rather than in one continuous block. As the company file grows and is written to repeatedly over years, Windows places new pieces wherever free space is available on the drive, which increasingly scatters the file across many separate locations. Intuit’s performance documentation confirmed: “Excessive DB File Fragments can degrade the performance of your computer.” The current fragment count is visible in the Product Information window (F2 inside QuickBooks) — a file with hundreds or thousands of fragments opens slower than the same file with fewer fragments, because QuickBooks must make multiple separate read requests to reassemble all the pieces.
This tip applies only to traditional hard disk drives (HDDs) — physical spinning disk drives that store data on magnetic plates. Solid-state drives (SSDs) — which store data on memory chips with no moving parts — do not fragment in the same way and should not be defragmented. For a company file stored on an HDD, running Windows’ built-in Defragment and Optimize Drives tool consolidates the scattered file pieces back into a single continuous block, which reduces the fragment count and speeds up all file read operations. For a company file on an SSD, the correct action is to confirm the file is on an SSD and that it meets Intuit’s recommended SSD storage specification — no defragmentation needed.
Steps: On the server, close QuickBooks so the company file is not actively being written to. Open the Windows Start menu and search for “Defragment and Optimize Drives”. Open the tool. The tool lists every drive and shows its media type — “Hard Disk Drive” or “Solid State Drive”. Click the drive that contains the company file. If it is a Hard Disk Drive, click Optimize and wait for the process to complete. After optimization, reopen QuickBooks and press F2 — the DB fragment count in the Product Information window should be significantly lower. Schedule the Defragment tool to run automatically on a monthly basis through the Change Settings option in the tool.
Tip 7: Start a New Company File for the Current Year When the File Is Too Large to Condense Effectively
Starting a new company file for the current fiscal year is the correct approach for businesses whose files have grown too large for Condense Data to bring back within the practical size range. Intuit’s own community support team confirmed this option: “Aside from running the Condense Data utility to reduce the file size, you may start a new company file in QBDT.” The old company file remains fully accessible for historical reporting — it is simply not used for day-to-day work anymore. The new file starts at zero size, growing only with the current year’s transactions. The opening balances for every account in the new file are set using the Balance Sheet from the last day of the old file, which ensures financial continuity.
This approach is particularly effective for businesses that accumulate very high transaction volumes — retail businesses, restaurants, or service businesses with hundreds of daily transactions. A retail business with 14 years of transaction history and thousands of inactive items cannot condense its way back to a small file — the item list alone may be 50,000 entries, most inactive. Starting a new file and importing a clean list of active items only, with the correct opening balances, gives a file that performs like new while preserving the full historical file for any needed look-up.
Steps: Open the existing company file. Run a Balance Sheet report as of the last day of the period (e.g., December 31, 2025). Export the Chart of Accounts through Lists > Chart of Accounts > Reports > Account Listing. Export the active Item List, Customer List, and Vendor List through File > Utilities > Export > Lists to IIF Files. Close the file. Go to File > New Company and follow the setup wizard. In the new file, import the exported lists through File > Utilities > Import > IIF Files. Enter opening balances for every account using the Balance Sheet figures through Company > Make General Journal Entries. Keep the old file accessible on the server in a clearly labelled archive folder for historical reference.
QuickBooks Maintenance Schedule: Keep the File Optimized Year-Round
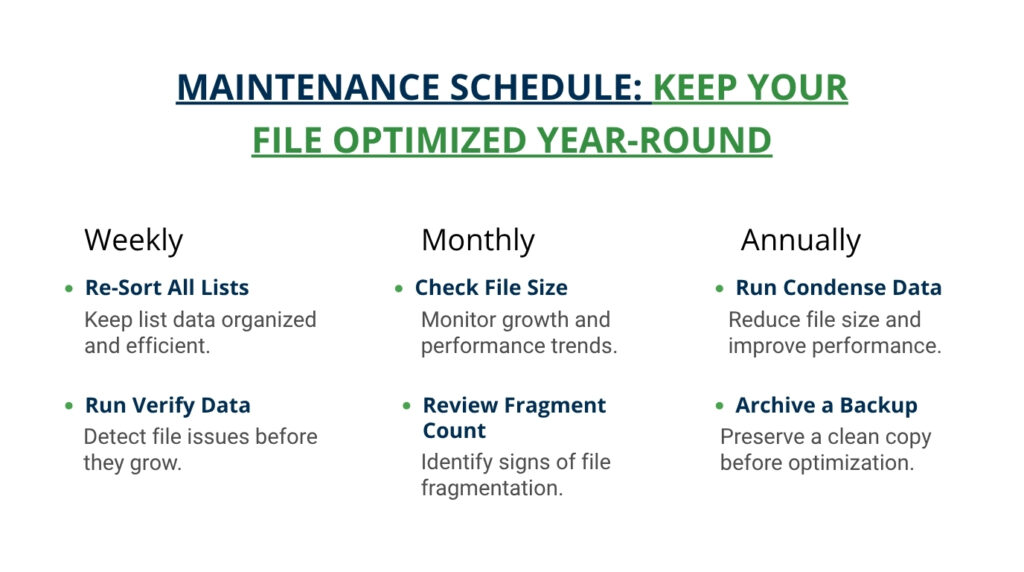
Weekly: Re-Sort All Lists and Run Verify Data
Two weekly tasks keep the company file performing at its best between annual condense runs. First: re-sort all lists (Customer, Vendor, Item, Chart of Accounts) through the View > Re-sort List option in each list — Intuit’s own documentation confirms this should be done weekly. Second: run Verify Data through File > Utilities > Verify Data. A clean Verify result (“QuickBooks detected no problems with your data”) confirms the file has no structural damage building up. Catching damage weekly, while it is still minor, means Rebuild Data can fix it in a single pass — before it grows into the kind of multi-layer damage that causes major size and performance problems.
Monthly: Check the File Size and Fragment Count via F2
Pressing F2 inside QuickBooks opens the Product Information window, which shows the current file size in kilobytes and the DB fragment count. Checking these two numbers monthly — the first working day of each month — creates a record of how fast the file is growing and how quickly fragments are accumulating. A file growing more than 20 MB per month is on a trajectory to reach the 200–250 MB performance threshold within a year for Pro/Premier users, which means scheduling a Condense run before the year is out. A fragment count growing by more than 50 per month signals that the hard drive is being written to in increasingly scattered patterns and that a defragmentation run is needed.
Annually: Run Condense Data and Archive the Pre-Condense Backup
An annual Condense Data run — timed to coincide with the end of the fiscal year — is the most effective schedule for keeping the company file within the practical size range. Running Condense at year-end, after all year-end transactions are entered and reconciled, removes the oldest year of detailed transactions (or the full Audit Trail up to the current date) and starts the new fiscal year with a smaller, faster file. The backup created before condensing — saved with the date in its name — becomes the permanent archive for that year’s detailed transaction data. Storing this archive on an external drive or cloud storage separate from the live file preserves full historical detail indefinitely without adding to the live file’s size.
Conclusion
QuickBooks company file size grows continuously with every transaction, every list entry, every Audit Trail log entry, and every attachment added to the file. Intuit confirmed the performance impact: “QuickBooks’ performance decreases as the size of the company file increases.” The practical size thresholds — 150–200 MB for Pro and Premier, approximately 1 GB for Enterprise — are not hard cutoffs but the range above which slowdowns become noticeable and data errors become more likely. Staying below these thresholds through regular maintenance prevents the performance problems from ever appearing, rather than requiring recovery after they do.
The most effective single action for reducing file size is the Condense Data utility, specifically the Data File Optimization option that removes the Audit Trail while keeping all transactions intact. Testing by QuickBooks ProAdvisors documented file size reductions of 25–54% from this option alone, without any loss of transaction detail or historical report accuracy. Running this option annually — at the end of each fiscal year — keeps the file within the practical size range for Pro and Premier indefinitely, and within a manageable range for Enterprise for multiple years between full transaction condensing runs.
The supporting maintenance — weekly list re-sorts and Verify Data checks, monthly F2 size and fragment checks, stopping direct attachment of large files inside transactions, turning off automatic Search Index updates, and running Windows defragmentation on HDD-stored files — addresses the secondary size contributors that accumulate between annual condense runs. Together these practices keep the company file lean, fast, and stable throughout the year, and prevent the gradual performance degradation that makes QuickBooks feel unreliable after years of growth without maintenance.
Frequently Asked Questions
1. The company file was just condensed and the file size barely changed. Why did Condense Data not reduce the size?
Condense Data reduces size differently depending on which option is selected. If “Remove the transactions you select” was chosen but most of the transactions in the date range selected are open (unpaid invoices, uncashed checks, or uncleared bills), QuickBooks excludes them from condensing because open transactions cannot be replaced with journal entries until they are closed. A file where most transactions remain open sees little size reduction.
The fix is to close all open transactions before condensing — pay or write off all old unpaid invoices, clear old outstanding checks, and close the books through Company > Set Closing Date. Alternatively, choosing the Audit Trail removal option (“Keep all transactions but remove audit trail info to date”) produces a 25–54% reduction regardless of whether transactions are open or closed, because it removes the log data rather than the transactions themselves.
2. The company file is 450 MB and is on QuickBooks Enterprise. Reports are still fast. Does it need to be condensed?
A 450 MB Enterprise file that is performing well does not require immediate condensing. Enterprise handles larger files than Pro and Premier, and with correct hardware — server RAM meeting Intuit’s specification of file size in GB multiplied by number of users — performance at 450 MB is within the stable operating range.
The practical time to schedule a condense is when the file approaches 1 GB, when Verify Data begins finding recurring errors that Rebuild cannot permanently fix, or when reports begin taking noticeably longer to load than they did six months earlier. Running Condense Data before the file reaches 1 GB — rather than after — produces a better result in less time and with lower risk, because the condense tool operates more reliably on a file well within its capacity than on one approaching its limits.
3. Can the Audit Trail be turned off permanently to stop it from growing the file?
The Audit Trail can be turned off in QuickBooks Desktop through Edit > Preferences > Accounting > Company Preferences > check “Use Audit Trail” — unchecking this box turns off the Audit Trail recording. However, Intuit’s accountant guidance strongly discourages permanently disabling the Audit Trail because it removes the ability to track who changed what inside the company file.
For businesses subject to any financial audit, the Audit Trail is an important record of data integrity. The better alternative is to run the “Remove audit trail info to date” Condense option annually — this clears the accumulated Audit Trail history up to a selected date while leaving the Audit Trail active for ongoing recording. The Audit Trail starts fresh from the condense date, providing a clean record of all future changes while removing the size burden of years of historical log data.
4. The Condense Data option is missing from the File > Utilities menu. Why is it not available?
The Condense Data option is not available in all QuickBooks editions and regional versions. It is confirmed to be absent from the Canadian version of QuickBooks Desktop — a QuickBooks community thread specifically noted this, with an Intuit representative confirming the feature is not included in the Canadian edition.
It is also unavailable when QuickBooks is not in single-user mode — the option is grayed out if any other user is connected to the company file. Switching to single-user mode through File > Switch to Single-User Mode makes the Condense Data option available in compatible editions. If single-user mode is already active and the option remains grayed out or absent, the QuickBooks edition in use may not support the feature — contact Intuit support directly to confirm whether the Condense tool is available for the specific edition and region.
5. After condensing, some reports show different numbers than before the condense. Is the data correct?
Report differences after condensing are documented and expected for the “Remove transactions” condense option. Intuit’s official Condense documentation confirms: “Reports may not match after condensing a file.”
The reason is that condensing replaces individual transactions before the cutoff date with summary journal entries. A journal entry records the net debit and credit for each account but does not preserve the individual line items — so a report that breaks down sales by product or shows individual customer payment history before the cutoff date will show the summary journal entry instead of the original detail.
The account totals and final balances are correct, but the transaction-level detail for the condensed period is no longer in the active file. The pre-condense archive backup, stored automatically in the same folder with the date in its name, still contains all original detail and can be opened in a read-only mode to look up any historical transaction from before the condense date.
Anusmita is a seasoned content writer who brings perspective to words. As a writer, she enriches her work with a journalistic aptitude, utilising her training in Mass Communication and Journalism. She loves to travel and explore, which imparts a greater sense of understanding, maturity, and experience that are reflected in her content.
Beyond her professional work, Anusmita enjoys painting, singing, dancing, and spending time planting. She is also a self-proclaimed foodie who loves exploring different cuisines, an interest that further adds to her curiosity and perspective as a writer.
Leave a Reply