Verify Data and Rebuild Data are QuickBooks Desktop’s two built-in tools for finding and fixing problems in the company file — the file that holds every transaction, account balance, payroll record, and customer entry for the business. Verify Data scans the file and reports whether any damage exists. Rebuild Data then attempts to repair whatever Verify found. Running both tools is the documented first step for any data error in QuickBooks Desktop, and for many problems, one or two passes through both tools resolves the issue completely.
The problem this article addresses is what happens when Rebuild does not finish the job. Verify still reports “Your data has lost integrity” after Rebuild completes. The same errors reappear every time QuickBooks closes. Reports show incorrect numbers even after a successful rebuild. Specific transactions remain damaged. Intuit’s own support documentation acknowledges this directly: “If the verify finds more damage, you will need to fix it manually.” The built-in tools have limits, and understanding those limits is the starting point for fixing what Rebuild left behind.
This article explains exactly why Verify and Rebuild sometimes fail to finish the repair, what the error messages in the log file actually mean, and every documented step to take when the standard tools are not enough. The fixes covered here apply to QuickBooks Desktop Pro, Premier, and Enterprise on Windows. Every step includes what to do, why it works, and the exact clicks required to complete it.
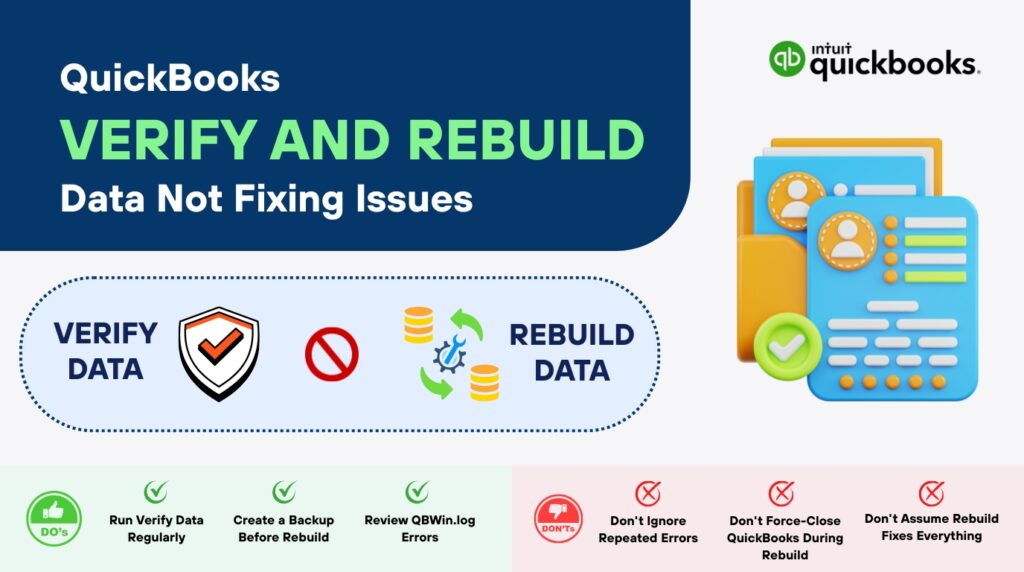
Table of Contents
What Verify and Rebuild Data Actually Do — and What They Cannot Fix in QuickBooks?
Verify Data: The Scanner That Reports What Is Wrong
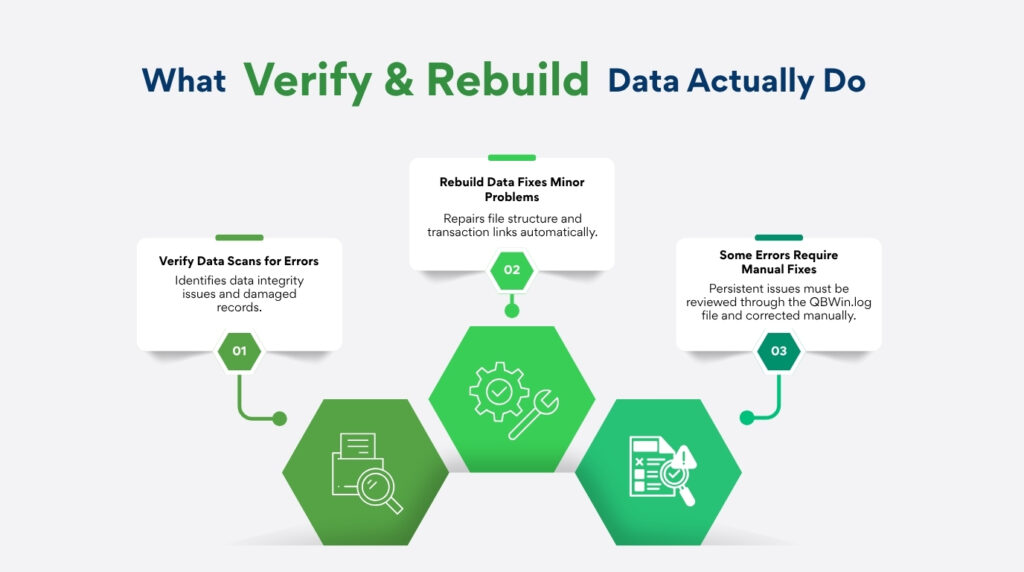
Verify Data is a scanning tool that checks the QuickBooks company file for internal errors — broken links between transactions, account balances that do not match the sum of their underlying transactions, damaged records in estimates or purchase orders, and other structural problems inside the file. Running Verify Data produces one of three results. The first result is: “QuickBooks detected no problems with your data” — the file is clean and no action is needed. The second result is a specific error message — a named error that links to a documented fix. The third result is: “Your data has lost integrity” — damage was found, and Rebuild Data must be run next.
Verify Data writes its full findings to a log file called QBWin.log, stored automatically on the computer in the same folder as the QuickBooks program files. This log file is more detailed than the on-screen results and names the exact transaction or record that is damaged. Reading the QBWin.log file is the critical step that most users skip — it identifies specifically what is broken, which determines which manual fix is needed when Rebuild cannot resolve the issue automatically.
Rebuild Data: What It Repairs and What It Leaves Behind?
Rebuild Data takes the company file apart record by record and reassembles it in the correct order, fixing structural problems as it goes. It repairs broken links between transactions, rebuilds damaged index tables (internal lists that QuickBooks uses to locate records quickly), and corrects account balance discrepancies caused by data order problems. Intuit’s documentation describes it directly: the Rebuild tool “automatically fixes minor company file data issues.” The word “minor” in that description is important — Rebuild has a defined scope, and some categories of damage fall outside it.
Rebuild Data cannot fix all types of damage. It cannot repair a damaged transaction where the transaction data itself is corrupted — it can only fix the structural connections between intact transactions. It cannot fix damage caused by a specific individual transaction being incorrectly entered and linked, such as a payment that was applied to the wrong invoice years ago and has since created a chain of dependent errors. Intuit’s documented guidance states that when Rebuild does not resolve the errors, they require manual correction: “If the verify finds more damage, you will need to fix it manually. Search for the error(s) in the qbwin.log on the QuickBooks Desktop support site for how to fix it.”
Why the Same Errors Reappear After Rebuild Completes?
Rebuild completing successfully — showing the “Rebuild has completed” message — does not guarantee all errors are fixed. It means the rebuild process ran without crashing. The Rebuild tool reports what it fixed and what it could not fix in the Verify Results window immediately after completion. Expanding the results by clicking “Expand All” in that window shows two categories: errors that were fixed and errors that could not be fixed. Errors in the “could not fix” category remain in the file and will reappear the next time Verify Data is run.
A loop where Verify finds errors, Rebuild says it completed, and Verify immediately finds the same errors again means the damage is in the second category — beyond what Rebuild can automatically repair. A documented explanation from Intuit’s community confirms this pattern: the loop indicates minor corruption that the Rebuild tool detects but cannot fully resolve. The fix for this loop requires reading the QBWin.log to identify the specific error, then correcting the named transaction manually inside QuickBooks.
Quick Diagnosis: Match the Situation to the Correct QuickBooks Step
Find the description that matches what is happening before applying any fix. Starting at the correct step saves time and avoids unnecessary changes to the company file.
| What Is Happening | Most Likely Reason | Start With This Step |
| Rebuild completes but Verify finds the same errors again immediately | The damage is deeper than what the Rebuild tool can fix automatically | Step 1: Read the QBWin.log file to identify the specific error, then fix the named transaction manually |
| Verify and Rebuild loop keeps repeating every time QuickBooks is closed | Minor corruption exists that Rebuild detects but cannot fully resolve | Step 2: Run Rebuild in single-user mode, then try the portable company file method |
| Rebuild says “Rebuild has completed” but reports still show wrong numbers | Rebuild fixed the file structure but specific transactions still carry incorrect data | Step 3: Use the Verify Results window to find and manually correct the named transactions |
| Rebuild is frozen and shows “QuickBooks is not responding” | Rebuild is still running — the screen freezes during heavy file processing | Wait: as long as the mouse cursor moves, Rebuild is working. Do not close QuickBooks. |
| Verify finds errors but the Rebuild took more than 2 hours to complete | Company file is very large or the damage is extensive | Contact Intuit support directly — a rebuild over 2 hours signals a problem beyond standard repair |
| Verify shows “Your data has lost integrity” after the company file size grew significantly | File exceeds recommended size limits (200 MB for Pro/Premier, 450 MB for Enterprise) | Step 5: Condense the company file to reduce its size before rebuilding again |
| All repair attempts fail — the file cannot be opened or keeps crashing | The company file has severe damage that the built-in tools cannot address | Step 6: Restore the most recent backup or contact Intuit Data Services |
QuickBooks Steps to Fix What Verify and Rebuild Left Behind
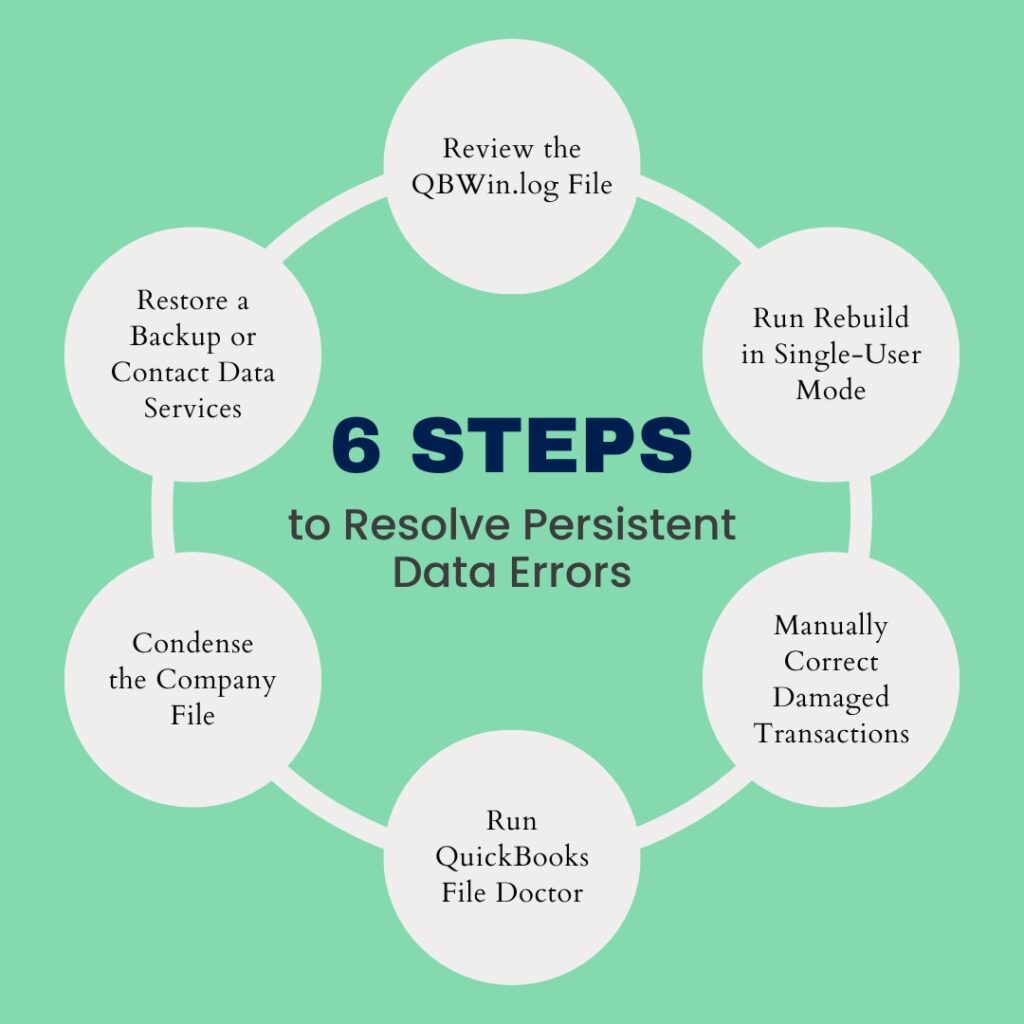
QuickBooks steps to fix what verify and rebuild left behind are given below in six steps. They are:
- Step 1: Read the QBWin.log File to Find the Exact Error
- Step 2: Run Rebuild in Single-User Mode, Then Try the Portable File Method
- Step 3: Manually Fix the Named Transactions from the Verify Results Window
- Step 4: Run QuickBooks File Doctor
- Step 5: Condense the Company File When File Size Is the Root Cause
- Step 6: Restore a Backup or Contact Intuit Data Services When All Else Fails
Step 1: Read the QBWin.log File to Find the Exact Error
The QBWin.log file is a text log that QuickBooks writes automatically every time Verify Data or Rebuild Data runs. It contains the full, detailed results of the scan — including the specific name and type of every damaged transaction that Rebuild could not fix. The on-screen Verify Results window shows a summary, but the QBWin.log file shows the exact error codes and transaction identifiers needed to locate and manually fix the problem. Intuit’s own documentation directs users to this file when Rebuild does not resolve the errors: “Search for the error(s) in the qbwin.log on the QuickBooks Desktop support site for how to fix it.”
Two common error entries found in the QBWin.log file have documented manual fixes. The first is “Error: Verify Target: Invalid Sibling Name” — Intuit’s support team confirmed that this error means one or more non-posting transactions are damaged. A non-posting transaction is a transaction that does not affect account balances — specifically, estimates, purchase orders, and sales orders. The fix is to delete the damaged transaction listed in the log (deleting non-posting transactions does not affect financial statements) and re-enter it if needed. The second is “Target Chaining” errors — documented by Intuit as errors where bills or invoices and their linked payments have become unlinked. The fix involves locating the transactions named in the log and relinking payments to invoices manually.
Steps to find and open the QBWin.log file: Close QuickBooks completely. Open File Explorer on the computer. In the address bar, type C:\Users\Public\Documents\Intuit\QuickBooks\[Year] and press Enter — this is the default QuickBooks program folder. Look for the file named QBWin.log. Right-click it and select Open with > Notepad. Press Ctrl + End to jump to the bottom of the file — the most recent Verify or Rebuild results are always at the end. Look for lines containing “LVL_ERROR” or “SEVERE ERROR” — these lines name the specific damaged transactions. Search Intuit’s support site for the exact error text to find the documented fix for that specific error.
Step 2: Run Rebuild in Single-User Mode, Then Try the Portable File Method
Rebuild Data requires the company file to be in single-user mode — a mode where only one person has the file open on one computer. Multi-user mode, where several people access the same file across a network, keeps background connections open that can interrupt the rebuild process. Running Rebuild while other users are connected to the file produces incomplete results because the rebuild cannot fully reorganize records that other sessions have locked. Switching to single-user mode before rebuilding closes all other connections and gives the tool uninterrupted access to every record in the file.
Steps for single-user mode Rebuild: Ask all other users to log out of QuickBooks and close the program on their computers. On the computer that hosts the company file, open QuickBooks. Go to File > Switch to Single-User Mode. Go to File > Utilities > Rebuild Data. Create the backup when prompted, using a new file name so it does not overwrite any existing backup. Wait for the rebuild to complete — the screen may show “QuickBooks is not responding” but as long as the mouse cursor moves, the tool is still working. After the rebuild completes, go to File > Utilities > Verify Data to check whether the errors are resolved.
The portable company file method addresses a different category of hidden file problems. A portable company file is a compressed copy of the company file — QuickBooks compresses it by stripping out temporary data, rebuilding the internal structure from scratch, and saving the result as a new .QBM file. Restoring this portable file back to a regular company file produces a clean copy with a rebuilt structure. This process resolves certain types of corruption that the standard Rebuild tool cannot reach because they exist in the temporary data sections that the portable compression process removes.
Steps for the portable file method: Open QuickBooks with the company file. Go to File > Create Copy. Select Portable company file and click Next. Save the portable file (.QBM) to the Desktop. Close QuickBooks. Reopen QuickBooks without opening the company file. Go to File > Open or Restore Company. Select Restore a portable file and click Next. Browse to the portable file on the Desktop and open it. Save the restored file with a different name from the original — for example, add “_restored” to the end of the file name. Open the restored file and run Verify Data to check whether the errors are gone.
Step 3: Manually Fix the Named Transactions from the Verify Results Window
The Verify Results window, which appears after every Verify Data run, shows a list of every error found in the company file. Clicking “Expand All” at the top of this window opens the full list. Each error in the list has a “See Online Article” link — clicking this link opens Intuit’s documented fix for that specific error. This window is the correct place to identify which transactions need manual correction after Rebuild has been unable to fix them automatically. Intuit’s own fix page confirms this: “If you’re comfortable manually fixing your errors, you can find the errors you can fix from the Verify Results window.”
Non-posting transactions — estimates, purchase orders, and sales orders — are the most common source of errors that Rebuild cannot fix automatically. These transactions do not affect account balances or financial reports, so deleting a damaged one does not change any financial statement. The QBWin.log identifies the damaged transaction by its reference number. Finding and deleting that specific transaction removes the error from the file permanently. If the transaction was a real estimate or purchase order that the business needs, it can be re-entered after deletion.
Steps: Run Verify Data through File > Utilities > Verify Data. In the Verify Results window, click Expand All. For each error listed, click See Online Article and follow the specific documented fix for that error. For damaged estimates or purchase orders identified in the QBWin.log: go to Customers > Create Estimates (or Vendors > Create Purchase Orders) and use the Previous button to scroll through transactions to find the one matching the reference number in the log. Open the damaged transaction and use Edit > Delete to remove it. After deleting all named damaged transactions, run Verify Data again to confirm the errors are resolved.
Step 4: Run QuickBooks File Doctor
QuickBooks File Doctor is a free tool from Intuit, available inside the QuickBooks Tool Hub, that addresses both company file damage and network configuration problems. It goes beyond what the standard Rebuild tool can repair because it accesses the file at a different level — scanning for damage in the file’s network descriptor sections and internal structure components that the Rebuild tool does not check. Intuit’s fix documentation for data damage explicitly lists File Doctor as the next step when Rebuild does not resolve the issue: “If you still have data issues, use the QuickBooks File Doctor to fix your company file.”
File Doctor is specifically useful when Rebuild completes without error but the company file still behaves incorrectly — reports show wrong numbers, transactions appear linked incorrectly, or QuickBooks produces unexpected errors when opening specific records. These symptoms indicate damage in areas of the file that Rebuild’s scope does not cover, and File Doctor addresses them through a different repair process that examines the file from the outside rather than reorganizing it from within.
Steps: Download and install QuickBooks Tool Hub from Intuit’s official support page if it is not already installed. Open the Tool Hub. Click Company File Issues in the left menu. Click Run QuickBooks File Doctor. File Doctor takes up to one minute to open. In the File Doctor window, select the company file from the drop-down list or click Browse to locate it. Select Check your file and network and click Continue. Enter the QuickBooks administrator password and click Next. Wait for the scan and repair to complete — this takes 10 to 20 minutes. Open QuickBooks and run Verify Data again to check whether the errors are resolved.
Step 5: Condense the Company File When File Size Is the Root Cause
Company file size is a documented cause of recurring verify and rebuild errors. Intuit’s guidelines establish size thresholds above which the company file becomes increasingly prone to corruption that the built-in tools cannot fully repair: QuickBooks Pro and Premier files should not exceed 200 MB, and QuickBooks Enterprise files should not exceed 450 MB. A megabyte (MB) is a unit of file size — to check the current company file size, press F2 inside QuickBooks to open the Product Information window and look at the File Information section, which shows the file size. Files above these limits take longer to rebuild, are more likely to develop corruption in the first place, and may produce errors that rebuild after every session because the file is too large for the tool to process cleanly in a single pass.
The Condense Data utility — accessed through File > Utilities > Condense Data — reduces the company file size by removing historical transaction detail and replacing it with summary journal entries that preserve the account balances without keeping every individual transaction. Condensing removes transactions before a user-selected date, so all transactions from that date forward remain fully intact and detailed. The result is a smaller file that Rebuild can process completely, which stops the recurring error loop caused by file size.
Steps: First, create a full backup of the company file through File > Back Up Company > Create Local Backup — condensing is irreversible and the backup is the only way to access the removed detail afterward. Go to File > Utilities > Condense Data. Select Remove the transactions you select and choose a date — all transactions before that date will be summarized. Follow the on-screen prompts to complete the condensed process. After condensing, run File > Utilities > Rebuild Data, followed by Verify Data, to confirm the file is now clean.
Step 6: Restore a Backup or Contact Intuit Data Services When All Else Fails
Restoring a backup is the correct action when all the steps above have been applied and the company file still fails Verify Data. A backup file (.QBB) is a complete snapshot of the company file from the moment the backup was created — it contains every transaction that existed at that point, before the damage occurred. Restoring it gives a clean starting point without any of the corruption the current file contains. The critical rule is to restore the backup to a new, separate folder — never overwrite the current company file directly — so the current file remains available as a reference for re-entering any transactions added after the backup was made.
Intuit also offers a paid data recovery service called Intuit Data Services for company files that cannot be repaired by any built-in tool. This service is appropriate when the file cannot be opened at all, when every backup available is also damaged, or when the damage is extensive enough that restoring any available backup would mean re-entering months of transactions. Intuit Data Services requires sending the damaged company file to Intuit, and the process takes multiple business days. This option is documented on Intuit’s support page as the final escalation path for data damage that the QuickBooks tools cannot fix.
Steps to restore a backup: Open QuickBooks. Go to File > Open or Restore Company. Select Restore a backup copy and click Next. Choose Local backup and browse to the most recent backup file (.QBB) from before the data errors began. In the Save Company File As dialog box, create a new folder on the Desktop and save the restored file there — do not save it over the current company file. Open the restored file and run Verify Data to confirm it is clean. Re-enter any transactions that were created between the backup date and the current date using bank statements, receipts, or the Audit Trail from the damaged file.
All QuickBooks Steps at a Glance
| Step | What It Fixes | Time |
| Step 1: Read the QBWin.log file | Identifies the specific damaged transaction by name so it can be fixed manually | 10–15 min |
| Step 2: Run Rebuild in single-user mode + try portable file method | Removes multi-user interference and re-compresses the file to clear hidden issues | 15–30 min |
| Step 3: Manually fix named transactions from Verify Results | Corrects specific damaged estimates, purchase orders, sales orders, or linked payments | 20–60 min |
| Step 4: Run QuickBooks File Doctor | Automatically repairs file and network issues that Rebuild cannot address | 15–20 min |
| Step 5: Condense the company file | Reduces file size below recommended limits to stop recurring corruption | 30–90 min |
| Step 6: Restore a backup or contact Intuit Data Services | Recovers all data when the built-in repair tools cannot fix the damage | Varies |
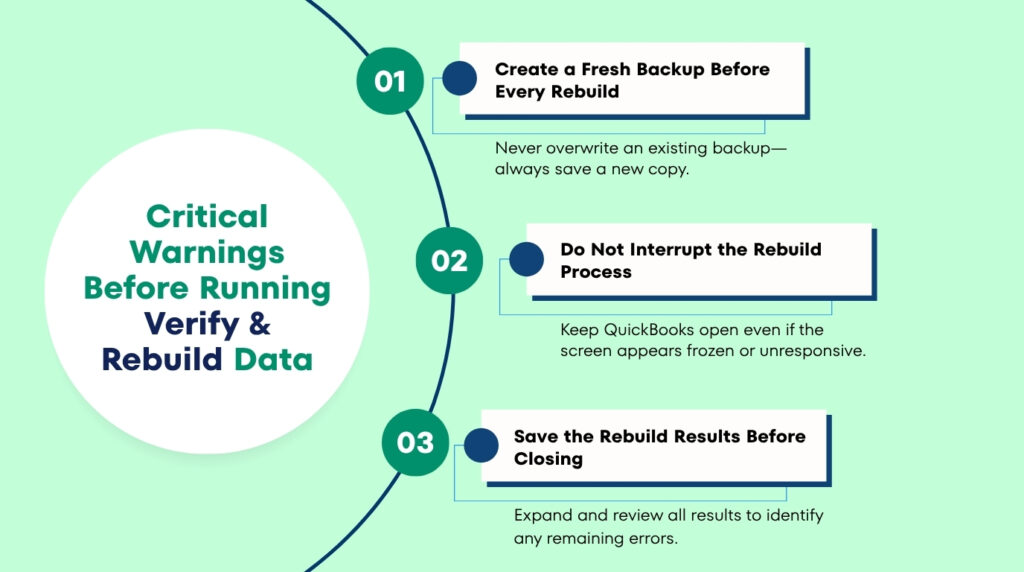
Critical Warnings Before Running Verify or Rebuild Data
- Always Create a New Backup Before Every Rebuild — Never Replace an Existing One
QuickBooks requires a backup before it will run the Rebuild tool, and this requirement exists for good reason. Rebuild reorganizes the company file internally, and if Rebuild itself encounters a serious error mid-process, the file can be left in a worse state than before the rebuild started. The backup created immediately before Rebuild is the recovery point if that happens. Intuit’s own documentation is explicit about the naming rule: “Do not replace another backup file. Enter a new name in File name and select Save.” Overwriting an existing backup destroys the previous recovery point — creating a new, named backup for each rebuild run preserves every recovery option.
- Do Not Close QuickBooks During a Rebuild Even If the Screen Appears Frozen
The Rebuild process frequently causes the QuickBooks screen to go unresponsive — showing “QuickBooks is not responding” in the window title — while it processes large sections of the company file. This frozen appearance is normal and does not mean Rebuild has stopped or crashed. Intuit’s documentation confirms this directly: “Your computer may display the message ‘QuickBooks is not responding’. However, as long as you can move your mouse, QuickBooks is trying to rebuild your company data; wait for the process to complete.” Closing QuickBooks during an active rebuild interrupts the process mid-reorganization, which can leave the company file in a damaged state that is harder to recover from than the original problem.
- Expand and Save the Rebuild Results Before Closing the Results Window
The Rebuild Results window appears immediately after Rebuild completes and shows what was fixed and what could not be fixed. This window does not stay accessible after it is closed — it disappears when the user clicks OK, and the only remaining record of its contents is the QBWin.log file. A documented warning from an Intuit community user confirmed this: “Watch the rebuild results CAREFULLY! — EXPAND THE ERRORS AND PRINT IT OUT TO PDF! When QuickBooks says it COULDN’T fix entries, the next time you run the rebuild it will NOT show you these errors again and they are now part of your database.” Clicking Expand All and saving the results to a PDF or printing them before clicking OK preserves the specific error details needed to fix the remaining problems manually.
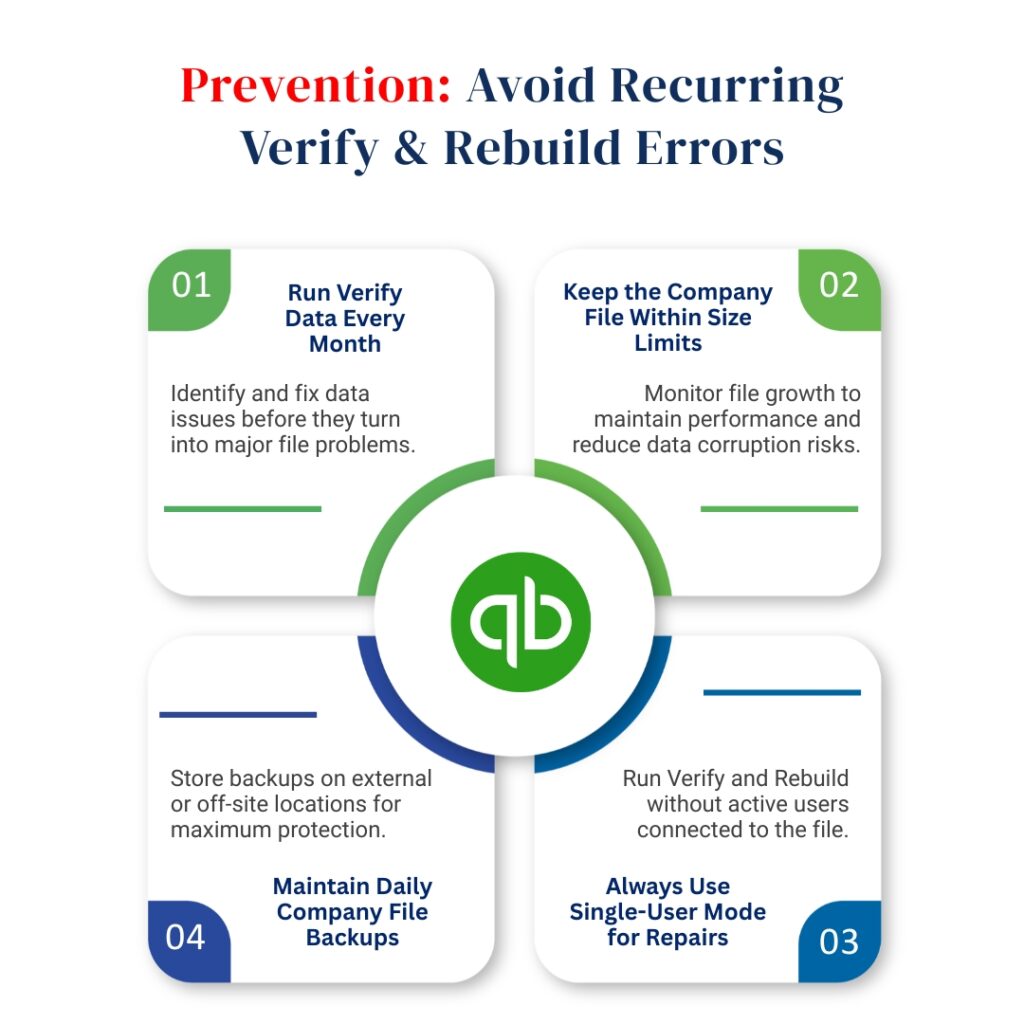
Prevention: Stop Recurring Verify and Rebuild Errors
- Run Verify Data Monthly and Address Errors Before They Accumulate
Verify Data takes only a few minutes to run and catches damage while it is still minor and fixable by the standard Rebuild tool. Waiting until QuickBooks starts producing visible problems — wrong account balances, reports that do not reconcile, transactions that behave unexpectedly — means the damage has been building for weeks or months and has grown beyond what Rebuild can fix in a single pass. Running Verify Data monthly through File > Utilities > Verify Data and running Rebuild immediately if errors are found keeps the file clean and prevents the layer-by-layer accumulation of damage that causes the persistent error loops covered in this article.
- Keep the Company File Below the Recommended Size Limits
File size is the most commonly overlooked cause of recurring verify and rebuild errors. Intuit’s guidelines state that QuickBooks Pro and Premier files should not exceed 200 MB and Enterprise files should not exceed 450 MB. Checking the file size regularly — by pressing F2 inside QuickBooks and reading the File Information section — identifies when the file is approaching these limits. Using the Condense Data utility (File > Utilities > Condense Data) before reaching the limit keeps the file at a manageable size and prevents the performance and corruption issues that oversized files produce.
- Run Verify and Rebuild in Single-User Mode Every Time
Running Verify or Rebuild while other users are connected to the company file in multi-user mode allows background network activity to interfere with the scan and repair process. The result is incomplete rebuilds that appear successful on screen but leave errors in the file. Closing all other users’ connections through File > Switch to Single-User Mode before every Verify or Rebuild run ensures the tools have uninterrupted access to the complete file. This single step prevents a large proportion of the “Rebuild completed but errors persist” situations that require the manual steps in this article.
- Back Up the Company File Daily to an External or Off-Site Location
A daily backup provides a clean, verified copy of the company file from every business day — which means the maximum data loss from any file corruption is one day’s work. The backup must be saved to a location separate from the computer that runs QuickBooks: an external hard drive, a USB drive stored off-site, or a cloud backup service. A backup saved on the same hard drive as the company file provides no protection if the hard drive itself fails. Naming each backup with the date it was created — for example, “CompanyFile_2024_06_15.QBB” — makes it easy to identify exactly which backup to restore and how many transactions need to be re-entered after restoration.
Conclusion
Verify Data and Rebuild Data fix most common QuickBooks company file problems, but they have documented limits. Rebuild is designed to fix structural errors — broken links, out-of-order records, and index table problems. Rebuild cannot fix damage in the content of specific transactions, cannot repair errors caused by incorrectly linked payments and invoices, and cannot clear errors that live in non-posting transactions like estimates and purchase orders. When Rebuild completes and Verify still reports “Your data has lost integrity”, the QBWin.log file identifies what Rebuild left behind, and that information is the starting point for every subsequent fix.
Intuit’s own documentation provides the clear sequence when Rebuild is not enough: read the QBWin.log for the specific error, fix the named transaction manually using the Verify Results window, run QuickBooks File Doctor if manual fixes do not resolve the issue, and restore a backup if all repair attempts fail. Running Rebuild in single-user mode and using the portable company file method addresses the category of errors caused by multi-user interference and temporary file data — two causes that the standard Rebuild process cannot clear on its own.
The most effective long-term protection is monthly Verify Data runs, company file sizes kept below Intuit’s recommended limits, and daily backups saved to a separate location. These three practices together prevent the vast majority of verify and rebuild error loops before they start. A clean company file — one that produces “QuickBooks detected no problems with your data” after every Verify run — is the result of regular maintenance, not a single repair session. The steps in this article restore that clean state when Verify and Rebuild have fallen short.
Frequently Asked Questions
1. Rebuild completed and said “Rebuild has completed” but the same error appeared again when Verify was run immediately after. Does this mean Rebuild failed?
Rebuild did not fail — it completed its process, but the specific error was in the category of damage that Rebuild cannot automatically repair. The “Rebuild has completed” message confirms the process ran without crashing, not that every error was resolved. The next step is to open the Verify Results window, click Expand All, and look for any errors listed under a “could not fix” category. Those errors require manual correction using the specific steps Intuit’s support site documents for each error type. If the Verify Results window was closed before the errors were recorded, the QBWin.log file contains the same information and can be opened in Notepad to retrieve the error details.
2. QuickBooks asks to rebuild every time the program is closed. This has been happening for weeks. Is the company file permanently damaged?
The company file is not permanently damaged — this loop is a documented behavior where minor corruption exists that Rebuild detects at close but cannot fully resolve. The QuickBooks community confirmed this pattern: it indicates minor corruption that the Rebuild tool is not resolving, and the fix is to read the QBWin.log to find a more specific error, run Rebuild in single-user mode, and then try the portable company file method.
If the loop persists after all three of those steps, restoring a backup from before the loop started produces a clean file without the recurring error. Running Verify Data before restoring the backup from the damaged file confirms whether the backup itself is clean.
3. The Rebuild process has been running for more than two hours with no completion message. Is this normal?
A Rebuild that exceeds two hours is not normal and is specifically flagged by Intuit as a signal to contact support: “If the first rebuild took 2+ hours, contact support.” A long rebuild that has not completed can be caused by a very large company file, severe damage in the file that the tool is repeatedly attempting and failing to repair, or a hardware problem such as a failing hard drive that slows down every read and write operation.
The mouse cursor test still applies — if the cursor moves, the tool is still running and should not be interrupted. If the cursor also stops responding, the tool has frozen and must be closed. Before restarting QuickBooks after a frozen rebuild, check the QBWin.log for any error entries written before the freeze.
4. The QBWin.log shows an error about an encrypted credit card number. What does that mean and how is it fixed?
The specific error entry in the QBWin.log is “LVL_SEVERE_ERROR – GetDecryptedCreditCardNumber Failed: The decryption has failed” along with a Customer ID number. This error means QuickBooks found an encrypted credit card number stored on a customer record that it can no longer decrypt correctly. Encrypted data means data that has been scrambled for security purposes — QuickBooks stores saved credit card numbers in this scrambled form.
The fix is to open the customer record named by the ID in the log (through Customers > Customer Center, find the customer by their ID), go to the Payment Settings tab, and remove the stored credit card number. Clearing the corrupted credit card entry resolves this specific error. The customer’s actual credit card number can be re-entered if the business stores it intentionally.
5. After rebuilding, several bills that were paid years ago now appear as unpaid in QuickBooks. How did Rebuild cause this and how is it fixed?
Rebuild can unlink payments from bills when it repairs target chaining errors — situations where the internal links connecting a bill to its payment have become corrupted. Rebuilding the links sometimes removes the incorrect connection entirely, leaving the bill without any linked payment. Intuit documented this behavior in its target chaining error article: when bills and payments are unlinked, the payments lose their associated names and the bills show as outstanding.
The fix is to locate each newly unpaid bill through Vendors > Pay Bills, find the corresponding payment that is now unlinked (it appears in the payment history without a bill reference), and manually re-apply the payment to the correct bill using the Apply Credits function. Running Verify Data after re-applying all payments confirms the links are restored correctly.
Anusmita is a seasoned content writer who brings perspective to words. As a writer, she enriches her work with a journalistic aptitude, utilising her training in Mass Communication and Journalism. She loves to travel and explore, which imparts a greater sense of understanding, maturity, and experience that are reflected in her content.
Beyond her professional work, Anusmita enjoys painting, singing, dancing, and spending time planting. She is also a self-proclaimed foodie who loves exploring different cuisines, an interest that further adds to her curiosity and perspective as a writer.
Leave a Reply