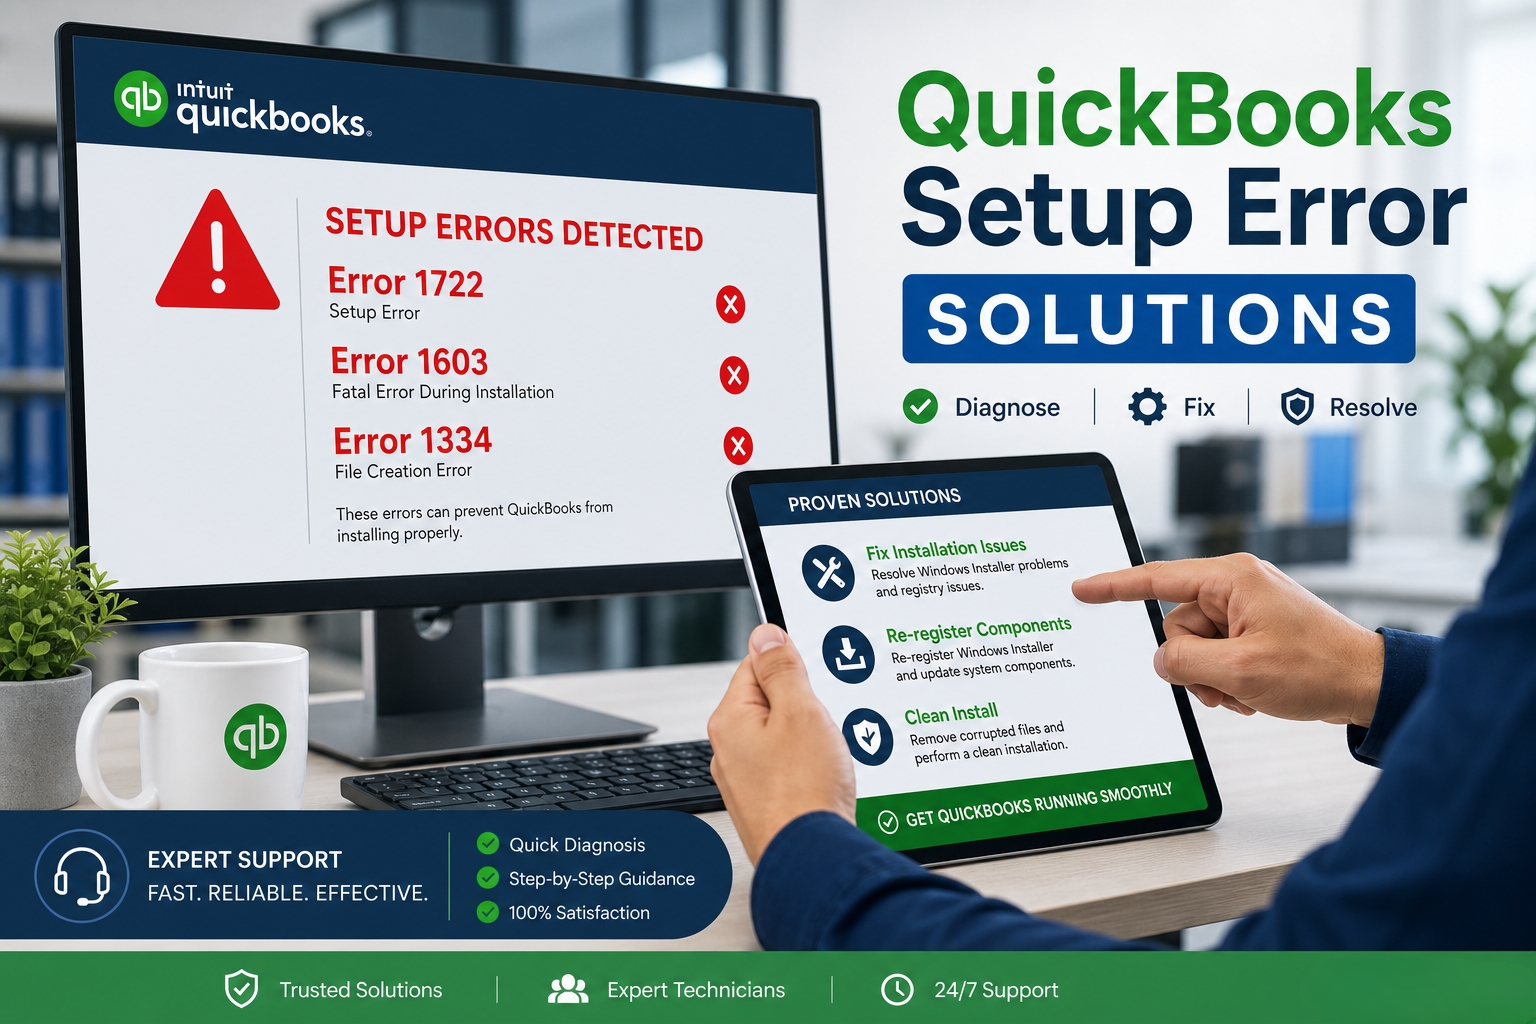
QuickBooks setup errors 1722, 1603, and 1334 stop the installation before it finishes and leave QuickBooks either partially installed or not installed at all. Each error code has a specific meaning: Error 1722 means a helper program the installer was running failed to complete its task, Error 1603 means the installation encountered a fatal internal error and stopped, and Error 1334 means a specific file the installer needed could not be written to the computer. All three can appear during the same failed installation attempt a documented case on Intuit’s own community forum showed a QuickBooks Desktop 2024 R13P update failing with three simultaneous errors (1712, 1603, and 1311), confirming that installation failures often produce multiple codes at once because each failure triggers the next.
These three errors all trace back to the same root causes: damaged Windows software components that QuickBooks’ installer depends on, antivirus programs blocking the installation files, an incomplete installer download, or leftover files from a previous QuickBooks installation conflicting with the new one. Fixing any one of these causes resolves all three errors at the same time because all three codes are generated by different symptoms of the same underlying problem. This article covers every cause and every fix, applied in the sequence that Intuit’s own community support team has confirmed resolves these errors.
The article applies to QuickBooks Desktop Pro Plus, Premier Plus, and Enterprise versions 2022 through 2025 on Windows 10 and Windows 11. The error messages may appear during a fresh installation, during a QuickBooks update patch, or during a repair installation. The fix sequence is the same in all three situations. Before applying any fix in this article, note the QuickBooks license number and product key from the original purchase email or from the Intuit account portal this information is required if the installation must be completely removed and reinstalled.
Table of Contents
What Each QuickBooks Error Code Means?
Error 1722: The Custom Action Failed
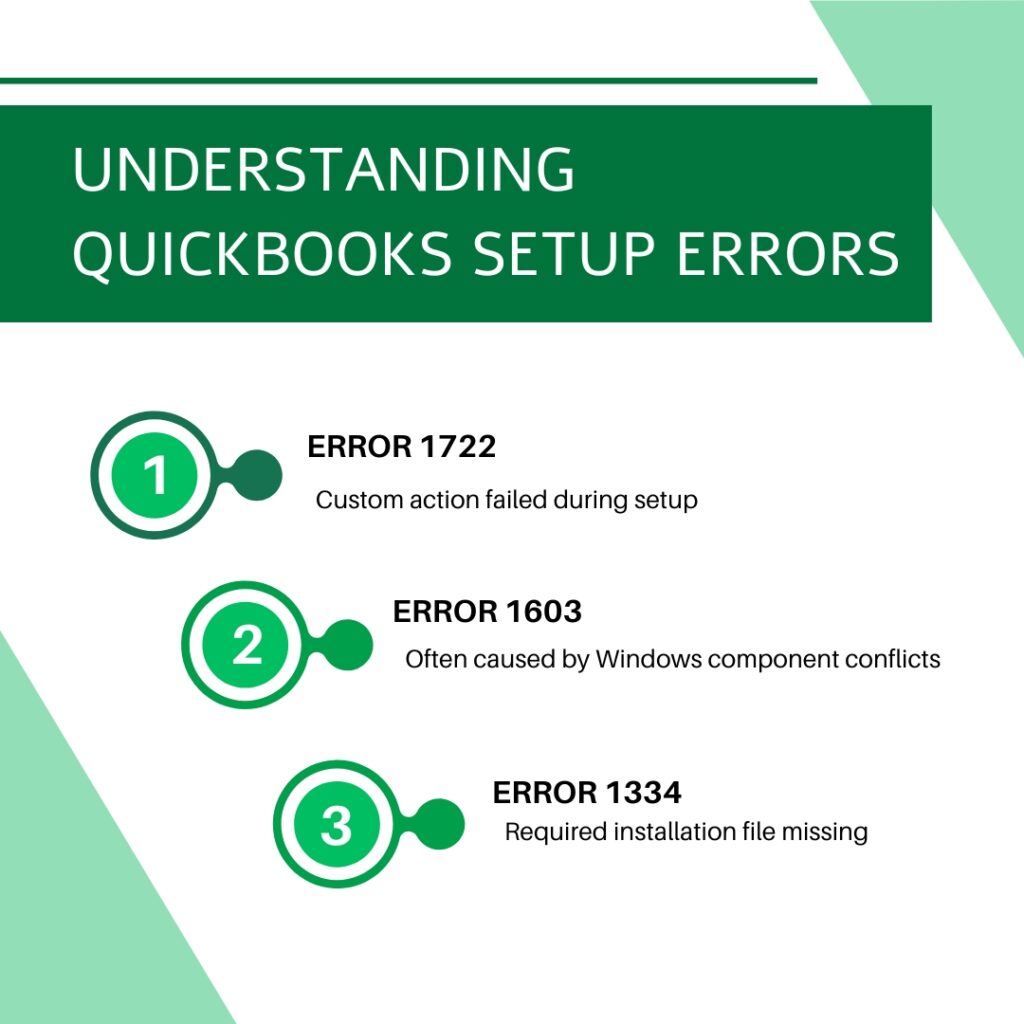
Error 1722 produces this message: “There is a problem with this Windows Installer package. A program run as part of this setup did not finish as expected. Contact your support personnel or package vendor.” The phrase “a program run as part of this setup” refers to what Windows calls a custom action. A custom action is a small helper program that the QuickBooks installer embeds inside its setup package to perform specific tasks during installation tasks like checking system requirements, registering Windows components, or installing software dependencies. The Windows Installer technology that handles all software installations on Windows allows software makers to include these helper programs inside their installer packages.
For QuickBooks, the custom action that produces Error 1722 is almost always related to .NET Framework registration or MSXML component setup. The documented error message on Intuit’s community forum included the specific detail: “Action NewCustomAction1. location: Users\mn_si\AppData\Local\Temp\FP_AX_MSI_INSTALLER.exe, command: … MSI returned 1603: Fatal error during installation.” This reveals that the custom action is a temporary executable file, a program file that the installer extracts to the Temp folder and runs. Error 1722 fires when this executable fails to run or complete. Error 1603 immediately following Error 1722 is a confirmed related pattern: the two errors share the same root cause and the fix for both is the same.
Error 1603: The Fatal Internal Installation Error
Error 1603 produces one of three documented messages: “Error Status 1603: The update installer has encountered an internal error,” “Error Status 1603: Unable to apply the patch,” or “MSI returned 1603: Fatal error during installation.” A fourth documented variant reads: “Install Error 1603: There was a problem installing Microsoft .NET Framework.” This fourth variant is the most specific; it directly identifies .NET Framework as the failed component. MSI is the abbreviation for Microsoft Installer, the Windows system that manages all software installations. “MSI returned 1603” means the Windows Installer system reported a fatal error back to the QuickBooks setup process.
Error 1603 during a QuickBooks update has a specific additional documented cause: background applications running while the update installs. QuickBooks updates run as MSI patch processes that modify existing installed files. Another application that has those files open at the same time prevents the update from modifying them, which produces Error 1603. This is why Selective Startup mode which disables all non-essential background programs before installation resolves some Error 1603 cases that the Install Diagnostic Tool alone does not fix.
Error 1334: The File Cannot Be Written
Error 1334 produces one of two documented messages: “Error 1334: Error writing to file [filename]. Verify that you have access to that directory,” or “Error 1334: The file cannot be installed. Insert the QuickBooks CD and retry.” The first message appears during a digital download installation when the installer cannot write a specific file to the computer. The second message appears in CD-based installations when the installer cannot read a file from the disc. In digital download installations on modern computers, Error 1334 means either the installer download is incomplete (the file it needs was not fully downloaded), or the destination folder where the file should be written has permission settings that prevent the installer from writing to it.
A missing or damaged QuickBooks Desktop installation file is the primary documented cause of Error 1334. Error 1334 is confirmed by Intuit’s own support documentation as a distinct, known error with its own dedicated help article Intuit’s support update errors page lists “Fix Error 1334 when installing, updating, or repairing QuickBooks Desktop” as a separate article, confirming this error is common enough to require its own fix guide.
Quick Diagnosis: Which QuickBooks Error Cause Applies to This Situation?
Match the situation to this table before applying any fix. The first matching row identifies the correct starting point.
| What Was Happening When the Error Appeared | Most Likely Root Cause | Start With This Fix |
|---|---|---|
| Error during a fresh QuickBooks installation on a new computer | Damaged Windows components (.NET Framework, MSXML, Visual C++) or incomplete installer download | Fix 1: Install Diagnostic Tool, then Fix 2 if it persists |
| Error during a QuickBooks update patch (not a fresh install) | Background applications blocking the patch from modifying existing files, or missing installer cab file (Data1.cab) | Fix 3: Selective Startup, then Fix 1 |
| Error 1722 appeared and then Error 1603 appeared immediately after | Both errors share the same root cause one custom action failed and then a second one also failed | Fix 1: Install Diagnostic Tool (may need to run twice) |
| Error 1334 appeared with a specific filename in the message | The named file was not downloaded completely or the destination folder blocks the installer | Fix 4: Clear Temp folder; re-download fresh installer |
| Error appeared on a computer that previously had QuickBooks installed | Leftover registry entries or installation folders from the old version conflicting with the new installer | Fix 5: Clean Install Tool |
| Error appeared despite the installer being downloaded successfully | Real-time antivirus blocked the custom action executable (FP_AX_MSI_INSTALLER.exe) from running | Fix 3: Selective Startup to disable antivirus during install |
| Error 1603 with message about .NET Framework specifically | .NET Framework is damaged or the wrong version is installed | Fix 2A: Manual .NET Framework repair |
| Error appeared on a computer that is part of a business network domain | Group Policy or network security settings blocking installation, or SYSTEM account lacks folder permissions | Fix 6: Folder permissions check |
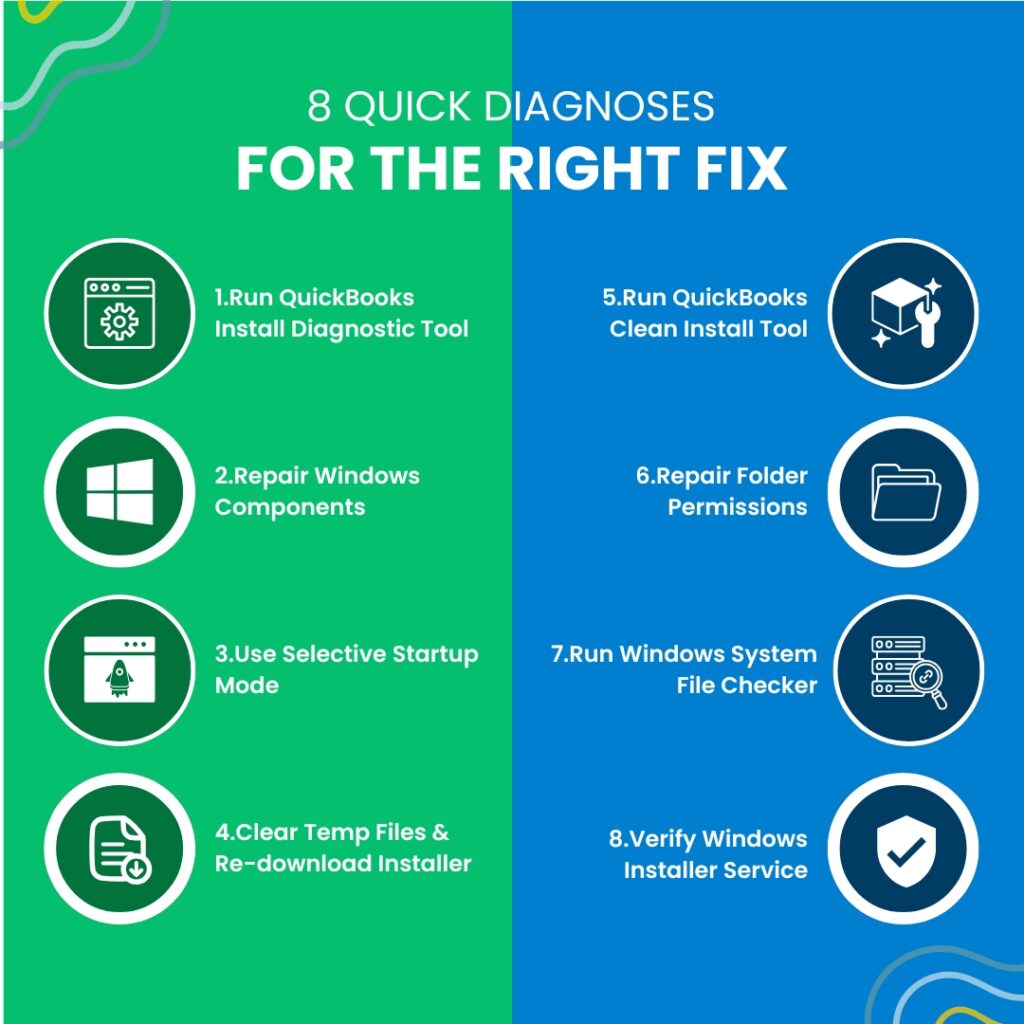
Fix 1: Run the QuickBooks Install Diagnostic Tool
What This Tool Does and Why It Is the First Step?
The QuickBooks Install Diagnostic Tool is a free program from Intuit that automatically detects and repairs the Windows components that QuickBooks needs to install: Microsoft .NET Framework (a software layer Windows provides that QuickBooks uses to run its setup screens and register program files), MSXML (Microsoft XML Core Services which the installer uses to read configuration and license data files), and Microsoft Visual C++ Redistributable files (shared program libraries that both the installer and the installed program use to operate). Errors 1722, 1603, and 1334 all occur when one or more of these components are damaged or missing. Intuit designed the Install Diagnostic Tool specifically to address these three components because they are the primary cause of QuickBooks installation failures.
Errors 1603, 1722, 1920, and 1935 are all installation errors that trace back to the same root cause: damaged Microsoft components. The Install Diagnostic Tool is the correct tool for all of them. In some cases, the tool needs to be run twice before all components are fully repaired because the first run repairs some components and the second run addresses components that could not be repaired until the first set was fixed.
Download the QuickBooks Tool Hub version 1.6.0.8 from Intuit’s official support page. Open the downloaded file (QuickBooksToolHub.exe) and follow the on-screen steps to install it. Open the QuickBooks Tool Hub. Click Installation Issues in the left menu. Click QuickBooks Install Diagnostic Tool. Allowing it to run can take up to 20 minutes because it downloads and verifies each component individually. Do not close the tool while it is running. Restart the computer when it finishes. Retry the QuickBooks installation.
If the installation fails again after one run of the Install Diagnostic Tool, run it a second time before moving to other fixes. A second run addresses components that could not be repaired on the first pass because they depended on other components being fixed first. The Intuit community forum confirmed this pattern directly: some users needed two Tool Hub runs before all components were fully repaired and the installation succeeded.
Fix 2: Manually Repair Windows Components
Fix 2A: Repair .NET Framework Through Windows Features
Microsoft .NET Framework is a software layer that Windows provides and that programs like QuickBooks use to run their setup processes and internal functions. Windows 11 requires .NET Framework 4.8, and QuickBooks’ installer also requires .NET Framework 3.5. .NET Framework 3.5 is not enabled by default on Windows 11 it must be manually turned on. A missing .NET Framework 3.5 causes the QuickBooks installer’s custom action to fail with Error 1722 because the installer tries to use a 3.5 function that is not present.
Press Windows + R, type control panel, and press Enter. Go to Programs > Turn Windows Features On or Off. Find .NET Framework 3.5 (includes .NET 2.0 and 3.0) in the list. Check the box next to it. Also confirm .NET Framework 4.8 Advanced Services is checked. Click OK. Windows downloads and installs the component. Restart the computer. To rebuild damaged .NET 4.8 files: find .NET Framework 4.8 in the list, uncheck it, restart, then check it again and restart a second time. This process forces Windows to reinstall the component from scratch.
Fix 2B: Repair Visual C++ Redistributable Files
Microsoft Visual C++ Redistributable files are shared program libraries that QuickBooks and Windows both use during installation and operation. Multiple versions of these libraries exist on most computers (2010, 2013, 2015–2022), and QuickBooks needs specific versions to be intact. A damaged Visual C++ Redistributable set causes Error 1603 or 1722 when the installer tries to register the QuickBooks program files that depend on them.
Press Windows + R, type control panel, and press Enter. Go to Programs > Programs and Features. Look for all entries named Microsoft Visual C++ Redistributable in the list. Right-click each one and select Repair. Repair each version present. After all repairs complete, restart the computer and retry the QuickBooks installation.
Fix 2C: Re-register MSXML on a 64-Bit Windows System
MSXML Microsoft XML Core Services is the Windows component QuickBooks uses to read its configuration and registration files during installation. On a 64-bit Windows system which is required for QuickBooks 2022 and later MSXML must be registered using a specific 32-bit compatibility folder called SysWOW64. SysWOW64 is a folder in Windows that handles running 32-bit programs and components on a 64-bit system. Running the MSXML registration command from the standard system folder does not work on 64-bit Windows and produces an error.
Press Windows, type cmd, right-click Command Prompt, select Run as administrator. Type: cd\windows\syswow64 and press Enter. Then type: regsvr32 MSXML6.dll and press Enter. A message reading “DllRegisterServer in MSXML6.dll succeeded” confirms successful registration. Restart the computer and retry the QuickBooks installation.
Fix 3: Install QuickBooks in Selective Startup Mode
What Selective Startup Mode Is and Why It Resolves These Errors
Selective Startup mode is a Windows state where the computer starts with only essential Microsoft services and programs running. All third-party programs, antivirus software, browser helpers, startup applications, and non-Microsoft background services are disabled. This state is required for QuickBooks installation when antivirus software is blocking the custom action executable that Error 1722 identifies. The documented custom action executable is a file named FP_AX_MSI_INSTALLER.exe that the QuickBooks installer extracts to the Windows Temp folder and runs during setup. Antivirus programs sometimes classify this as a suspicious unknown executable being run from a Temp folder and block it, causing Error 1722. Selective Startup removes the antivirus from memory entirely during installation.
Selective Startup is also the correct fix when Error 1603 is caused by background applications that are holding QuickBooks files open while the update tries to modify them. An application that locks a file prevents the installer from writing to it, which produces a fatal installation error. Selective Startup eliminates all such applications.
Press Windows + R, type msconfig, and press Enter. Click the General tab. Select Selective Startup. Uncheck Load Startup Items. Click the Services tab. Check Hide All Microsoft Services. Click Disable All. Click Apply > OK. Click Restart. After the computer restarts, right-click the QuickBooks installer and select Run as administrator. After QuickBooks installs successfully, open msconfig again, select Normal Startup, click Apply > OK, and restart the computer.
Fix 4: Clear the Temp Folder and Re-Download the Installer
Why Temp Folder Cleanup Resolves Error 1334
Error 1334 is directly caused by a missing or damaged installation file. QuickBooks’ installer extracts its files to the Windows Temp folder as the first step of installation. The Temp folder, a storage area Windows uses for files that programs need temporarily during active tasks, accumulates files from every previous application and installation. A Temp folder that contains partial files from a previous failed QuickBooks installation can conflict with a new installation attempt, causing the new installer to find the wrong version of a file it expects or to fail when it tries to overwrite a file that is locked by a leftover process.
A documented Intuit community forum case showed a QuickBooks Desktop 2024 R13P update failing with Error 1311 (a close relative of Error 1334) because the file Data1.cab the compressed package containing all QuickBooks installation files did not exist in the expected Temp folder path. The installer’s path and folder were correct, but the file itself was absent because a previous failed download was incomplete. The documented path was: C:\Users\[username]\AppData\Local\Temp\QbS0BC533F1\qbooks\Data1.cab. Clearing the Temp folder and downloading the installer fresh resolved the missing file problem entirely.
Press Windows + R, type %temp%, and press Enter. Select all files in the Temp folder (Ctrl + A). Delete them. Skip any files that cannot be deleted because they are in use by clicking Skip. Press Windows + R again, type temp, and press Enter. Delete all files in this second Temp folder as well. Download the QuickBooks installer fresh from Intuit’s official website do not reuse a previously downloaded installer file. Save the installer directly to the Desktop (not inside a nested folder). Right-click the installer file and select Run as administrator. Retry the installation.
For Error 1334 specifically during a CD-based installation, the error occurs because a specific file on the CD is scratched, unreadable, or the CD drive is reading at a speed that causes read errors. Copying the entire CD contents to a folder on the desktop and running the installer from that local copy rather than directly from the CD resolves read errors caused by disc surface damage or drive speed issues.
Fix 5: Use the Clean Install Tool to Remove All Previous QuickBooks Files
When Previous QuickBooks Installations Cause Errors 1722 and 1603
Orphaned registry entries from a previous QuickBooks installation conflict with the new installer’s custom action registration process. The Windows registry is a database where Windows stores configuration information for all installed programs. When a QuickBooks installation fails partway through, or when QuickBooks is uninstalled through the standard Control Panel process, registry entries from the old installation remain. These leftover entries conflict with the new installation when the installer tries to write to a registry key that already exists with incompatible data from the previous version causing the custom action to fail and producing Error 1722.
Intuit’s Clean Install Tool removes QuickBooks more completely than the standard Windows uninstall, specifically targeting the registry entries and shared component registrations that a normal uninstall leaves behind. This tool is the correct fix when Error 1722 or 1603 appears on a computer that previously had any version of QuickBooks installed, or when the errors appeared during a repair installation that should have fixed existing files rather than installing new ones.
Record the QuickBooks license number and product key before starting. Open Control Panel > Programs > Programs and Features. Right-click QuickBooks and select Uninstall. After the uninstall completes, download the QuickBooks Clean Install Tool from Intuit’s official support page. Run the Clean Install Tool it finds and removes the files and registry entries that the standard uninstall left behind. Restart the computer. Download a fresh QuickBooks installer from Intuit’s official website. Right-click the installer and select Run as administrator. Follow the installation prompts.
Fix 6: Repair Folder Permissions for the Intuit Installation Directory
Why Folder Permissions Cause Error 1603 and Error 1334?
The Windows Installer writes QuickBooks program files to specific folders during installation: C:\Program Files\Intuit\QuickBooks [Year] and C:\ProgramData\Intuit. Both folders must grant the SYSTEM account which is how Windows runs background installation processes and the current user account Full Control permission. Full Control permission means the account can read, write, modify, and delete files in the folder. A folder that grants only Read permission blocks the installer from writing files, producing Error 1334 because the file write is blocked. A folder that has no permission entry for the SYSTEM account produces Error 1603 because the Windows Installer service runs as the SYSTEM account and cannot write to a folder it has no access to.
Intuit’s own installation error documentation confirms this directly: Error 1303 (a related installation error) “can occur if either the SYSTEM group or the Everyone group does not have Full Control privileges for the directory mentioned in the error.” The fix for Error 1303 applies equally to permission-caused Error 1334: manually modify permissions to Full Control for the SYSTEM and Everyone groups on the affected folder.
Open File Explorer. Navigate to C:\Program Files\Intuit. Right-click the Intuit folder and select Properties. Click the Security tab. Click Edit to modify permissions. If SYSTEM is not in the list, click Add, type SYSTEM, and click OK. Select SYSTEM in the list and check Full Control under the Allow column. Repeat for the Everyone group if it is present. Click Apply > OK. Repeat this process for C:\ProgramData\Intuit. Retry the QuickBooks installation.
Fix 7: Run the Windows System File Checker
What the System File Checker Does?
The Windows System File Checker is a built-in Windows tool that scans all protected Windows system files and replaces any that are damaged or missing with a correct version. The command to run it is sfc /scannow, typed in an administrator Command Prompt. System files are the core files Windows needs to operate; they include the Windows Installer service files, the .NET Framework base files, and other foundational components. A system file that is damaged by a disk error, a virus, or an interrupted Windows update can cause QuickBooks installation to fail with Error 1722 or 1603 even after the Install Diagnostic Tool has repaired the QuickBooks-specific components.
The System File Checker scan can take 15 to 30 minutes. After it finishes, it reports one of three outcomes: no integrity violations were found (system files are clean), corruption was found and repaired (the fix worked), or corruption was found but could not be repaired (deeper Windows repair is needed). A successful repair by the System File Checker restores the Windows components that the QuickBooks installer needs and resolves Error 1722 or 1603 that persisted through all previous fixes.
Press Windows, type cmd, right-click Command Prompt, and select Run as administrator. In the Command Prompt window, type: sfc /scannow and press Enter. Allow the scan to complete fully and do not close the Command Prompt window during the scan. After the scan finishes, read the result message. Restart the computer if the scan reports any repaired files. Retry the QuickBooks installation.
Fix 8: Verify the Windows Installer Service Is Running
Why Does the Windows Installer Service Affect All Three Errors?
The Windows Installer service is the Windows background program that manages all software installations, updates, and removals on the computer. Every time any software installs including QuickBooks the Windows Installer service handles the actual file-writing process. The QuickBooks installer, its custom actions, and all its file writes all go through this service. A Windows Installer service that has stopped, is set to a disabled startup type, or is running in a restricted mode blocks all installation activity and produces Errors 1722, 1603, and 1334 simultaneously because no part of the installation can succeed without it.
Press Windows + R, type services.msc, and press Enter. The Windows Services panel opens. Scroll down to find Windows Installer in the list. Right-click it and select Properties. Set Startup Type to Manual. Under Service Status, click Start to start the service if it is not already running. Click Apply > OK. Retry the QuickBooks installation.
A Windows Installer service that shows “Disabled” as its current status and cannot be started from the Services panel has been restricted by a Group Policy rule or a Windows component failure that requires Microsoft’s own repair tools. Intuit’s own installation error documentation states directly for this situation: “To fix this, it’s best to reach out to an IT expert or a specialist from Microsoft.” A disabled Windows Installer service is outside the scope of QuickBooks troubleshooting.
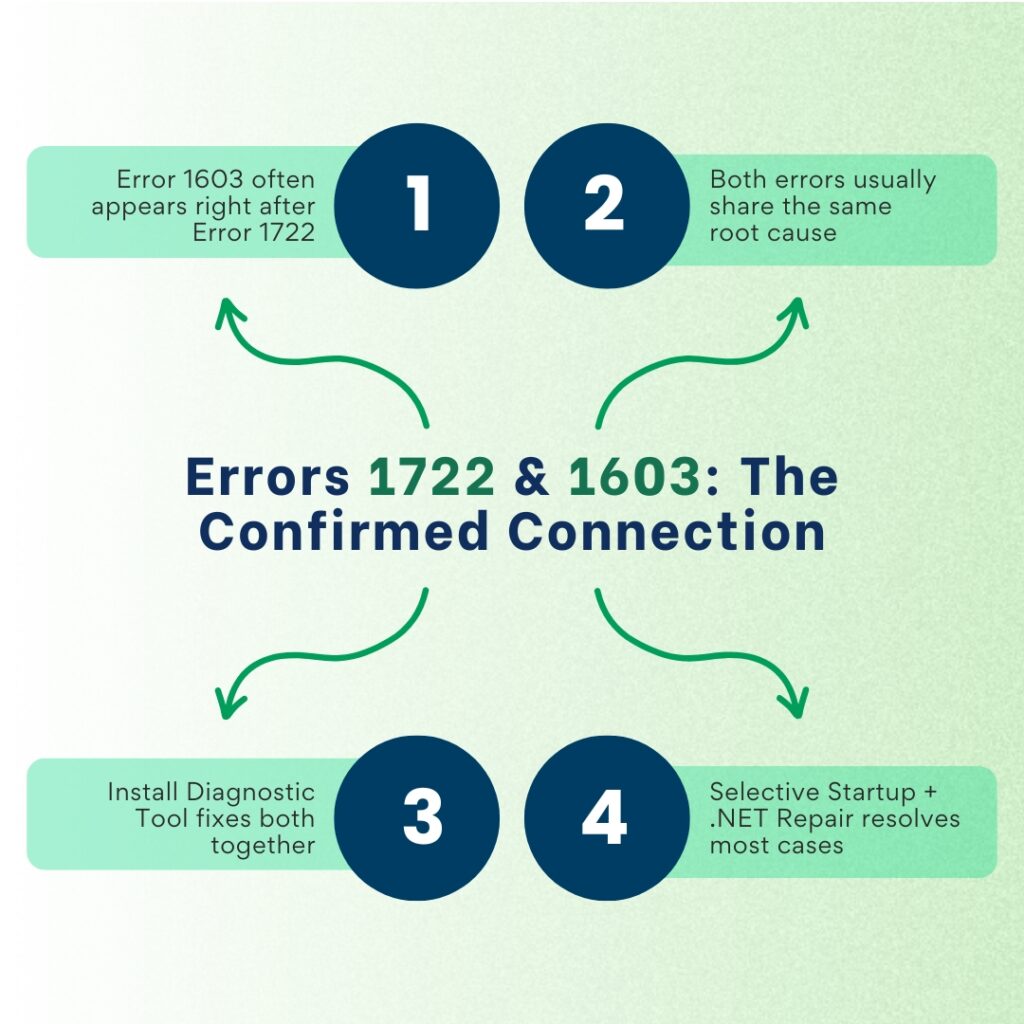
QuickBooks Errors 1722 and 1603 Combined
Receiving Error 1603 immediately after Error 1722 disappears is a documented and confirmed pattern, not two separate problems. The Install Diagnostic Tool, Selective Startup mode, the Clean Install Tool, and the manual .NET repair are the right tools for both errors together. In cases where both errors persist after two Install Diagnostic Tool runs, proceed with the manual .NET Framework repair (Fix 2A) and then Selective Startup installation (Fix 3). The combined application of these two steps resolves the overwhelming majority of 1722-plus-1603 double-error situations.
A documented case on Intuit’s community forum confirmed that a QuickBooks Enterprise Accountants Edition 2022 user encountered Error 1722 with Error 1603 on every installation attempt despite being an experienced installer who had run QuickBooks without issues for years. Microsoft’s support team reviewed the case and confirmed it was a QuickBooks-side issue with the 2022 version specifically. Intuit’s community moderator confirmed that running the Install Diagnostic Tool and performing the installation in Selective Startup mode together resolves the 2022 version’s specific custom action failure.
All QuickBooks Fixes at a Glance
| Fix | Addresses | Time to Apply | When to Use It |
|---|---|---|---|
| Fix 1: Install Diagnostic Tool | .NET Framework, MSXML, Visual C++ damage | 15–20 min | First fix for all three errors; run twice if needed |
| Fix 2A: Repair .NET Framework (Windows Features) | Missing .NET 3.5 or damaged .NET 4.8 | 10 min | When Fix 1 did not resolve it or error message names .NET |
| Fix 2B: Repair Visual C++ Redistributables | Damaged shared program libraries | 10 min | After Fix 2A, before moving to Selective Startup |
| Fix 2C: Re-register MSXML via Command Prompt | Unregistered MSXML component on 64-bit system | 5 min | When error 1722 involves XML or registration in its detail text |
| Fix 3: Selective Startup installation | Antivirus blocking FP_AX_MSI_INSTALLER.exe; background apps blocking file writes | 15 min | When Fix 1 and Fix 2 did not resolve it |
| Fix 4: Clear Temp folder + fresh installer download | Incomplete download or leftover installer files from failed attempt | 10 min | For Error 1334 specifically; also good practice before any install |
| Fix 5: Clean Install Tool | Orphaned registry entries from previous QuickBooks installation | 30–60 min | When computer previously had QuickBooks installed |
| Fix 6: Repair folder permissions | SYSTEM or user account cannot write to Intuit installation folders | 10 min | When error message names a specific folder in its text |
| Fix 7: Windows System File Checker (sfc /scannow) | Damaged core Windows system files | 20–30 min | After all other fixes have been applied without success |
| Fix 8: Check Windows Installer service | Installer service stopped or disabled | 5 min | When all other fixes fail or the system shows no installer activity |
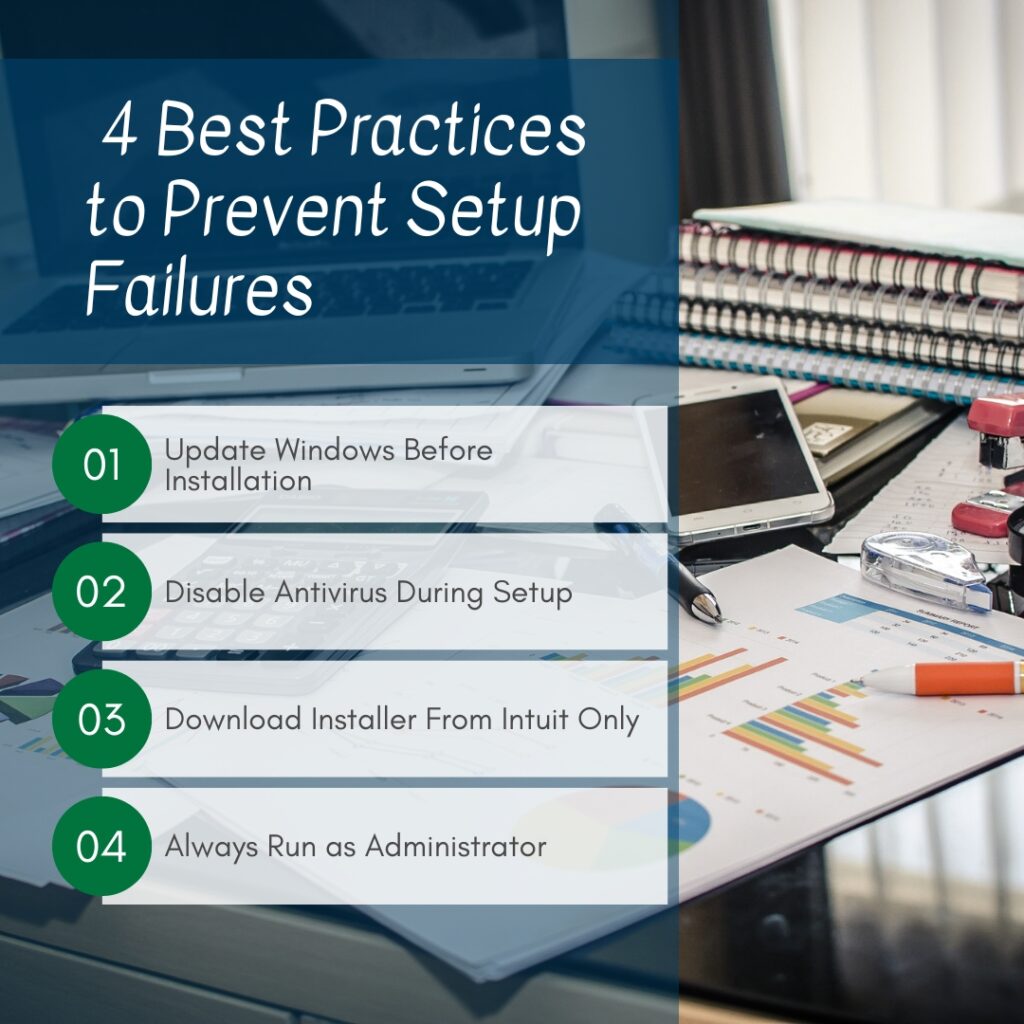
QuickBooks Error Prevention: Stop These Errors From Recurring
- Update Windows Before Installing or Updating QuickBooks
Windows updates fix bugs in the Windows Installer service, .NET Framework, MSXML, and other components that QuickBooks installation depends on. Installing QuickBooks or a QuickBooks update on a computer that has pending Windows updates means the installation runs against older, potentially buggy versions of these components. Checking for and installing all available Windows updates through Settings > Windows Update > Check for Updates before every QuickBooks installation or update eliminates the component-compatibility gap that errors 1722, 1603, and 1334 exploit.
- Temporarily Disable Antivirus Real-Time Protection During Installation
Antivirus real-time protection, the continuous background process that scans every file being written to the computer blocks the QuickBooks custom action executable (FP_AX_MSI_INSTALLER.exe) because it appears as an unknown program being run from the Temp folder. Disabling real-time protection through Windows Security > Virus & Threat Protection > Manage Settings > Real-Time Protection > Off before starting any QuickBooks installation or update allows the custom action executable to run without interference. Re-enable real-time protection immediately after the installation completes.
- Always Download the Installer Fresh From Intuit’s Official Site
An incomplete or corrupted installer file is the direct cause of Error 1334. A QuickBooks installer file is 400 to 600 MB and must download completely before it is run. Downloading from any source other than Intuit’s official website risks receiving a modified or incomplete file. Saving the downloaded installer directly to the Desktop not inside nested folders keeps the file path short and avoids the Windows file path length limit of 260 characters, which can cause installer read failures when the installer extracts its files from a deeply nested location.
- Run the Installation as Administrator Every Time
Right-clicking the QuickBooks installer and selecting Run as Administrator ensures the installer has the full system access it needs to write files to protected Windows folders and update registry entries. A standard user account without administrator elevation cannot write to C:\Program Files or modify HKEY_LOCAL_MACHINE registry keys, both of which QuickBooks installation requires. Running as Administrator bypasses the User Account Control (UAC) prompts that restrict these writes and gives the installer uninterrupted access to all the locations it needs.
Conclusion
Errors 1722, 1603, and 1334 all stem from the same small set of root causes: damaged Windows components (.NET Framework, MSXML, Visual C++), antivirus programs blocking the installer’s custom action executable, incomplete installer downloads, leftover files from previous QuickBooks installations, and insufficient folder permissions. The QuickBooks Install Diagnostic Tool from Intuit addresses the Windows component root cause automatically and is the correct first step for all three errors. When the Diagnostic Tool is not sufficient, Selective Startup mode eliminates antivirus interference, and the Clean Install Tool removes leftover installation conflicts.
Errors 1722 and 1603 appearing together in the same failed installation confirm they share a root cause and respond to the same fix. Running the Install Diagnostic Tool twice if the first run does not fully resolve the error is the documented approach when both codes appear. The manual component repairs (Fix 2A, 2B, 2C) handle cases where the Diagnostic Tool cannot complete its repairs because of a Windows environment issue the tool cannot access.
Intuit’s QuickBooks Tool Hub version 1.6.0.8 free from Intuit’s official support page contains the Install Diagnostic Tool that handles the component repair step, Quick Fix My Program for background process conflicts, and guidance to the Clean Install Tool for severe installation damage. Keeping the Tool Hub downloaded and available means the primary repair tool is ready to run the moment any of these three installation errors appears.
Frequently Asked Questions
1. The Install Diagnostic Tool ran for 20 minutes and the errors still appear. Is this a QuickBooks problem or a Windows problem?
An Install Diagnostic Tool run that does not resolve Errors 1722 or 1603 indicates either that the Windows environment has a problem the tool cannot reach (such as a damaged Windows Installer service or a corrupted system file), or that antivirus software is blocking the QuickBooks custom action executable during installation.
The next step is to run the Windows System File Checker (sfc /scannow in an administrator Command Prompt) to check whether core Windows system files are damaged because the Diagnostic Tool repairs QuickBooks-specific components but not the Windows system files that those components depend on.
If the System File Checker reports corruption it cannot repair, a Windows 11 in-place upgrade (which reinstalls Windows over itself without deleting data) resolves deeply damaged Windows environments that no individual repair tool can address.
2. Error 1722 appeared during a QuickBooks Enterprise 2022 installation on a computer that runs other software without installation errors. Is the 2022 version specifically affected?
A documented case on Intuit’s community forum confirmed this exact scenario: a user experienced Error 1722 with the 2022 version while having installed QuickBooks without issues for years on previous versions. Microsoft’s support team reviewed the case and confirmed the issue was with the 2022 installation package’s specific custom action.
Intuit’s community moderator confirmed that running the Install Diagnostic Tool and performing the installation in Selective Startup mode together resolves the issue. For the 2022 version specifically, the Selective Startup approach is more reliable than the Diagnostic Tool alone because the 2022 custom action is more sensitive to background application interference than earlier versions.
3. Error 1334 names a specific file in its message. Does fixing that specific file resolve the error?
The file named in Error 1334’s message is the specific file the installer could not write at the moment the error appeared. Fixing only that one file does not resolve the error because the installer will encounter the same block on the next file it tries to write.
The root cause either an incomplete download, a permissions block on the destination folder, or leftover installer files from a previous attempt will produce Error 1334 again for the next file in the sequence. Clearing the Temp folder, re-downloading the installer fresh from Intuit’s official site, and verifying that the Intuit installation folder has Full Control permissions for the SYSTEM account resolves the root cause and prevents Error 1334 from recurring on subsequent files during the same installation.
4. The installation succeeds after using Selective Startup, but the error returns the next time QuickBooks is updated. Why does the fix need to be repeated?
An error that returns specifically during QuickBooks updates rather than during the original installation means the antivirus’ real-time protection is blocking the update’s custom action executable every time an update runs, not just during the initial install.
The permanent fix for this pattern is adding the QuickBooks installation folder (C:\Program Files\Intuit\QuickBooks [Year]) and the Windows Temp folder path used by QuickBooks updates to the antivirus exclusion list.
This prevents the antivirus from scanning and blocking the custom action executable during every future update. Selectively disabling real-time protection before each update and re-enabling it after is a workable temporary approach, but adding the exclusion is the one-time permanent solution.
5. After all fixes were applied, the installation succeeded but QuickBooks shows Error 1904 on first launch. Are these errors related?
Error 1904 which reads “[file path/name/extension] failed to register” appearing after a successful installation means one specific QuickBooks DLL file (a shared program library that multiple programs use) could not write itself to the Windows registry during the final installation steps. DLL files must be registered in the Windows registry, a database where Windows stores configuration information for installed programs before QuickBooks can use them.
Error 1904 after installation is caused by a restrictive User Account Control (UAC) setting that blocked the registry write for that specific file. Running the QuickBooks installation again from the built-in Windows Administrator account enabled by typing net user administrator /active:yes in an administrator Command Prompt gives the installer unrestricted registry access and resolves Error 1904. Disable the built-in Administrator account immediately after installation by typing net user administrator /active:no.
Anusmita is a seasoned content writer who brings perspective to words. As a writer, she enriches her work with a journalistic aptitude, utilising her training in Mass Communication and Journalism. She loves to travel and explore, which imparts a greater sense of understanding, maturity, and experience that are reflected in her content.
Beyond her professional work, Anusmita enjoys painting, singing, dancing, and spending time planting. She is also a self-proclaimed foodie who loves exploring different cuisines, an interest that further adds to her curiosity and perspective as a writer.
Leave a Reply