QuickBooks Desktop’s Switch to Multi-User Mode option lets every member of the accounting team open and work on the same company file at the same time from different computers. Not being able to switch to multi-user mode stops every staff member except one from accessing the company file — payroll, invoicing, accounts payable, and every other accounting task that requires QuickBooks comes to a halt.
The “Switch to Multi-User Mode” option lives in the File menu in QuickBooks. Seven distinct problems can block this switch: not being logged in as the QuickBooks admin, stopped background services on the server, a firewall blocking the network ports QuickBooks uses, a ghost session left by a crashed QuickBooks window, hosting turned off at the server, a damaged network configuration file, or incorrect Windows folder permissions. Each problem has a direct fix, and knowing which one applies saves significant time.
This problem affects QuickBooks Desktop Pro, Premier, and Enterprise on all supported versions. It appears after Windows updates, after QuickBooks upgrades, after power outages, and after adding new computers to the office network — four situations that all change the underlying settings QuickBooks needs to run in multi-user mode.
This guide covers every cause and every fix with exact steps, including the precise Windows settings, service names, file locations, and permission account names that differ by QuickBooks version.
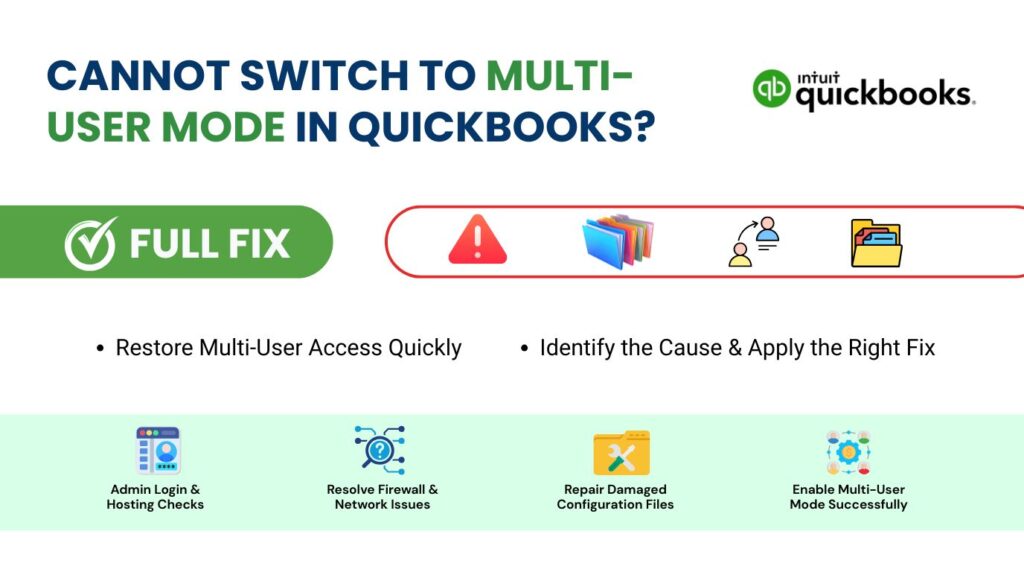
Table of Contents
Find Your Situation Before Starting
Match what you are experiencing right now to the table below. Each row identifies a specific scenario, the cause behind it, and the first fix to apply — so you go directly to the right solution without working through every step in the guide.
| What You Are Experiencing | Most Likely Cause | Start Here |
| “Switch to Multi-User Mode” option is missing from the File menu | You are not logged in as the QuickBooks admin, or the company file is not open | Fix 1 – Log in as admin and open the file before switching |
| Option is visible but clicking it produces an H202 or H505 error | QuickBooks services are stopped on the server, or firewall is blocking ports | Fix 2 – Restart QuickBooks services; Fix 3 – Add firewall rules |
| Error says another user is in single-user mode, but no one else is logged in | A previous QuickBooks session did not close properly and left a ghost session active | Fix 4 – Close all QuickBooks sessions and restart the server |
| QuickBooks switches to multi-user mode but workstations cannot connect | Hosting is off on the server, or the .ND file is damaged | Fix 5 – Turn on hosting at server; Fix 6 – Repair or delete the .ND file |
| Multi-user mode worked before but stopped after a Windows update | Windows update reset QuickBooks services to Manual startup | Fix 2 – Restart services and set them back to Automatic |
| Workstations get error 6190–816 when trying to open the company file | Someone has the file open in single-user mode on another computer | Fix 4 – Identify and close the single-user session, then switch the host to multi-user |
How Multi-User Mode Works — and Why It Fails?
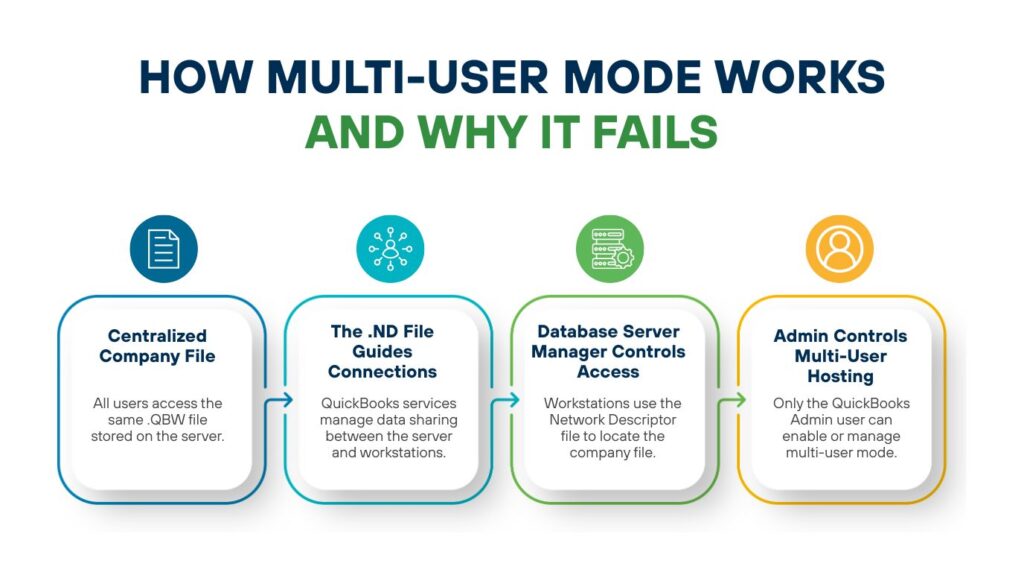
QuickBooks Desktop stores all of a business’s financial data in a single company file with the extension .QBW. In a multi-user setup, this file lives on one central computer called the server or host computer. Every other computer in the office — called a workstation — connects to the server over the local office network to open and edit the same company file. Multi-user mode is the QuickBooks setting that activates this shared access. Switching to multi-user mode on the server tells QuickBooks to allow network connections from workstations.
The switch works through a program called the QuickBooks Database Server Manager. This program runs two background services on the server: QuickBooksDBXX (where XX is a number that matches the QuickBooks version — QuickBooks 2024 uses QuickBooksDB34) and QBCFMonitorService. QuickBooksDBXX is the database engine that handles every read and write request from every connected workstation. QBCFMonitorService monitors each workstation’s connection and keeps it stable. Both services must be running at all times for multi-user mode to work.
The Database Server Manager also creates a small helper file called the .ND file (Network Descriptor file) alongside the company file. The .ND file stores the server’s name and exact network address. Every workstation reads this file when it opens QuickBooks to find where the company file is located on the network. A missing or corrupted .ND file makes the switch to multi-user mode appear to succeed on the server while every workstation fails to connect because it cannot find the file.
The “Switch to Multi-User Mode” option appears in the File menu only for the QuickBooks admin user. Regular QuickBooks users — employees added under the Company > Set Up Users and Passwords menu — do not see this option. The admin user is the person who initially set up the QuickBooks company file and has access to all features, including hosting controls. Logging in as a regular user and finding the option missing is not an error — it is a permissions setting working as designed.
Root Causes at a Glance
The table below summarises every documented cause of the switch failing, what breaks in each case, and which fix section to jump to. Use it as a reference point before and after applying fixes.
| Root Cause | What Breaks | Fix to Apply |
| Not logged in as admin | The “Switch to Multi-User Mode” option does not appear in the File menu | Fix 1 |
| QuickBooks services stopped | Workstations produce H202 or H505 the instant multi-user mode is turned on | Fix 2 |
| Firewall blocking ports | Workstations cannot reach the server even though services are running | Fix 3 |
| Ghost session from a crashed QuickBooks window | QuickBooks says a user is in single-user mode even when no one else is logged in | Fix 4 |
| Hosting turned off on the server | Workstations cannot connect to the company file even when multi-user mode is active | Fix 5 |
| Damaged .ND file | Workstations are sent to the wrong server address and cannot find the file | Fix 6 |
| Wrong folder permissions | Database Server Manager cannot open the company file to serve it to workstations | Fix 7 |
How to Fix “Cannot Switch to Multi-User Mode” – Step by Step
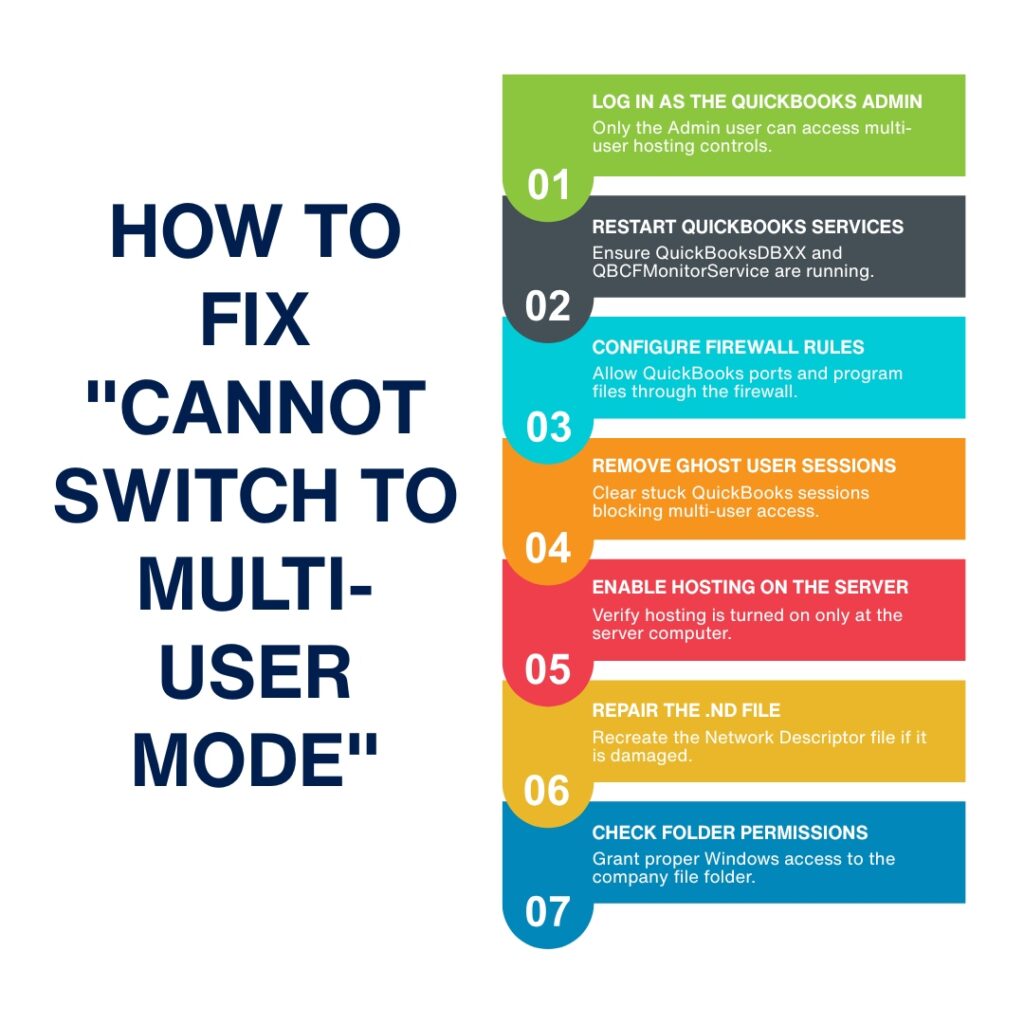
Fix 1: Confirm You Are Logged In as the QuickBooks Admin
The “Switch to Multi-User Mode” option is visible in the File menu only to the QuickBooks admin user. A non-admin QuickBooks user — a staff member with a restricted QuickBooks account — does not see this option because Intuit restricts hosting controls to the admin for security reasons. The admin is the person with the master QuickBooks login, not just a Windows administrator account. These are two separate things: a Windows admin is someone with full control of the Windows computer, while a QuickBooks admin is someone with full control of the QuickBooks company file.
Close the company file and log out of QuickBooks on the machine where the switch is being attempted. Go to File > Open or Restore Company and select the company file. At the QuickBooks login screen, enter the admin username and password — the admin username is typically “Admin” unless it was changed during the initial QuickBooks setup. After logging in as admin, go to File in the top menu and check whether Switch to Multi-User Mode now appears. If it does, click it. If it still does not appear, the company file may already be open in multi-user mode — the option will show as Switch to Single-User Mode in that case, which means multi-user mode is already active.
The admin password can also be reset if it has been forgotten. According to Intuit’s support documentation, a QuickBooks admin password reset requires contacting Intuit directly, as QuickBooks does not provide a self-service reset option for the admin account for security reasons. Regular QuickBooks user passwords can be reset by the admin from the Company > Set Up Users and Passwords menu.
Fix 2: Restart the QuickBooks Background Services on the Server
The two QuickBooks background services — QuickBooksDBXX and QBCFMonitorService — must be running on the server for multi-user mode to work. Windows frequently stops these services automatically after a reboot or a Windows update. A stopped service produces H202 or H505 errors on every workstation the moment multi-user mode is turned on at the server, even though the switch itself appears to succeed. The services restart step must be done on the server computer, not on a workstation.
On the server, open the Windows Start menu, type Run in the search bar, open the Run window, type services.msc, and press Enter. The complete Windows Services list opens. Scroll to QuickBooksDBXX — the XX matches the QuickBooks version number plus 10 (QuickBooks 2024 = QuickBooksDB34, QuickBooks 2025 = QuickBooksDB35, QuickBooks 2026 = QuickBooksDB36). Double-click the service to open its settings. Set Startup Type to Automatic so the service restarts automatically after every future server reboot. Check Service Status — it must show Running. Click Start if the status shows Stopped. Click the Recovery tab, set all three dropdowns (First failure, Second failure, Subsequent failures) to Restart the Service, then click Apply and OK.
Repeat every step above for QBCFMonitorService. The Recovery tab configuration is the most important part of this step — it instructs Windows to restart each service automatically if it stops unexpectedly, which prevents the same problem from repeating after the next Windows update or server restart. After both services show Running status, go to each workstation and test multi-user mode by going to File > Switch to Multi-User Mode on a workstation that was connected to the server.
Fix 3: Add QuickBooks Firewall Rules on the Server
The Windows Firewall on the server blocks all incoming network traffic on ports that do not have an approved rule. QuickBooks workstations send connection requests to the server over specific TCP ports — TCP stands for Transmission Control Protocol, the standard method computers use to exchange data reliably over a network. A firewall with no QuickBooks exception rules blocks every connection attempt from every workstation, and multi-user mode fails silently. The switch at the server succeeds, but no workstation can connect to it.
On the server, open Windows Defender Firewall with Advanced Security from the Windows Start menu. Click Inbound Rules, then New Rule. Select Port, click Next, confirm TCP is selected, and enter the port numbers for the QuickBooks version in use. According to Intuit’s published firewall documentation: QuickBooks 2021 uses 8019 and 55363–55367; QuickBooks 2022 uses 8019 and 55368–55372; QuickBooks 2023 uses 8019 and 55373–55377; QuickBooks 2024 uses 8019 and 55378–55382. For QuickBooks 2019 and later, also open the Database Server Manager on the server, click the Port Monitor tab, note the dynamic port number shown for your version, and add that number to the port list.
Select Allow the Connection, click Next twice, check all three profiles (Domain, Private, Public), name the rule QuickBooks Ports [Year], and click Finish. Immediately repeat the entire process under Outbound Rules. Both inbound and outbound rules are required — a one-directional rule still blocks multi-user connections. Also add program exceptions for QBDBMgrN.exe, QBCFMonitorService.exe, and QBW32.exe using Program rules in both Inbound and Outbound Rules. After all rules are added, test multi-user mode on each workstation.
Fix 4: Clear the Ghost Session Blocking the Switch
QuickBooks tracks which users are currently logged in to the company file and in what mode. A ghost session occurs when QuickBooks closes unexpectedly — due to a crash, a forced shutdown, or a network drop — without properly clearing that user’s active session record. The next time any user tries to switch to multi-user mode, QuickBooks reads the session record, sees that the ghost session is in single-user mode, and blocks the switch with the message: “You cannot switch to Multi-User Mode because someone else is using the file in Single-User Mode.” This message appears even when no other person is actually working in QuickBooks.
According to Intuit’s community support documentation, the correct fix for a ghost session is to close QuickBooks on every computer in the office — server and all workstations — and then restart the server. Restarting the server clears all active session records, including ghost sessions from crashed windows. After the server restarts, the QuickBooks Database Server Manager restarts automatically (if the services are set to Automatic as described in Fix 2), and the session record is cleared.
After the server restarts, open QuickBooks on the server first. Go to File > Open or Restore Company and open the company file. Go to File > Switch to Multi-User Mode. The switch should succeed without any “someone else is using the file” message. If the message appears again after a clean server restart, use the Chat With a Coworker feature inside QuickBooks (Company > Chat With a Coworker) to see a list of currently active sessions. This list shows which specific user account has an active session — locate that user and have them close and reopen QuickBooks to clear the session properly.
Fix 5: Turn On Hosting at the Server Computer
Hosting is the QuickBooks setting that designates one computer as the machine responsible for serving the company file to all workstations. Only the server should have hosting turned on. The hosting setting is found in the File menu under Utilities, and it appears as either “Host Multi-User Access” (hosting is off — click to turn it on) or “Stop Hosting Multi-User Access” (hosting is on — clicking this turns it off). Switching to multi-user mode on a server that does not have hosting active sends the multi-user connection request into an empty channel — no program on the server is listening for workstation connections.
On the server computer, open QuickBooks without opening the company file. Go to File > Utilities. If the option shows Host Multi-User Access, hosting is currently off — click it to turn it on and click Yes to confirm. If it shows Stop Hosting Multi-User Access, hosting is already on and this step is not needed. After turning hosting on at the server, open the company file and go to File > Switch to Multi-User Mode.
Also check every workstation and confirm hosting is turned off on all of them. On each workstation, open QuickBooks without opening the company file, go to File > Utilities, and look for Stop Hosting Multi-User Access. If that option appears on a workstation, click it to turn hosting off — only the server should show hosting as active. A workstation with hosting turned on competes with the server for control of the file and blocks other workstations from connecting. According to Intuit’s support documentation, H101, H303, and H505 errors all result from workstations that incorrectly have hosting turned on.
Fix 6: Repair or Delete the .ND File
The .ND file (Network Descriptor file) is a small file that QuickBooks creates automatically in the same folder as the company file. Its only job is to store the server’s computer name and network address so that workstations know exactly where to connect when they open QuickBooks in multi-user mode. A corrupted or outdated .ND file causes workstations to connect to the wrong address or to no address at all — the switch to multi-user mode at the server succeeds, but no workstation can open the file. Power outages, abrupt server shutdowns, and failed QuickBooks updates all corrupt the .ND file.
Delete the .ND file to force QuickBooks to create a fresh, correct one. Navigate to the folder containing the company file — the default location is C:\Users\Public\Documents\Intuit\QuickBooks\Company Files. Find the file with the same name as the company file but with the extension .ND — for example, if the company file is BusinessName.QBW, delete BusinessName.ND. This action is safe because the .ND file contains only network configuration data, not accounting records. The accounting data is in the .QBW file, which is not touched.
After deleting the .ND file, open the QuickBooks Database Server Manager on the server. Go to the Scan Folders tab, confirm the company file folder is listed, and click Scan Now. The Database Server Manager creates a new, accurate .ND file within seconds of the scan. After the scan completes, open QuickBooks on the server, switch to multi-user mode, and test the connection from each workstation. Running QuickBooks File Doctor from the Tool Hub (Company File Issues > Run QuickBooks File Doctor > Check your Network) also repairs .ND file corruption automatically and is the recommended first step before manual deletion.
Fix 7: Set the Correct Windows Folder Permissions for the Company File
The QuickBooks Database Server Manager runs on the server under a dedicated Windows service account called QBDataServiceUserXX, where XX is a number that matches the QuickBooks version. According to Intuit’s published permissions documentation, each QuickBooks version has its own service account number. This service account needs Full Control permission over the folder where the company file is stored. Without Full Control, the Database Server Manager cannot open the company file, and multi-user mode fails even when services are running and the firewall is open.
The service account name differs by QuickBooks version. Use the table below to find the correct account name for the version installed on the server.
| QuickBooks Version | Service Account Name to Use in Windows Permissions |
| QuickBooks Desktop 2024 | QBDataServiceUser34 |
| QuickBooks Desktop 2023 | QBDataServiceUser33 |
| QuickBooks Desktop 2022 | QBDataServiceUser32 |
| QuickBooks Desktop 2021 | QBDataServiceUser31 |
| QuickBooks Desktop 2020 | QBDataServiceUser30 |
| QuickBooks Desktop 2019 | QBDataServiceUser29 |
| QuickBooks Desktop 2018 | QBDataServiceUser28 |
On the server, open File Explorer and go to the company file folder. The default location is C:\Users\Public\Documents\Intuit\QuickBooks\Company Files. Right-click the folder and select Properties. Click the Security tab. Click Edit. Look for QBDataServiceUserXX in the list — use the exact name from the table above for the QuickBooks version on the server. If the account is not listed, click Add, type the exact account name, and click OK. Select the account from the list, check Full Control under Allow, and click Apply and OK.
Also set sharing permissions on the same folder. Right-click the folder, go to Properties > Sharing > Advanced Sharing, check Share this folder, click Permissions, and give QBDataServiceUserXX Full Control in the share permissions. Both the security permission and the share permission must allow Full Control. After setting both, open the Database Server Manager, click Scan Now on the company file folder, then test multi-user mode from each workstation.
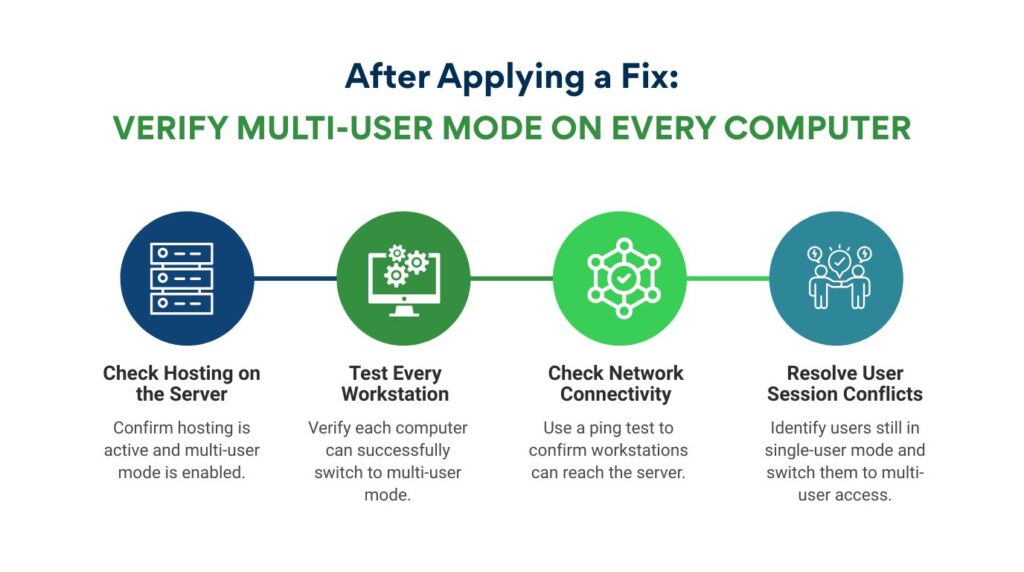
After Applying a Fix: Verify Multi-User Mode on Every Computer
After applying any fix, test multi-user mode on the server and every workstation — not just the one where the problem was first noticed. On the server, go to File and confirm the option shows Stop Hosting Multi-User Access (confirming hosting is active) and Switch to Single-User Mode (confirming multi-user mode is already on). On each workstation, open QuickBooks, go to File, and select Switch to Multi-User Mode. A successful switch confirms the fix worked on that machine.
A workstation that still cannot connect after the server fix has a local problem — most commonly a local firewall blocking outgoing connections to the server, or hosting accidentally turned on for that specific workstation. Check File > Utilities on each failing workstation for Stop Hosting Multi-User Access and click it if present. Also test the connection from the workstation by opening the Command Prompt and typing ping [ServerName] — replace [ServerName] with the server computer’s name. Four “Reply from” responses confirm the workstation can reach the server.
Error 6190–816 on workstations after the server is in multi-user mode means a specific user still has the file open in single-user mode on another machine. According to Intuit’s documentation, the fix is for that user to switch their session to multi-user mode or to close QuickBooks and reopen the file. The Chat With a Coworker feature inside QuickBooks shows who is currently logged in and in what mode, making it possible to identify and contact the specific user causing the block.
Prevention: Stop the Switch from Failing Again
Multi-user mode switches fail repeatedly in offices that do not address the four situations that trigger the failure: Windows updates that stop services, QuickBooks upgrades that reset hosting settings, power outages that damage the .ND file, and new computers added to the network with hosting accidentally turned on. Each trigger has a specific action that prevents the failure.
| Situation | What to Do to Prevent the Switch Failing |
| After every Windows update on the server | Open services.msc and verify QuickBooksDBXX and QBCFMonitorService are both set to Automatic startup |
| After every QuickBooks version upgrade | Re-confirm hosting is on at the server (File > Utilities > Host Multi-User Access) and re-run the Database Server Manager scan |
| After a power outage or abrupt server shutdown | Delete the .ND file in the company file folder; Database Server Manager creates a fresh one on next scan |
| After adding a new computer to the office network | On the new computer, open QuickBooks, go to File > Utilities, and click Stop Hosting Multi-User Access immediately |
| When a workstation’s QuickBooks crashes | Restart the workstation before the next login attempt — a clean restart clears any ghost session the crash left behind |
Keep the QuickBooks Database Server Manager version matched to the QuickBooks Desktop version in use on all workstations. A 2023 Database Server Manager cannot correctly manage connections for 2024 workstations — the version number must match exactly. After every QuickBooks version upgrade, update the Database Server Manager on the server first, before asking workstations to connect. The new version’s service name also changes (QuickBooksDB34 for 2024, QuickBooksDB35 for 2025), so confirm the new service is set to Automatic in Windows Services after the upgrade.
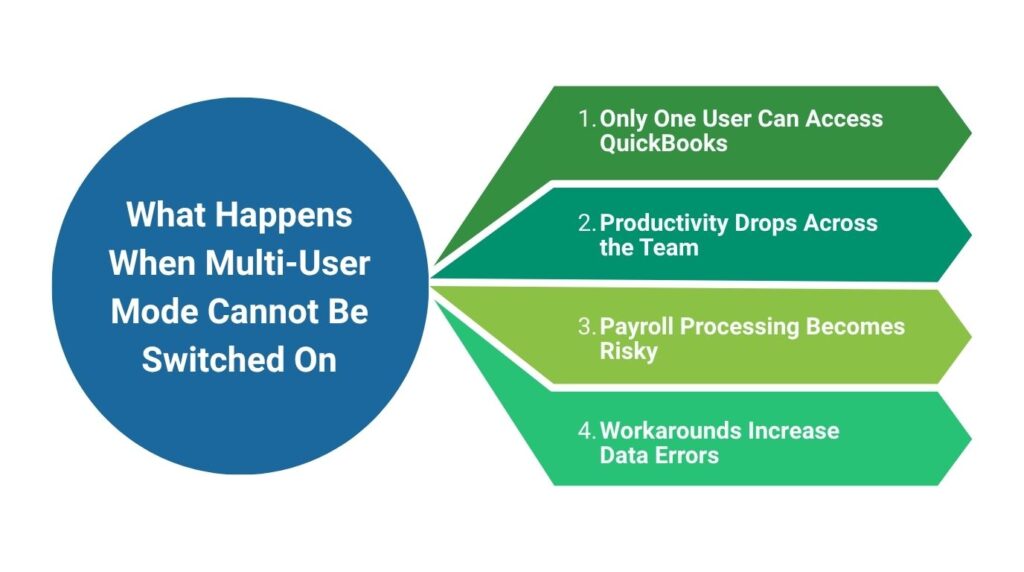
What Happens When Multi-User Mode Cannot Be Switched On
A QuickBooks setup stuck in single-user mode means only one person can work in QuickBooks at a time. Every other team member — accounts payable, accounts receivable, payroll, management reporting — must wait for that one user to close QuickBooks before they can open it. In a small office of two to five accounting staff, this creates an immediate productivity bottleneck that slows down every deadline-driven task.
Payroll is the highest-risk task affected by a single-user restriction. Payroll processing in QuickBooks requires the payroll administrator to access the file, complete all payroll entries, and close the file before the next user can verify or approve entries. A multi-user failure during payroll week means the deadline cannot be met efficiently, and any delay in payroll processing creates legal compliance risk for businesses in regions with strict payroll timeline requirements.
Staff who work around the single-user restriction by entering transactions in a spreadsheet and importing them later create a data integrity risk. Manual imports to QuickBooks frequently produce duplicate entries, missed entries, or reconciliation differences. Each discrepancy requires individual investigation and correction, and a backlog of uncorrected discrepancies grows into a reporting problem that obscures the business’s actual financial position.
Conclusion
The inability to switch to multi-user mode in QuickBooks Desktop has seven documented causes: missing admin login, stopped background services, blocked firewall ports, a ghost session from a previous crash, hosting turned off at the server, a damaged .ND file, and incorrect Windows folder permissions. Each cause has a direct fix that takes 5–15 minutes when applied to the right component.
Intuit’s QuickBooks Tool Hub resolves the most frequent causes automatically. Running the Database Server Manager scan from the Network Issues tab repairs firewall permissions and rebuilds the .ND file. Running QuickBooks File Doctor from the Company File Issues tab checks and repairs both. These two Tool Hub actions together fix the majority of multi-user switch failures without requiring manual Windows configuration.
The offices that switch to multi-user mode reliably every day are those that keep QuickBooks services set to Automatic restart in Windows Services, confirm hosting is on only at the server after every QuickBooks upgrade, and restart workstations after any QuickBooks crash before the next login attempt. These three habits eliminate the three most common triggers for repeated multi-user switch failures and keep the full accounting team working simultaneously without interruption.
Frequently Asked Questions
1. The “Switch to Multi-User Mode” option is completely missing from the File menu. What does that mean?
The option disappears for two reasons: the logged-in QuickBooks user is not the admin, or the company file is not currently open. The Switch to Multi-User Mode option only appears in the File menu when the QuickBooks admin user has a company file open. Open the company file and log in as the admin (the username is typically “Admin”) — the option will appear in the File menu after a successful admin login.
2. Multi-user mode was working yesterday and stopped today without any changes. Why?
QuickBooks services — specifically QuickBooksDBXX and QBCFMonitorService — sometimes stop on their own when Windows runs scheduled maintenance tasks overnight. These tasks occasionally reset service startup types from Automatic to Manual, which prevents the services from starting after the next reboot. Open services.msc on the server, find both QuickBooks services, and confirm they are set to Automatic startup and show a Running status. Starting both services restores multi-user mode in most cases where nothing was deliberately changed.
3. Multi-user mode is on but only one specific workstation cannot connect. What is different about that machine?
A single workstation that cannot connect while others work fine has a local problem unique to that machine. The three most common local causes are: hosting is accidentally turned on for that workstation (check File > Utilities for Stop Hosting Multi-User Access and click it), the local firewall or antivirus on that workstation is blocking outgoing connections to the server, or that workstation cannot reach the server by name on the network (test with ping [ServerName] in Command Prompt). Each cause has a direct fix that does not affect the other workstations.
4. QuickBooks File Doctor says the scan was unsuccessful but multi-user mode now works. Is the file damaged?
QuickBooks File Doctor sometimes reports an unsuccessful scan even after successfully repairing the issue it found. According to Intuit’s documentation, this is a known behavior — the tool may display an unsuccessful message while still completing the repair. The reliable confirmation is whether multi-user mode now works on all workstations. Open the company file on each workstation and confirm access. If all workstations can connect, the company file and network are functioning correctly regardless of what the File Doctor message said.
5. Can multiple company files run in multi-user mode at the same time on the same server?
Yes — the QuickBooks Database Server Manager supports multiple company files hosted on the same server simultaneously. Each company file gets its own .ND file, and the Database Server Manager serves each one independently. The restriction is that the same workstation cannot have two different company files open at the same time. Opening multiple company files on a single workstation causes multi-user mode errors. Each workstation should have exactly one company file open at a time, while the server can host as many files as the network capacity supports.
Anusmita is a seasoned content writer who brings perspective to words. As a writer, she enriches her work with a journalistic aptitude, utilising her training in Mass Communication and Journalism. She loves to travel and explore, which imparts a greater sense of understanding, maturity, and experience that are reflected in her content.
Beyond her professional work, Anusmita enjoys painting, singing, dancing, and spending time planting. She is also a self-proclaimed foodie who loves exploring different cuisines, an interest that further adds to her curiosity and perspective as a writer.
Leave a Reply