A power outage or computer crash while QuickBooks is open is one of the most common causes of company file corruption. QuickBooks Desktop writes data to the company file continuously during every active session. A sudden power loss or system crash cuts off this write process in the middle of a database operation — a save, an edit, or a transaction record — leaving the company file with incomplete or inconsistent data. The result is a company file that either refuses to open, produces error codes when accessed, or opens but contains damaged records that produce incorrect report totals, missing transactions, or error messages during specific operations.
A sudden power outage or system crash might lead users to lose unsaved and sometimes even saved data. Corrupt or broken database files can also contribute to QuickBooks’ lost data. The reason a crash causes more damage than a normal shutdown is specifically about timing: QuickBooks is a database program, and databases write data in structured sequences where one record must be completed and linked to the next before the sequence is valid. A crash stops this sequence mid-write, producing records that are started but not finished, links that point to records that were never written, and structural markers in the file that no longer match the data they are supposed to describe.
The good news is that company file corruption from a power outage or crash is recoverable in the majority of cases. QuickBooks provides four built-in repair tools that address increasing levels of damage in sequence: QuickBooks File Doctor, Verify Data, Rebuild Data, and Auto Data Recovery. Intuit’s Data Services team handles the cases that self-service tools cannot repair.
This article covers every step of the company file corruption recovery process, the specific signs that indicate which level of damage is present, and the prevention steps that protect the company file against the next power outage.
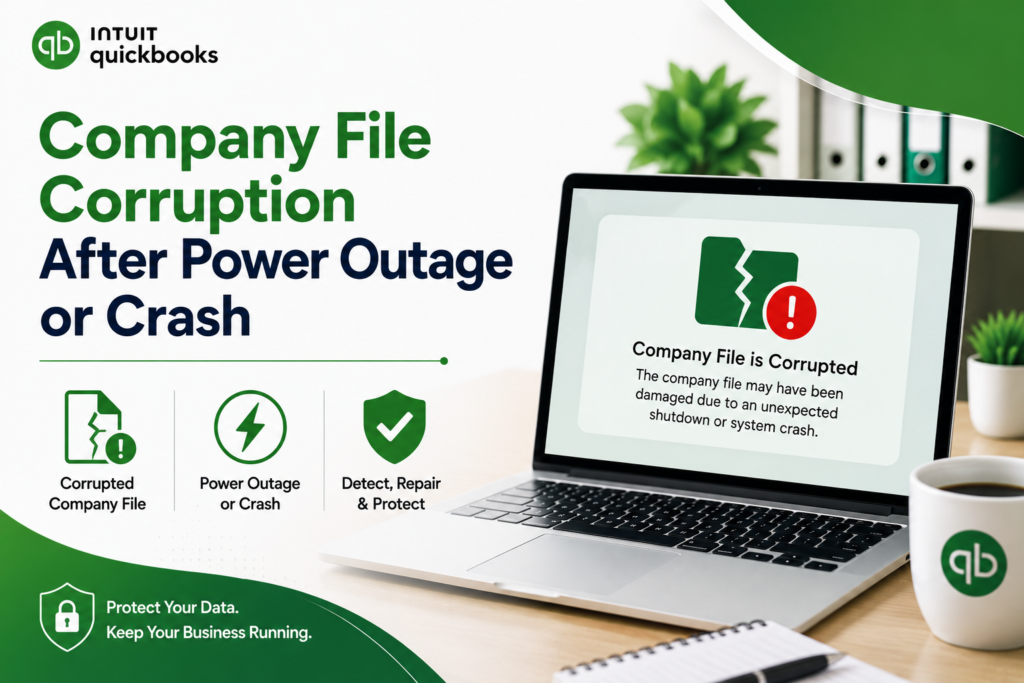
Table of Contents
What Exactly Happens to the QuickBooks Company File During a Power Outage?
How QuickBooks Writes Data During Normal Operation?
QuickBooks Desktop stores all accounting data — every transaction, every customer record, every report — in a single company file with the .QBW extension. This file is a database, which means it stores data in an organized structure of tables (organized groups of records), rows (individual records within each table), and links (connections between related records in different tables).
When a user saves a transaction in QuickBooks, the program writes the transaction data to multiple tables simultaneously: the transaction record itself, the account balance record, the customer or vendor record, and the audit trail record. All of these writes must be completed before the transaction is fully saved.
QuickBooks also maintains a separate file called the Transaction Log file, identified by the .TLG extension and stored in the same folder as the company file. The .TLG file is a real-time journal — it records every change made to the company file during the current session, moment by moment.
This file exists specifically to protect against data loss from crashes: if the company file is damaged by an unexpected shutdown, the .TLG file provides a record of what was being written at the moment of the crash, which repair tools use to reconstruct the incomplete data.
What the Crash Interrupts in QuickBooks Company File?
A power outage or crash that occurs while QuickBooks is writing a transaction interrupts the multi-table write sequence at a random point. The transaction record may be written to the transaction table but not yet linked to the account balance table. The account balance may be updated but the audit trail may not have been written yet. The .TLG file may have the complete record of the in-progress transaction, or it may have only the partial write up to the moment of the crash. The result is a company file that contains internal inconsistencies — records in one table that do not match the records in the tables they are supposed to link to.
These internal inconsistencies are exactly what QuickBooks’ Verify Data tool checks for and what Rebuild Data repairs. The types of damage that result from a crash mid-write include: transaction records with no linked account balance update, account balances that do not match the sum of their transactions, list entries (customers, vendors, items) with corrupted data fields, broken links between payments and the invoices they cover, and structural table headers that no longer accurately describe the tables they mark. Each of these damage types produces specific, identifiable symptoms in QuickBooks.
Signs of QuickBooks Company File Corruption After a Power Outage or Crash
Check the table below to identify which type of damage is present. The symptom points directly to the repair tool needed.
| Symptom After Power Outage or Crash | What It Indicates | Which Repair Tool to Use |
| QuickBooks will not open the company file at all; shows a 6000-series error code | The company file structure is damaged enough to prevent access entirely | Run QuickBooks File Doctor first; then Verify and Rebuild if File Doctor opens the file |
| QuickBooks opens but Balance Sheet totals do not balance (Assets ≠ Liabilities + Equity) | Link damage between account balance records and their supporting transactions | Run Verify Data; Rebuild Data repairs most link damage automatically |
| A specific transaction that was in progress during the crash is missing or incomplete | The transaction write was interrupted; the record is partially written or absent | Run Verify Data and Rebuild Data; check QBwin.log for the specific damaged record |
| Transactions visible in one report are missing from another report for the same period | Link damage causing inconsistency between different report data sources | Run Verify Data followed by Rebuild Data |
| An account name appears with an asterisk (*) before it (e.g., *Accounts Receivable) | QuickBooks created a placeholder account to hold transactions whose original account is damaged | Run Verify Data and Rebuild Data; locate and re-link orphaned transactions |
| QuickBooks crashes or freezes when opening, saving, or deleting a specific transaction | That transaction record contains corrupted data that QuickBooks cannot process | Create a backup; run Verify Data; note the specific record from QBwin.log; correct manually |
| QuickBooks opens and seems normal but Verify Data reports integrity loss | Internal data damage that has not yet produced visible symptoms | Run Rebuild Data immediately; run Verify Data again to confirm repair |
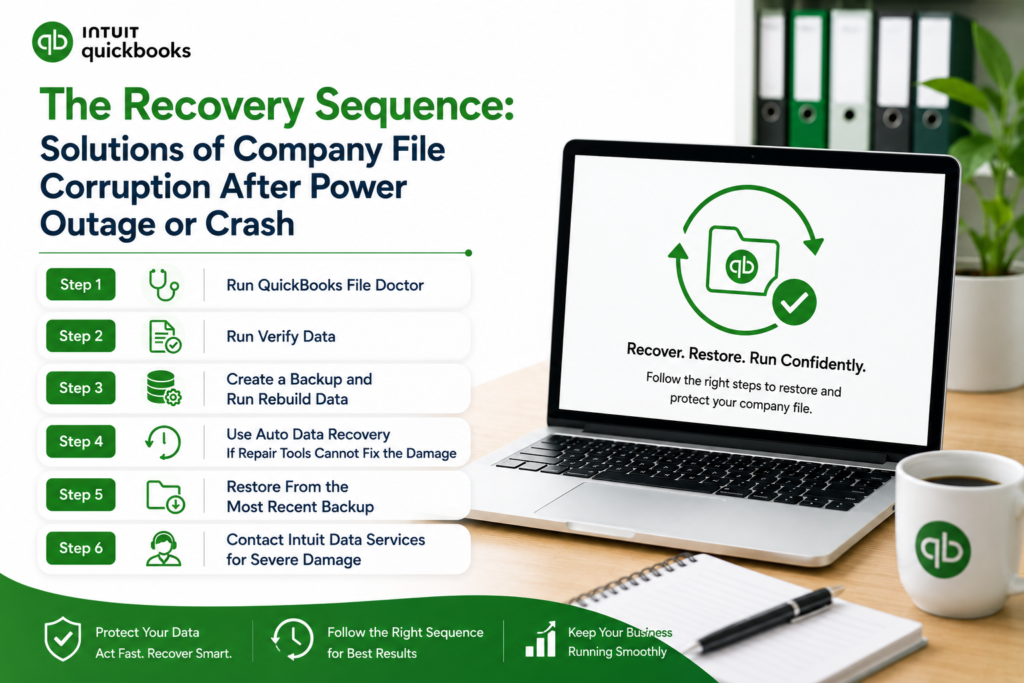
The Recovery Sequence: Solutions of Company File Corruption After Power Outage or Crash
Applying repair tools in the wrong order wastes time and can reduce the information available for recovery. The correct sequence is: QuickBooks File Doctor first (because it may be able to open the file and prepare it for the next tools), then Verify Data (to identify what is damaged before modifying anything), then Rebuild Data (to repair what Verify identified), then a second Verify Data (to confirm the repair worked). Auto Data Recovery is the step after this sequence when the self-service tools cannot fully repair the damage. Restoring from backup is the parallel option at any point when the damage is too severe for repair.
Step 1: Run QuickBooks File Doctor
QuickBooks File Doctor is Intuit’s own company file repair tool, available free through the QuickBooks Tool Hub. It is the first tool to run after a power outage or crash because it can open a company file that QuickBooks itself cannot open, perform a basic integrity scan, and repair enough structural damage to make the file accessible for the Verify and Rebuild tools. QuickBooks File Doctor combines two functions in one tool: it checks the company file for internal damage, and it checks the network configuration for multi-user setups. Both checks run simultaneously and the results inform the next repair step.
Intuit’s Tool Hub documentation specifically lists company file errors as the primary target of QuickBooks File Doctor. It is the recommended starting point for any situation where the company file is inaccessible after a crash. File Doctor takes 5 to 15 minutes depending on the file size and reports whether it found and repaired damage, or whether it found damage it could not fully repair. Even if File Doctor reports it was not fully successful, try opening the company file after it completes — it often repairs enough to allow access for the next repair steps.
Open the QuickBooks Tool Hub (download version 1.6.0.8 from Intuit’s official support page if not already installed). Click Company File Issues in the left menu. Click Run QuickBooks File Doctor. Select the company file from the dropdown, or click Browse to navigate to the .QBW file. Select Check your file and network. Enter the QuickBooks administrator password when prompted. Allow the scan to run — 5 to 15 minutes. After it finishes, open QuickBooks and try opening the company file.
Step 2: Run Verify Data
Verify Data is a built-in QuickBooks tool that scans every record in the company file and checks for inconsistencies between related records. According to Intuit’s official Verify and Rebuild documentation: “If the verify tool finds data damage, use the rebuild tool to repair your company file.” Verify Data produces one of three results: “QuickBooks detected no problems with your data” (the file is clean), “Your data has lost integrity” (damage was found and identified), or a specific error message identifying a particular type of damage. Running Verify Data before Rebuild ensures the repair targets only the actual damage, not the entire file.
The Verify Results window lists every error found with an “Expand All” option to see the detail of each error. Each error entry may include a “See Online Article” link that opens Intuit’s specific documentation for that error type. Note all errors shown in the Verify Results before closing the window. These errors are also written to the QBwin.log file — QuickBooks’ internal activity log — which is accessible through the Tech Help window (Ctrl + 1, then Ctrl + 2 inside QuickBooks) and provides more detail than the Verify Results screen shows.
Open the company file in QuickBooks. Go to File > Utilities > Verify Data. Allow the scan to complete fully — do not interrupt it. If it reports “Your data has lost integrity,” click OK and proceed immediately to Step 3. If it reports no problems, the file is clean and no further repair is needed. Note all errors shown in the Verify Results window before closing it.
Step 3: Create a Backup and Run Rebuild Data
Intuit’s official Rebuild Data documentation confirms: QuickBooks will ask to make a backup before it rebuilds the company file. This requirement exists because Rebuild Data modifies the company file directly — it changes record content, removes unrepairable records, and adjusts data links. If the Rebuild produces an unexpected result, the backup created just before it is the only way to return to the pre-Rebuild state. The backup must be saved to a location different from the company file — not to the same folder and not to the same drive if possible.
Intuit’s documentation also includes a specific warning: do not replace another backup file during this step. The backup created before Rebuild should be saved with a new filename that identifies it as the pre-Rebuild backup. This distinguishes it from the regular daily backup and makes it easy to locate if the Rebuild needs to be reversed. Save the backup to the Desktop or to a dedicated folder on the C: drive named QB_PreRebuild.
Go to File > Back Up Company > Create Local Backup. Choose Local Backup. On the Options screen, select Complete Verification to confirm the backup is valid before saving. Enter a filename that includes “PreRebuild” and the date. Save to the Desktop or a new folder named QB_PreRebuild. After the backup saves successfully, go to File > Utilities > Rebuild Data. Click OK when QuickBooks confirms it has the backup. Allow Rebuild to run — it may appear frozen but is working. Click OK when the message “Rebuild has completed” appears.
Run Verify Data Again After Rebuild: Immediately after Rebuild completes, go to File > Utilities > Verify Data again. Intuit’s documentation confirms this second Verify is mandatory: “After rebuilding, verify your data again to ensure the repairs were successful.” A clean result on the second Verify confirms the repair worked and the file is now in good health. If the second Verify still shows errors, those specific errors need manual correction — search for each error message in the QBwin.log and on Intuit’s support site for the documented fix for that specific error type.
Step 4: Use Auto Data Recovery If Repair Tools Cannot Fix the Damage
Auto Data Recovery — abbreviated as ADR — is a QuickBooks feature that maintains an automatically updated copy of the company file in the background. QuickBooks updates this copy every 12 hours while it runs. The ADR copies are stored in a hidden folder named QuickBooksAutoDataRecovery, located in the same folder as the company file. According to Intuit’s official ADR documentation: QuickBooks Desktop has a feature called Auto Data Recovery that, in the case of data loss or corruption, may allow you to recover all or nearly all of your data.
ADR should only be used after all appropriate troubleshooting has been tried. This means ADR comes after File Doctor, Verify, and Rebuild have all been applied. Using ADR before these tools would overwrite information that the repair tools could have used. The ADR folder contains two key files: the .QBW.ADR file (a copy of the company file up to 12 hours old) and the .TLG.ADR file (a copy of the transaction log up to 12 hours old). Combining these ADR copies with the current .TLG file using Intuit’s documented recovery procedure can recover all transactions that were completed before the crash.
How to Check Whether ADR Files Exist and Are Current?
Open File Explorer. Navigate to the folder where the company file (.QBW) is stored. Look for a folder named QuickBooksAutoDataRecovery. To make this folder visible: click View > Show > Hidden Items. Open the QuickBooksAutoDataRecovery folder. Check whether it contains files named [CompanyFileName].qbw.adr and [CompanyFileName].qbw.tlg.adr. Check the file dates. The .adr files must be dated after the last time QuickBooks was working normally for ADR recovery to be useful. If the files are present and current, follow Intuit’s official ADR recovery procedure from Intuit’s support page (search “QuickBooks Auto Data Recovery”) to combine the ADR files and restore the company data.
One important limitation: ADR is not available for all QuickBooks editions and has a file size limit. According to confirmed documentation, the ADR method is not suitable if the backup file is more than 1.5 GB. For companies with very large company files, ADR may not apply, and the recovery options are limited to backup restoration or Intuit Data Services.
Step 5: Restore From the Most Recent Backup
A company file with damage too severe for File Doctor, Verify/Rebuild, and ADR needs to be restored from a clean backup. The backup file — the .QBB file created through File > Back Up Company > Create Local Backup — is a complete compressed copy of the company file saved at the moment the backup was made. Restoring from backup replaces the damaged company file with the last clean version. Transactions entered between the backup date and the crash must be re-entered manually after the restore.
Before restoring: always copy the backup file to a local folder on the C: drive. Restoring from an external drive, network folder, or cloud sync service can produce Error -6147, 0 during the restore because these storage locations may interrupt the restore process. A path to the backup file that is shorter than 210 characters prevents file path length errors during restoration. Saving the restored company file to a new filename — rather than overwriting the existing damaged .QBW file — preserves the damaged file as a reference in case the restoration needs to be verified.
Copy the .QBB backup file to a folder on the C: drive (for example, C:\QBRestore). Open QuickBooks. Go to File > Open or Restore Company > Restore a Backup Copy > Local Backup. Browse to the C:\QBRestore folder. Select the .QBB backup file. When asked where to save the restored company file, save it to the C: drive with a new filename. After the restore completes, open the restored file and run Verify Data to confirm it is clean before replacing the damaged version.
Step 6: Contact Intuit Data Services for Severe Damage
Company file damage that persists after File Doctor, Verify/Rebuild, ADR, and backup restoration all fail requires professional data recovery. Intuit Data Services is Intuit’s own professional recovery team with specialized tools not available in the self-service tool set. Intuit’s official ADR documentation confirms: Intuit Data Services can help with data recovery most of the time. However, the process can take some time and may mean that you cannot use QuickBooks for several days. The typical processing time is two to five business days after the file is submitted.
The specific damage type that requires Data Services is Structural Damage — damage to the database table headers that define how the data in the company file is organized. Structural Damage produces error messages like “Verify Target: Values in minor do not match major” in the QBwin.log file, or a Masterkey error when the Admin user runs Verify Data. Intuit’s own documentation on data damage states directly: “If the Admin user receives the Masterkey error, only send your file to Data Services.” This is the clearest signal that self-service tools cannot reach the type of damage present.
| All QuickBooks Recovery Steps at a Glance | |||
| Step | Tool Used | Time Required | When to Apply It |
| Step 1: QuickBooks File Doctor | QuickBooks Tool Hub > Company File Issues > Run File Doctor | 5–15 min | First — always; works even if the file cannot be opened normally |
| Step 2: Verify Data | File > Utilities > Verify Data | 5–10 min | After File Doctor opens the file; identifies all damage before modifying anything |
| Step 3: Backup + Rebuild Data | File > Back Up Company first, then File > Utilities > Rebuild Data | 15–45 min | After Verify Data confirms damage; creates a restore point before modifying the file |
| Step 3b: Verify Data (second run) | File > Utilities > Verify Data | 5–10 min | Immediately after Rebuild; confirms whether the repair succeeded |
| Step 4: Auto Data Recovery (ADR) | QuickBooksAutoDataRecovery folder + Intuit’s ADR procedure | 30–60 min | After Verify/Rebuild still shows errors; only if ADR files exist and are current |
| Step 5: Restore from backup | File > Open or Restore Company > Restore a Backup Copy | 10–20 min | When damage is too severe for repair tools; requires a recent clean backup |
| Step 6: Intuit Data Services | Contact Intuit support to submit the file | 2–5 business days | When all self-service steps have failed and the backup is too old or unavailable |
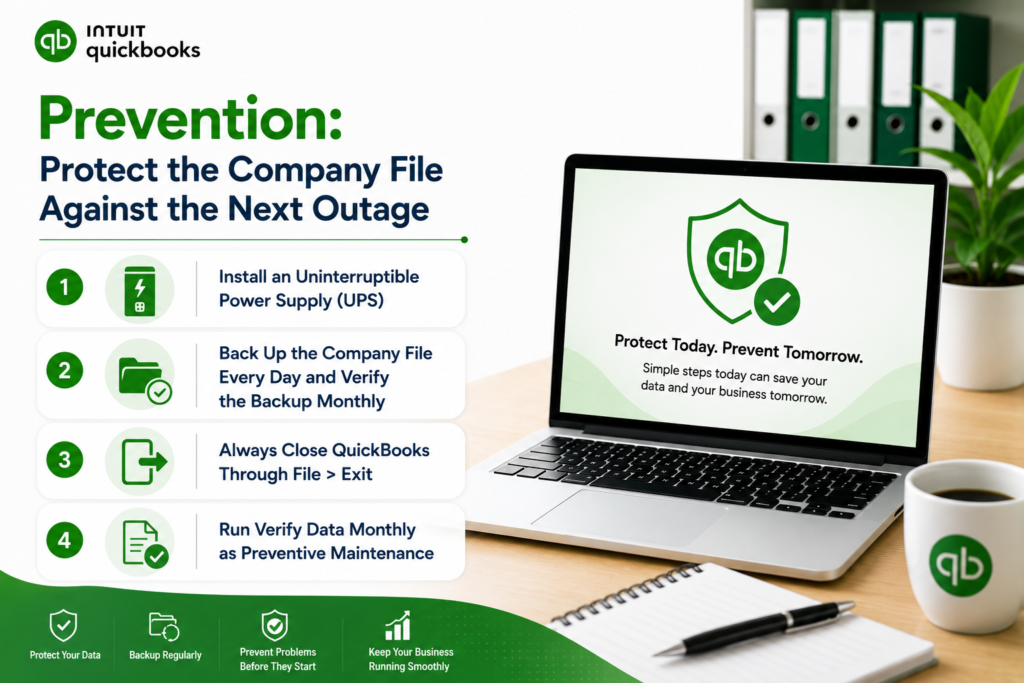
Prevention: Protect the Company File Against the Next Outage
- Install an Uninterruptible Power Supply (UPS)
An uninterruptible power supply — commonly called a UPS — is a device that contains a battery and automatically switches to battery power when the main power supply is cut off. A UPS gives the computer and QuickBooks enough time to complete any in-progress write operation and save the company file properly before the power runs out. According to confirmed best practices for QuickBooks data protection, using a UPS on the computer running QuickBooks and on the server hosting the company file is the single most effective physical protection against corruption from power outages. A UPS that provides five minutes of battery backup after power loss is sufficient for QuickBooks to complete any open write operation and close cleanly.
- Back Up the Company File Every Day and Verify the Backup Monthly
A daily backup through File > Back Up Company > Create Local Backup is the primary data protection measure against crash-related data loss. The backup limits the maximum data loss from any corruption event to one day’s worth of transactions — the work done since the last backup. Intuit’s Verify and Rebuild documentation advises creating a backup before making any changes to the company file, including before Rebuild Data. A backup that was never tested may not be restorable when needed. Testing a backup restore on the first business day of each month — by restoring the backup to a different filename and running Verify Data on the restored file — confirms the backup is valid before it is needed in an emergency.
- Always Close QuickBooks Through File > Exit
QuickBooks writes the final entries to the .TLG transaction log file and completes the current database write sequence only when it is closed through File > Exit. Closing QuickBooks by clicking the X button on the window, shutting down the computer while QuickBooks is running, or force-closing through Task Manager all interrupt this completion sequence. A QuickBooks session that is consistently closed incorrectly accumulates partial writes in the .TLG file over time, which compounds into company file damage that a single power outage later triggers into a full corruption event. File > Exit takes three seconds and eliminates this accumulated risk entirely.
- Run Verify Data Monthly as Preventive Maintenance
Running Verify Data (File > Utilities > Verify Data) on the first business day of each month takes five to ten minutes and catches company file damage at the early stage where Rebuild Data can repair it completely. Power outages, network drops in multi-user mode, and disk errors introduce small amounts of damage with each occurrence. This damage accumulates gradually and may produce no visible symptoms for weeks before it compounds into a full corruption event. Monthly Verify runs catch the damage before it compounds, allowing Rebuild Data to repair it while it is still minor. Intuit’s community support team specifically recommended monthly Verify Data runs as standard company file maintenance.
Conclusion
Company file corruption after a power outage or crash is caused by an interrupted database write operation that leaves the company file with incomplete or inconsistent records. QuickBooks provides four self-service recovery tools that address increasing levels of damage in the correct order: QuickBooks File Doctor (which repairs structural access issues and opens files that QuickBooks itself cannot), Verify Data (which identifies the specific damage without modifying the file), Rebuild Data (which repairs the damage Verify identified), and Auto Data Recovery (which uses QuickBooks’ own 12-hour background copies to recover data the other tools could not repair).
The most important action before any repair step is to create a backup of the company file — even a damaged company file can be backed up, and the backup provides a restore point if a repair step produces an unexpected result. Intuit’s documentation confirms that a backup is required before Rebuild Data runs, and this requirement protects the user against any unintended outcome from the repair process. The backup created before Rebuild is separate from the regular daily backup and is specifically intended as a pre-Rebuild reference.
Preventing corruption from future outages requires three physical and operational protections: a UPS device on the QuickBooks computer and server to give the system time to close cleanly after power loss, daily backups to limit the data at risk to one day’s work, and always closing QuickBooks through File > Exit to ensure each session completes its write sequence properly. Monthly Verify Data runs catch the damage these precautions cannot fully prevent, at the early stage where Rebuild Data can repair it without data loss.
Frequently Asked Questions
1. The power went out while QuickBooks was open. QuickBooks opens now but everything looks normal. Should repairs still be run?
Yes. Running Verify Data immediately after any unexpected shutdown — even when QuickBooks appears to open and work normally — is the correct action. Power outages that occur between save operations may leave damage that has no visible symptoms yet.
Confirmed documentation notes that corruption can be present and growing without producing visible symptoms until it compounds into a full error. A clean Verify Data result (no problems found) after the outage confirms the file was not damaged. A Verify Data result showing integrity loss begins the repair sequence before the damage becomes severe enough to cause visible errors or prevent access.
2. QuickBooks crashed during a payroll run. The payroll may be partially processed. How is this recovered?
A crash during payroll is more complex than a crash during data entry because payroll writes to multiple account types simultaneously: payroll liabilities, payroll expenses, checking account, and individual employee paycheck records. Run Verify Data and Rebuild Data first to repair any structural damage the crash introduced.
After a clean second Verify, review the payroll register (Employees > Payroll Center > Payroll History) to confirm which paychecks were fully written and which were not. A partially written paycheck — one that appears in the register but has incorrect amounts, missing deductions, or does not appear in the bank register — should be voided and re-entered rather than edited. Intuit’s recommendation for partially processed payroll after a crash is to verify the bank register matches the payroll register before re-running any incomplete payroll.
3. Rebuild Data ran but the second Verify still shows the same errors. What does this mean?
Errors that persist in the second Verify after Rebuild has completed are errors that Rebuild identified but could not automatically repair. Intuit’s Verify and Rebuild documentation states: “If the verify finds more damage, you will need to fix it manually. Search for the error(s) in the qbwin.log on the QuickBooks Desktop support site for how to fix it.”
The QBwin.log file records each remaining error with the specific table, record, and error type. Opening the QBwin.log through the Tech Help window (Ctrl + 1, then Ctrl + 2 in QuickBooks) and finding the LVL_ERROR entries identifies exactly which records need manual correction. For each remaining error, Intuit’s support site has a specific article describing the manual fix for that error type.
4. The most recent backup is two weeks old. Can the two weeks of missing transactions be recovered without re-entry?
Auto Data Recovery (ADR) is the correct option to attempt before accepting two weeks of re-entry. Check the QuickBooksAutoDataRecovery folder in the company file’s location for .QBW.ADR and .TLG.ADR files dated within the two-week window. If ADR files exist from that period, Intuit’s official ADR recovery procedure can recover all or nearly all transactions from the last 12 hours before the crash.
Transactions between the ADR file date and the crash date may also be recoverable by combining the ADR company file copy with the current .TLG transaction log file. If ADR files are not available or are too old, Intuit Data Services may be able to recover more than the standard repair tools from the damaged file directly.
5. How long does the Rebuild Data process take, and why does it look frozen while it runs?
Rebuild Data on a QuickBooks Pro or Premier company file under 100 MB typically takes 5 to 15 minutes. A file between 100 MB and 250 MB takes 15 to 45 minutes. Enterprise files above 250 MB can take one to two hours. Intuit’s documentation confirms directly: “Let Rebuild run completely — it may look like it’s frozen but usually is working.” The Rebuild process does not display a progress bar or step-by-step output while it runs.
The QuickBooks window appears completely unresponsive for the duration of the rebuild. The only indicator that it is working is that the hard drive activity light (if the computer has one) continues to blink, and the Task Manager (Ctrl + Shift + Esc) shows QuickBooks using CPU and disk resources. The rebuild is complete only when QuickBooks displays the message “Rebuild has completed.” Do not close QuickBooks or the Task Manager to force-stop the process during this time.
Anusmita is a seasoned content writer who brings perspective to words. As a writer, she enriches her work with a journalistic aptitude, utilising her training in Mass Communication and Journalism. She loves to travel and explore, which imparts a greater sense of understanding, maturity, and experience that are reflected in her content.
Beyond her professional work, Anusmita enjoys painting, singing, dancing, and spending time planting. She is also a self-proclaimed foodie who loves exploring different cuisines, an interest that further adds to her curiosity and perspective as a writer.
Leave a Reply