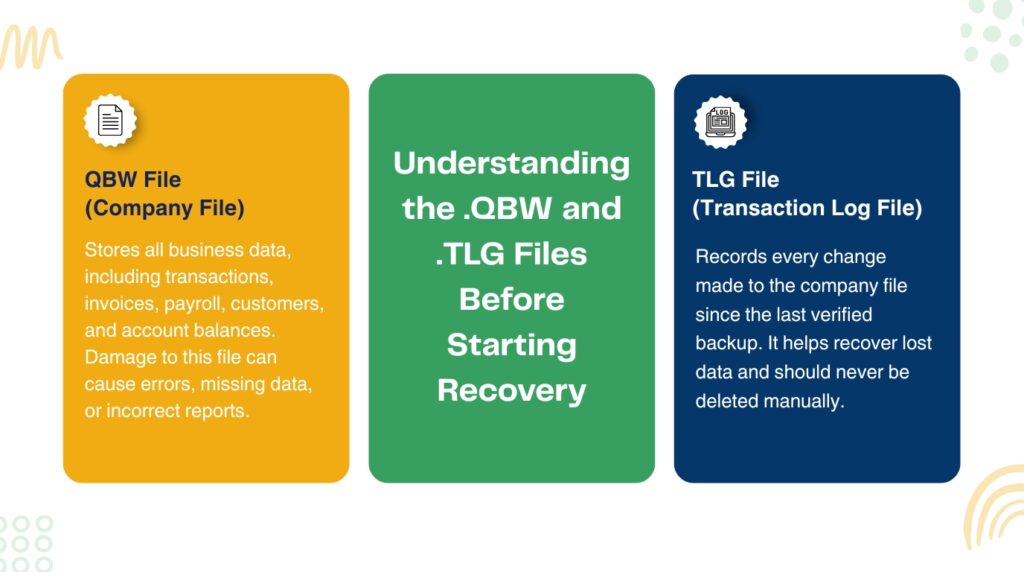
The QuickBooks company file — saved on the computer with a .QBW extension — holds every piece of financial data the business has entered in QuickBooks: every invoice, payment, check, payroll record, account balance, and customer entry. The .QBW file is the single most important file in the entire QuickBooks setup. The Transaction Log file — saved in the same folder with a .TLG extension and the same name as the company file — records every change made to the .QBW file since the last backup was run. Both files must be intact and accessible for QuickBooks to open and work correctly.
A damaged .QBW file prevents QuickBooks from reading the company’s financial data — the software either refuses to open the file entirely, or it opens the file but shows incorrect account balances and missing transactions. A damaged or oversized .TLG file causes different symptoms: QuickBooks slows down significantly during normal work, or it cannot complete a backup with full verification. The recovery steps for each are different, and knowing which file has the problem determines which step to start with.
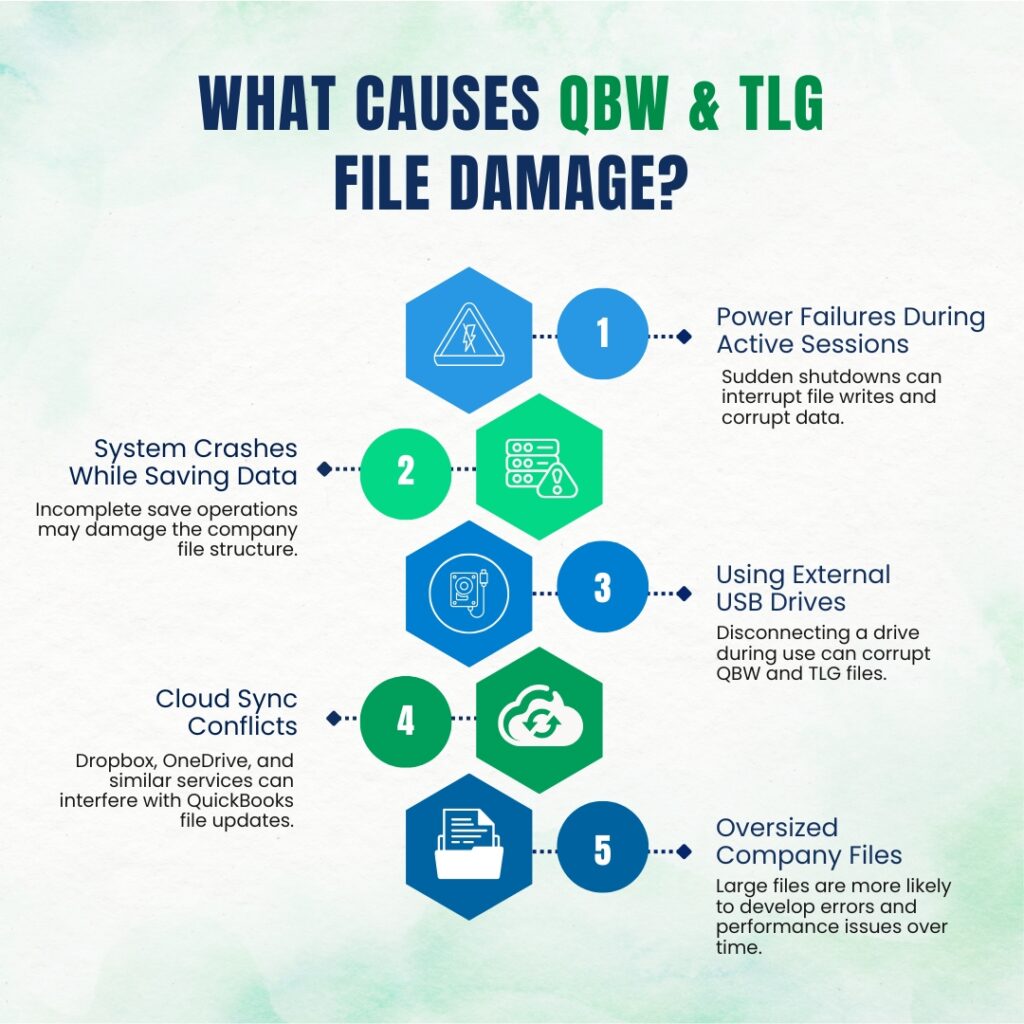
Documented causes of .QBW damage include: a sudden power cut or system crash while QuickBooks was actively saving data, a virus or malware attack that wrote to the company file folder, the company file stored on an external USB drive or a cloud-syncing folder where write operations get interrupted, and company files over the recommended size limits that accumulate internal errors over time. Intuit’s own documentation confirms the most common causes: “Large-sized company files, improper system shutdown, and power surges can corrupt the QuickBooks company file.” This article covers every documented recovery step, from the fastest built-in tools to the final escalation path through Intuit.
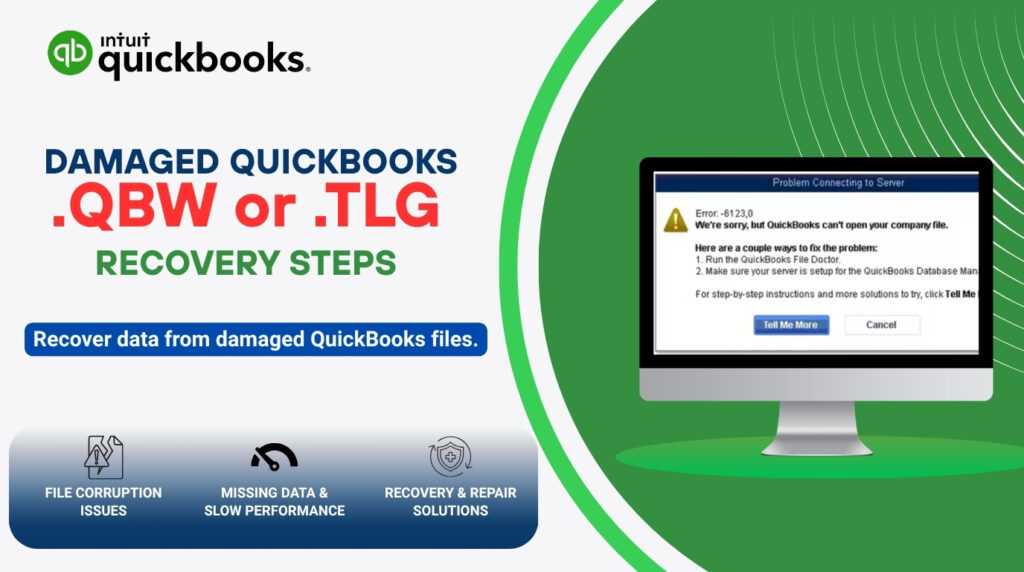
Table of Contents
Understanding the .QBW and .TLG Files Before Starting Recovery
The .QBW File: What It Holds and What Damage Looks Like
The .QBW file is a database — a structured collection of records that QuickBooks reads and writes continuously during normal use. Every time a transaction is saved, an invoice is created, or a payment is recorded, QuickBooks writes new data to the .QBW file. The file is not a simple document that can be opened and edited in another program — it has a specific internal structure that QuickBooks built and that only QuickBooks knows how to read correctly. Damage to this internal structure means QuickBooks cannot find the data it expects at the location it expects to find it, which causes errors when opening the file or loading reports.
Damage to the .QBW file appears in several ways. QuickBooks may refuse to open the file at all and show an error code from the 6000 series — errors like 6150, 6000-305, or 6147, which all indicate the program cannot access the company file. QuickBooks may open the file but show the message “Your data has lost integrity” after running the Verify Data tool — meaning internal records do not match what they should. Reports may show account balances that do not match the sum of the underlying transactions. Any of these symptoms means the .QBW file needs repair before the data inside it can be trusted or used.
The .TLG File: What It Records and Why It Must Never Be Deleted?
The .TLG file (Transaction Log) records every change made to the company file since the last full-verification backup was run. It is stored in the same folder as the .QBW file and has the same name — for example, if the company file is named “MyCompany.qbw”, the transaction log is named “MyCompany.tlg”. The TLG file serves two critical purposes. First, it acts as a recovery log: if the .QBW file becomes damaged, the TLG file contains the record of every transaction entered since the last backup, which allows QuickBooks’ Auto Data Recovery tool to reconstruct those transactions. Intuit’s own documentation warns: “You should never delete the TLG file, since the file may contain essential information needed to repair corruptions or lost data.”
The TLG file grows continuously as QuickBooks runs — every transaction saved adds a new entry to the log. A full-verification backup resets the TLG file to zero because it confirms that all the logged transactions have been safely included in the backup and no longer need to be held in the log for recovery purposes. A TLG file that has never been reset through a full-verification backup grows to hundreds of megabytes and slows QuickBooks down. A documented source on QuickBooks file management confirms this directly: “QuickBooks transaction log files can grow very large if they are NOT reset via a completely verified backup, and they will continue to increase in size until such a backup is performed.”
What Causes .QBW and .TLG File Damage?
Power failures during an active QuickBooks session are the most documented cause of .QBW file damage. QuickBooks writes data to the .QBW file in stages — it begins a write operation, updates the internal structure, then confirms the write is complete. A power cut or system crash mid-write leaves the file with an incomplete write: the internal structure shows that a write started but the data was never finished. QuickBooks reads this as structural damage and either refuses to open the file or reports data integrity errors when Verify Data is run.
Storing the company file on an external USB drive or in a cloud-synced folder creates a second category of damage risk. External drives can be disconnected while QuickBooks is writing to the file, interrupting the write exactly as a power failure would. Cloud-sync programs like Dropbox and OneDrive actively read and write files in the company file folder while QuickBooks is also writing to the same files, creating conflicts that corrupt the .QBW or .TLG file. Intuit’s recommended storage location for the company file is a local solid-state drive on the server — not an external drive, network-attached storage accessed over Wi-Fi, or any cloud-sync folder.
Quick Diagnosis: Match the Situation to the Correct Recovery Step
Find the description that matches what is happening before starting any recovery. Starting at the right step avoids wasted time and prevents making a damaged file harder to recover.
| What Is Happening | Most Likely Cause | Start Here |
| QuickBooks shows an error and refuses to open the company file at all | The .QBW file has internal structural damage — broken record links or unreadable data sections | Step 1: Run Verify and Rebuild Data. If that fails, run QuickBooks File Doctor from the Tool Hub |
| QuickBooks opens the company file but reports are showing wrong balances or transactions are missing | The .QBW file has partial damage — some records are intact and others are corrupted | Step 1: Run Verify and Rebuild Data to identify and repair the specific damaged records |
| The computer shut down suddenly during an active QuickBooks session (power cut, crash) and the file now errors on open | The .QBW file was being written to at the moment of shutdown — the write operation did not complete | Step 2: Use Auto Data Recovery (ADR) — the QuickBooksAutoDataRecovery folder holds a recovery copy created before the crash |
| The .TLG file has grown very large (several hundred MB) and QuickBooks has become slow | The TLG file has not been reset because a full-verification backup has not been run | Step 3: Run a full manual backup with verification to reset the TLG file — do not delete the TLG file |
| The QuickBooksAutoDataRecovery folder is empty or does not exist | ADR does not generate files for company files over 1.5 GB, or QuickBooks has not been open long enough to create a snapshot | Restore the most recent .QBB backup instead — Step 4 |
| The company file was stored on an external USB drive or cloud-synced folder and now errors on open | File damage from interrupted writes or sync conflicts during an active session | Step 4: Restore the most recent backup and move the company file to a local SSD drive |
| All built-in repair attempts have failed and the file still will not open | The damage exceeds what QuickBooks’ internal tools can repair | Step 5: Contact Intuit Data Services for professional file recovery |
Recovery Steps for Damaged .QBW and .TLG Files
Recovery steps for damaged .QBW and .TLG files are given below in five detailed steps. They are:
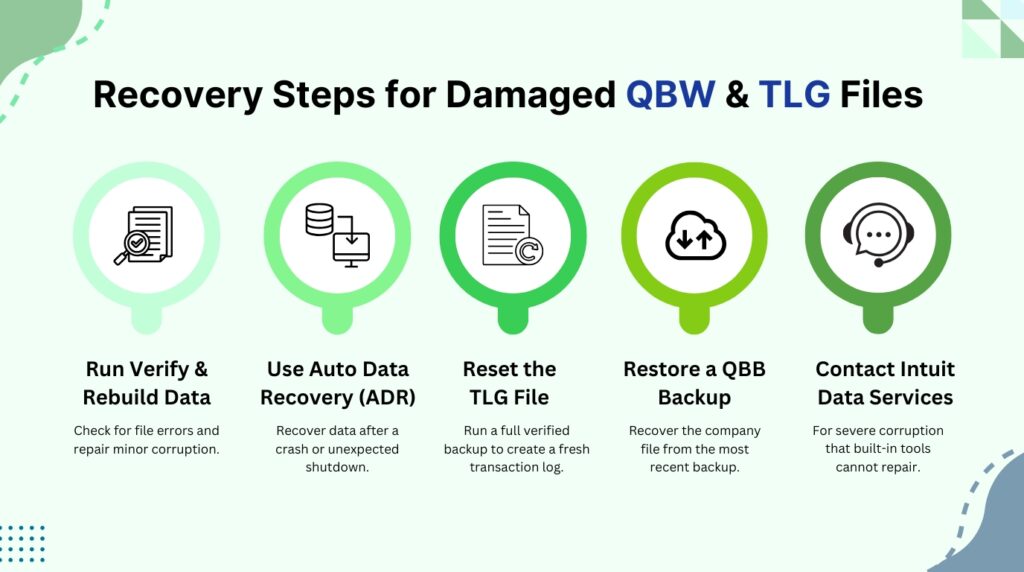
- Step 1: Run Verify Data and Rebuild Data – The First Response to Any .QBW Error
- Step 2: Use Auto Data Recovery (ADR) to Recover from a System Crash or Sudden Shutdown
- Step 3: Reset the TLG File by Running a Full-Verification Backup
- Step 4: Restore a .QBB Backup File When the .QBW File Cannot Be Repaired
- Step 5: Contact Intuit Data Services for Severe or Unrecoverable Damage
Step 1: Run Verify Data and Rebuild Data – The First Response to Any .QBW Error
Verify Data is a scanning tool built into QuickBooks that reads every record in the company file and checks that the internal structure is consistent. It reports three possible results: no problems found, a specific error message, or “Your data has lost integrity” — which means structural damage was found and Rebuild Data must be run. Running Verify Data first identifies the specific nature of the damage before any repair is attempted, which is why Intuit’s documentation lists it as the first step for any company file error.
Rebuild Data repairs structural damage in the .QBW file by reading every record, fixing broken links between records, rebuilding internal index tables (the lists QuickBooks uses to locate records quickly), and rewriting the file in correct order. A backup is required before Rebuild Data will run — QuickBooks asks for this backup automatically as the first step in the Rebuild process. Intuit’s documentation confirms: the Rebuild tool “automatically fixes minor company file data issues.” After Rebuild completes, Verify Data must be run again to confirm the damage was fully resolved or to identify any remaining errors that need manual correction.
Steps: Close all other QuickBooks users’ connections and switch to single-user mode through File > Switch to Single-User Mode. Go to File > Utilities > Verify Data. If Verify reports “Your data has lost integrity”, go to File > Utilities > Rebuild Data. Create the backup when prompted — save it with a new name that includes the date, for example “CompanyFile_BeforeRebuild_[date].QBB”. Wait for the rebuild to complete. The screen may show “QuickBooks is not responding” — this is normal. As long as the mouse cursor moves, the rebuild is still running. After it completes, click OK and run File > Utilities > Verify Data again to confirm the file is clean. If Verify now reports “QuickBooks detected no problems with your data”, the .QBW file is repaired and no further steps are needed.
For errors that Verify and Rebuild cannot fix automatically, the Verify Results window (shown after Verify Data runs) lists each remaining error with a “See Online Article” link. Each link opens Intuit’s specific fix for that error. Errors involving damaged estimates, purchase orders, or sales orders — non-posting transactions that do not affect account balances — can be deleted and re-entered without affecting any financial data. Non-posting transactions are transactions that QuickBooks records but that do not change any account balance — they are used for planning purposes, not bookkeeping.
Step 2: Use Auto Data Recovery (ADR) to Recover from a System Crash or Sudden Shutdown
Auto Data Recovery (ADR) is a built-in feature of QuickBooks Desktop that automatically creates a recovery copy of the company file every 12 hours while QuickBooks is running. It stores two files in a folder called QuickBooksAutoDataRecovery, located inside the same folder as the company file: a copy of the .QBW file (saved as .QBW.adr) and a copy of the TLG file (saved as .TLG.adr). Intuit’s ADR documentation confirms the availability and limitations: ADR is available in QuickBooks Pro, Premier, and Enterprise for Windows only — it is not available in the Accountant Edition — and it does not generate recovery files for company files over 1.5 GB in size. A gigabyte is a unit of file size — 1.5 GB is 1,500 megabytes.
ADR provides two recovery options. The first option uses the original current TLG file together with the .QBW.adr snapshot — this recovers all transactions including those entered in the hours immediately before the crash, because the current TLG file recorded those most recent changes even after the last ADR snapshot was taken. The second option uses both the .QBW.adr and .TLG.adr snapshot files together — this recovers all transactions except those entered in the last 12 hours before the crash, because both files come from the ADR snapshot rather than the current live files. Intuit’s ADR documentation recommends trying the first option before the second.
Steps — ADR Option 1 (recovers most recent transactions using current TLG + .QBW.adr): Create a new folder on the Desktop and name it QBTest. Open File Explorer and navigate to the company file folder — the default location is C:\Users\Public\Documents\Intuit\QuickBooks\Company Files. Find the TLG file (same name as the company file, ending in .tlg). Copy it and paste it into the QBTest folder. Open the QuickBooksAutoDataRecovery folder inside the company file folder. Find the file ending in .QBW.adr. Copy it and paste it into the QBTest folder. In the QBTest folder, right-click the .QBW.adr file and select Rename. Delete the “.adr” from the end of the file name so it ends in .QBW only. Open QuickBooks. Go to File > Open or Restore Company > Open a company file. Browse to the QBTest folder and open the renamed .QBW file. Check the account register to verify all transactions are present. Run File > Utilities > Verify Data. If the file is clean, move the damaged company file to a different folder and copy the QBTest file to the original company file location.
Steps — ADR Option 2 (recovers all but the last 12 hours, using both .QBW.adr and .TLG.adr): Create a new QBTest folder on the Desktop. Open the QuickBooksAutoDataRecovery folder inside the company file folder. Copy both the .QBW.adr and .TLG.adr files and paste them into QBTest. Rename both files by right-clicking each and removing the “.adr” extension from the end — so they end in .QBW and .TLG respectively. Open QuickBooks. Open the renamed .QBW file from the QBTest folder. Verify all transactions using the account register. Run File > Utilities > Verify Data. If the file is clean, move the damaged original file to a different location and place the QBTest copy in the original company file folder. Re-enter any transactions from the last 12 hours using bank statements, receipts, or invoices.
Step 3: Reset the TLG File by Running a Full-Verification Backup
The TLG file must never be deleted. Deleting the TLG file destroys the only record of transactions entered since the last backup — any data not yet captured in a .QBB backup file is permanently lost if the TLG file is deleted. The correct way to reduce a large TLG file is to run a full manual backup with the complete data verification option selected. The backup process reads the entire company file, confirms all data is intact, and then resets the TLG file to zero — because all logged transactions are now safely included in the backup.
Steps: Open QuickBooks with the company file. Go to File > Back Up Company > Create Local Backup. Click Options. Make sure “Verify data integrity before saving backup” is selected — this is the full-verification option that resets the TLG file. A quick backup or a scheduled backup without verification does not reset the TLG. Click OK. Choose a backup location — save to an external drive or a separate folder, not the same location as the company file. Enter a new file name that includes the date, for example “CompanyFile_2024_06_15.QBB”. Click Save. After the backup completes, open File Explorer and check the TLG file size in the company file folder — it should now be very small (a few kilobytes), confirming the reset was successful. QuickBooks immediately starts building the TLG again from the new baseline as soon as work resumes.
A TLG file that will not reset — meaning the full-verification backup fails to complete — indicates that the company file itself has data integrity errors. The Verify Data tool confirms this: a damaged company file blocks the full-verification backup from finishing. The fix is to run Verify and Rebuild Data first (Step 1) until Verify reports no problems, and then run the full-verification backup again. Only a clean company file can produce a successful full-verification backup, and only a successful full-verification backup resets the TLG.
Step 4: Restore a .QBB Backup File When the .QBW File Cannot Be Repaired
A .QBB file is a QuickBooks backup — a complete snapshot of the company file saved at the moment the backup was created. Restoring a backup brings back every transaction, account balance, and record that existed at the time the backup was made. The restored file is a fully intact .QBW file that QuickBooks can open and work with immediately. Restoring a backup is the correct step when Verify and Rebuild have not resolved the damage and the ADR folder is empty or the ADR files are also damaged.
The critical rule for backup restoration is: never restore the backup directly over the damaged company file. Restoring to the same location and file name overwrites the damaged file permanently, removing any possibility of recovering data from it using more advanced methods. Instead, restore the backup to a new folder — for example, a folder named “Restored” on the Desktop — with a new file name. Open the restored file from that location, confirm it opens correctly, and check that it is as complete as expected by reviewing the account register and running a Profit & Loss report. After confirming the restored file is good, move the damaged file to a backup location and copy the restored file to the original company file folder.
Steps: Open QuickBooks Desktop. Go to File > Open or Restore Company. Select Restore a backup copy and click Next. Select Local Backup and browse to the most recent .QBB backup file. In the Save Company File As dialog box, navigate to a new folder on the Desktop — for example, a folder named “Restored_[date]”. Enter a new file name for the restored file. Click Save. QuickBooks restores the backup and opens the restored company file. Run File > Utilities > Verify Data on the restored file to confirm it is clean. If it is clean, move the damaged .QBW file (and its associated .TLG file) from the company file folder to a separate archive folder. Copy the verified restored file to the original company file location. Re-enter any transactions created between the backup date and the current date, using bank statements, paper invoices, or receipts as reference.
Step 5: Contact Intuit Data Services for Severe or Unrecoverable Damage
Intuit Data Services is a professional data recovery service provided directly by Intuit for QuickBooks company files that the built-in tools cannot repair. This service is the correct escalation path when: Verify and Rebuild Data cannot fix the errors after multiple attempts; the ADR folder is empty or the ADR files are also damaged; no recent backup exists; or the company file size exceeds the 1.5 GB limit that ADR supports. Intuit’s documented guidance for persistent data errors that Rebuild cannot fix confirms the escalation path: “If the first rebuild took 2+ hours, contact support.”
The Intuit Data Services process involves sending the damaged .QBW file to Intuit’s data recovery team. The team uses tools and access that are not available inside QuickBooks Desktop itself. The service takes multiple business days and has a cost. Before sending the file, make a copy of both the .QBW and .TLG files to an external drive — both files together give the recovery team the maximum possible data to work with, because the TLG file contains transaction records that may not yet exist in the .QBW file.
Steps to prepare for Intuit Data Services: Open File Explorer and navigate to the company file folder. Copy both the .QBW file and the .TLG file to an external drive. Do not send the backup .QBB file in place of the .QBW file — the recovery team needs the actual company file, not a backup copy. Contact Intuit support through the QuickBooks Tool Hub (Help > QuickBooks Desktop Help > Contact Us) to open a data recovery case. Describe the damage: what error message appears, when the damage occurred, and what steps have already been tried. Intuit will provide instructions for securely submitting the damaged file.
All QuickBooks Recovery Steps at a Glance
| Step | What It Recovers | Time |
| Step 1: Run Verify and Rebuild Data | Identifies and repairs structural damage in the .QBW file — the correct first response to any file error | 15–30 min |
| Step 2: Use Auto Data Recovery (ADR) | Recovers the company file from a system-generated snapshot taken every 12 hours — works for files under 1.5 GB | 20–45 min |
| Step 3: Reset the TLG file with a full-verification backup | Resets an oversized TLG file that is slowing QuickBooks without deleting any transaction data | 15 min |
| Step 4: Restore a .QBB backup | Recovers all data up to the backup date — the safest and most complete recovery method when the file cannot be opened | 20–40 min |
| Step 5: Contact Intuit Data Services | Professional recovery for severely damaged files that the built-in tools cannot repair | 1–5 business days |
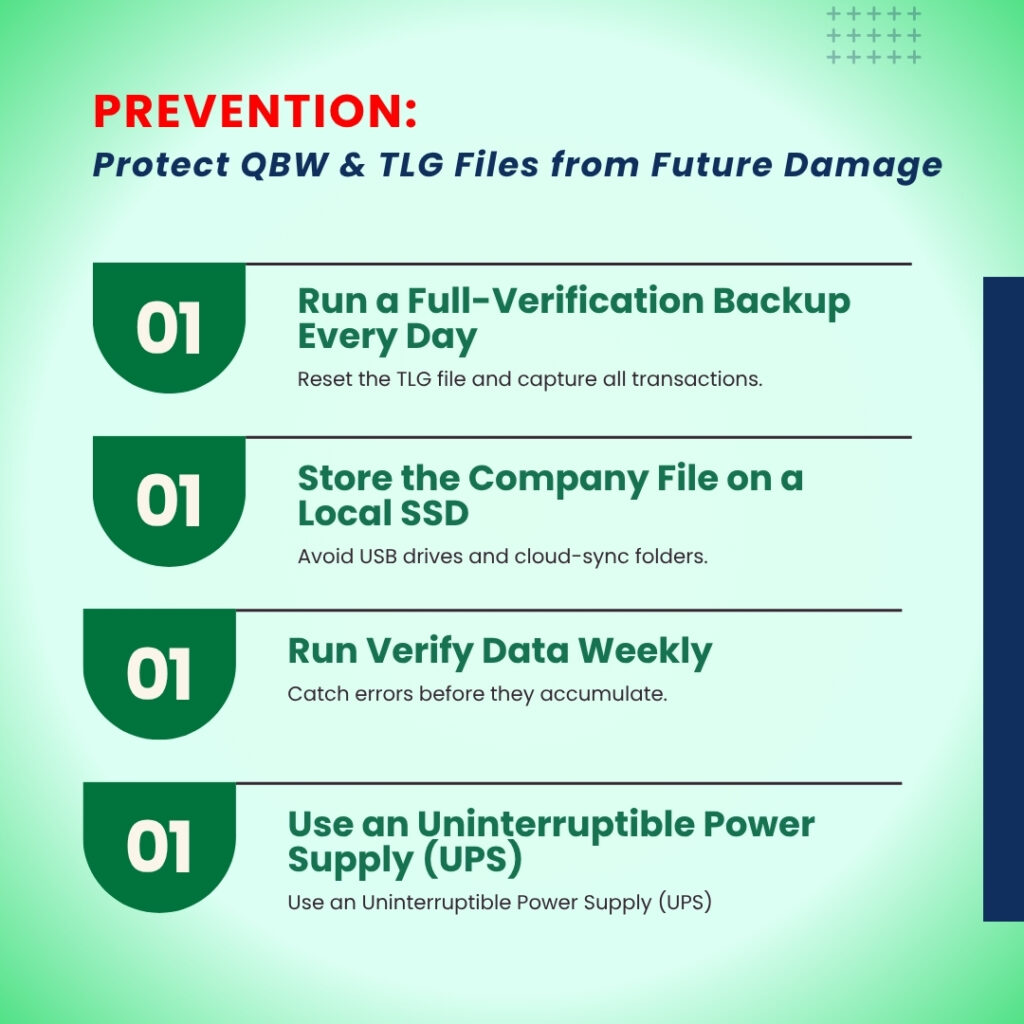
QuickBooks Prevention: Protect the .QBW and .TLG Files from Future Damage
- Run a Full-Verification Backup Every Day to Reset the TLG and Capture All Transactions
A daily full-verification backup does three things at once: it creates a complete copy of the company file in its current state (the .QBB file), it resets the TLG file to zero so it never grows large enough to slow QuickBooks, and it ensures that no more than one day’s transactions are at risk if the .QBW file is damaged. QuickBooks can schedule automatic backups through File > Back Up Company > Set Up Automatic Backup. The “Verify data integrity before saving backup” option must be selected in the backup settings — this is the full-verification option, and it is the only backup type that resets the TLG file. Store the backup on an external drive or cloud storage separate from the computer that runs QuickBooks.
- Store the Company File on a Local Solid-State Drive — Never on a USB Drive or Cloud-Sync Folder
The location where the company file is stored directly affects how vulnerable it is to damage. Intuit’s system requirements specify that the company file must be stored on a local solid-state drive (SSD) for best performance and stability. External USB drives can be accidentally disconnected during active QuickBooks sessions, interrupting writes to the .QBW file and causing structural damage. Cloud-sync programs like Dropbox, Google Drive, and OneDrive run in the background and can attempt to sync the .QBW or .TLG file at the same moment QuickBooks is writing to it — this simultaneous access is a documented cause of file damage. Keeping the company file on a local SSD on the server, with a daily backup to a separate external or cloud location, provides both the speed and safety the file needs.
- Run Verify Data Weekly to Catch Errors Before They Accumulate
Running Verify Data weekly through File > Utilities > Verify Data catches structural errors in the .QBW file while they are still small and fixable by a single Rebuild. Small errors left unaddressed grow over time as QuickBooks continues to write data to the file around the damaged sections. A weekly Verify routine that catches errors early means Rebuild Data can fix them in one pass — a process that takes 15 to 30 minutes. Catching the same errors after months of accumulation requires multiple rebuild passes, may not fix all damage, and can ultimately require ADR or a backup restoration to recover. The weekly check costs 5 minutes of QuickBooks time and prevents the scenarios this article’s recovery steps address.
- Use an Uninterruptible Power Supply to Prevent Power Cut Damage
An uninterruptible power supply (UPS) is a battery device plugged into the wall that supplies power to the connected computer for several minutes during a power outage. A UPS does not need to power the computer for hours — it only needs to provide enough time to save all open work in QuickBooks and shut the computer down correctly through the Start menu. QuickBooks writes to the .QBW file continuously during an active session, and a sudden power cut interrupts these writes and leaves the file structurally incomplete. A UPS eliminates this risk entirely by ensuring that every power interruption is followed by an orderly shutdown rather than an instant cutoff. Documented guidance on QuickBooks file protection confirms this: using a UPS gives enough time to shut down the system properly, protecting the company file from power outage damage.
Conclusion
A damaged .QBW company file is the most serious data problem a QuickBooks user can face, because this file holds every financial record the business has entered. The recovery sequence is clear and documented: start with Verify Data and Rebuild Data, which repair the majority of structural damage in the .QBW file; move to Auto Data Recovery if the damage came from a sudden system crash and the company file is under 1.5 GB; reset the TLG file with a full-verification backup if the TLG has grown very large; restore a .QBB backup if the built-in repair tools cannot fix the file; and contact Intuit Data Services for damage that no built-in tool can address.
The TLG file must never be deleted. Intuit’s documentation is explicit: “You should never delete the TLG file, since the file may contain essential information needed to repair corruptions or lost data.” The TLG file is the bridge between the last backup and the present moment — it holds the record of every transaction entered since the backup was taken. In a situation where the .QBW file is damaged and the most recent backup is several days old, the TLG file is what makes it possible to recover those intervening days of work through ADR. Keeping the TLG file intact and using full-verification backups to reset it regularly preserves this safety net at all times.
Prevention is more effective than recovery. Daily full-verification backups stored off-site, the company file kept on a local SSD rather than an external drive or cloud-sync folder, weekly Verify Data checks, and a UPS device on the server computer eliminate the four most common causes of .QBW and .TLG file damage. A company that runs these four practices consistently will rarely need the recovery steps in this article — and on the rare occasion damage does occur, the recent backup and intact TLG file will make full recovery straightforward.
Frequently Asked Questions
1. The QuickBooksAutoDataRecovery folder exists but is completely empty. Why did ADR not create any files?
ADR does not generate recovery files under two documented conditions. First: the company file exceeds 1.5 GB in size. ADR cannot create a snapshot of a file larger than this — the folder exists but remains empty because the file size exceeded the limit. Check the company file size by pressing F2 inside QuickBooks and reading the File Information section.
Second: ADR only generates files after QuickBooks has been open and running on the server for at least 12 hours since the last ADR snapshot was created. If the computer was restarted shortly before the damage occurred, no new ADR files would have been generated yet. In both cases, the recovery path is to restore the most recent .QBB backup file.
2. The Rebuild Data process says it completed successfully, but the same errors appear again the next day. What is causing this?
Rebuilding successfully means the tool ran without crashing — it does not guarantee every error was resolved. Errors that reappear the next day fall into one of two categories. First: Rebuild fixed the structural damage but the underlying cause of that damage is still present — for example, the company file is stored on a USB drive that disconnects briefly during use, causing new damage every session.
Moving the company file to a local SSD eliminates this recurring cause. Second: The errors are in transactions that Rebuild cannot automatically repair, such as damaged non-posting transactions (estimates, purchase orders, sales orders). The Verify Results window after Rebuild lists these un-fixed errors specifically — each one must be located and deleted or re-entered manually using the QBWin.log file to identify which transaction is affected.
3. The TLG file is 800 MB. Running a full-verification backup fails every time. How is the TLG reset when the backup fails?
A full-verification backup that fails to complete means the .QBW company file has data integrity errors that prevent the backup from passing its verification check. The backup requires a clean company file to run successfully — it verifies the data before saving the backup, and a damaged file fails that verification.
The fix is to run Verify Data and Rebuild Data on the company file first, repeating Rebuild until Verify reports “QuickBooks detected no problems with your data.” Once the company file is fully clean, the full-verification backup will complete successfully and reset the TLG file. A TLG file of 800 MB is not itself dangerous to the financial data — it just slows QuickBooks down. The slowdown resolves itself the moment the backup successfully completes and resets the TLG to near-zero.
4. The company file was stored in a Dropbox folder and now shows errors. Is the data gone?
The data is not gone — cloud-sync damage to a .QBW file typically causes structural errors rather than complete data deletion. The file’s internal structure was interrupted by Dropbox syncing the file at the same moment QuickBooks was writing to it, leaving the file with incomplete write operations. The recovery sequence is: copy the damaged .QBW file and its .TLG file out of the Dropbox folder to a local drive immediately, then stop Dropbox from syncing the company file folder.
Never attempt recovery while the file is still in a cloud-synced location — any changes made during recovery could be overwritten by the sync. After moving the files to a local drive, follow Step 1 (Verify and Rebuild) and Step 2 (ADR) from this article. If those steps do not resolve the damage, restore the most recent .QBB backup from before the Dropbox sync conflict occurred.
5. Both the .QBW file and the only backup .QBB file are damaged. Is there any remaining recovery path?
A damaged backup file is rare but documented. Two paths remain. First: check the QuickBooksAutoDataRecovery folder for ADR files — even if the main .QBW file and the .QBB backup are both damaged, the ADR folder may contain a snapshot taken before the damage occurred. If the company file was under 1.5 GB and QuickBooks had been running for at least 12 hours before the damage, the ADR files may be intact. Use Step 2’s instructions to recover from the ADR folder. Second: if the ADR folder is also empty or damaged, contact Intuit Data Services.
The Intuit recovery team has tools that work at a lower level than the built-in QuickBooks repair utilities and can sometimes extract readable data from files that no standard tool can open. Keep the damaged .QBW file in its current state — do not attempt further repairs that might overwrite what recovery data remains in the file.
Anusmita is a seasoned content writer who brings perspective to words. As a writer, she enriches her work with a journalistic aptitude, utilising her training in Mass Communication and Journalism. She loves to travel and explore, which imparts a greater sense of understanding, maturity, and experience that are reflected in her content.
Beyond her professional work, Anusmita enjoys painting, singing, dancing, and spending time planting. She is also a self-proclaimed foodie who loves exploring different cuisines, an interest that further adds to her curiosity and perspective as a writer.
Leave a Reply