What is QuickBooks Error 6000 77 & How does it Look when it occurs
QuickBooks Error 6000 77 typically arises when you don’t have enough permissions to access any QB file in a multi-user environment. This issue is often seen when the multi-user mode is enabled in your system or if the File is saved in the incorrect folder. An unstable or poor Internet connection, wrong permission settings, or damaged company files may also lead to the same error code.
The following error prompts flash out on your screen when you try to open the company file in multi-user mode.
“We’re sorry. QuickBooks encountered a problem. Error codes: (-6000, -77).”

Major Causes Triggering the QuickBooks Error 6000 77 in Windows 11, 10 & 8.1
There are a variety of factors that may be responsible for QuickBooks Error 6000 77; some of the most common ones are as follows:
- Any opened QuickBooks background processes prevent you from opening company file access in multi-user mode.
- You have insufficient authorization to the server system or don’t have proper admin rights.
- Incorrect firewall and security software settings restrict QuickBooks from accessing the server.
- Communication issue when QuickBooks is running in multi-user mode.
- The company file is saved on external storage instead of being on the local drive or a network.
- Network data files (.ND) and transaction log files (.TLG) are damaged or corrupted.
- The filename is longer than the limit or contains some special characters.
- The mapped drive open with referenced is either damaged or has an incorrect file path.
- Insufficient folder permissions access is provided to the company file folder.
- The company file you’re attempting to open is missing, corrupted, or damaged.
- QuickBooks is not updated to the newest version, or you’re working on an outdated or older version.
How to recognize the effect of QuickBooks Error 6000 77 in Windows?
Below are some common indicators that may help you to detect and determine QuickBooks Error 6000 77:
- Inability to access the QB company file.
- QuickBooks screen may stop responding, hang, crash, and turn blank suddenly.
- You won’t be able to click the tabs or buttons in the application, or they become unresponsive.
- The user faces difficulty when shifting to any other application running on the device.
- Windows freezes repeatedly, and the system shuts down at periodic intervals.
Customized Solution for QuickBooks Error 6000 77 in Windows
- To fix this, you can first restart your QuickBooks software with more permissions. In many cases, the issue gets resolved after this.
- Also, open QuickBooks with full admin privileges. For this, hit right-click on the QB icon and choose Run as administrator.
- Ensure that all your QuickBooks background processes are closed; otherwise, they may interfere with the existing company file.
- If the error still persists, you can download the QuickBooks file doctor tool from the tool hub. The tool has the ability to repair damaged or corrupted QuickBooks company files. To run this tool, you first have to download and install the QuickBooks tool hub in your system.
- The company file you’re trying to access is LOCATED on an external storage device, move it to a local or Network drive. Then, opening the QBW file in QuickBooks may rectify the problem.
- When the company file references the mapped drive, change the settings and choose the right server or Network. To do this, click on the Open or Restore in the file menu, choose to Open a company file, and hit the Network place. Later, select the entire Network and click on the server in which the company file is saved.
- In case there are any special characters, or blank spaces available before the beginning or after the end of the company file name, then clear them out and try accessing the data file again.
- If no single quick fix helps you to get over the issue, then you are recommended to go through the following solutions one by one.
Best Troubleshooting Ways to Fix QuickBooks Error 6000 77 windows 11, 10 & 8.1
Solution Part 1
Before moving toward the solution part, let’s have a look at the list of certain precautionary steps that must be followed carefully:
- Make sure Windows firewall and other security software are set as an exception for QuickBooks programs and not blocking access to your company file.
- You are recommended to create a backup before moving your company file to another location or Network.
- Verify that there’s no corruption and discrepancy between the .ND and .TLG files, as this may prevent you from accessing or functioning QuickBooks software in your system.
- The filenames and the file extensions must be accurate without including any especial characters, or else you cannot open the company file in multi-user mode.
- It is advisable to use the Universal naming convention (UNC) path rather than using a mapped drive, which is used to access network resources with relative directory segments.
- Before copying the company file into a particular folder, double-check that you have enough permissions to do so.
- Also, ensure that the company file you’re trying to open in a multi-user environment is free from corruption.
- Last but not least, the QuickBooks version you’re using must be updated to the most recent release and installed properly on your system.
Solution Part 2
To access/open the company file in multi-user mode, we have discussed some feasible methods that will help you root out QuickBooks error 6000 77 as soon as possible. For this, follow the steps provided below:
Solution 1: Close all QuickBooks processes
- To begin with, hold and press Ctrl + Shift + Esc to open the Task Manager.
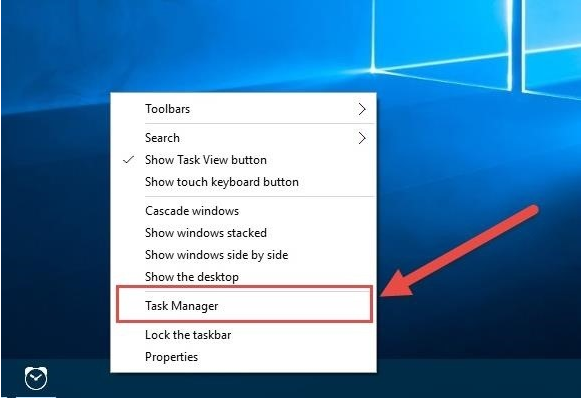
- Now, click on the More Details dropdown at the bottom.
- Hit the Processes tab.
- After this, click the image name to index all open processes.
- Select and close every single QuickBooks process (QBW32.EXE, qbupdate.exe, and QBDBMgr.exe). For this:
- Hit right-click on the process name and
- Choose the End Task.
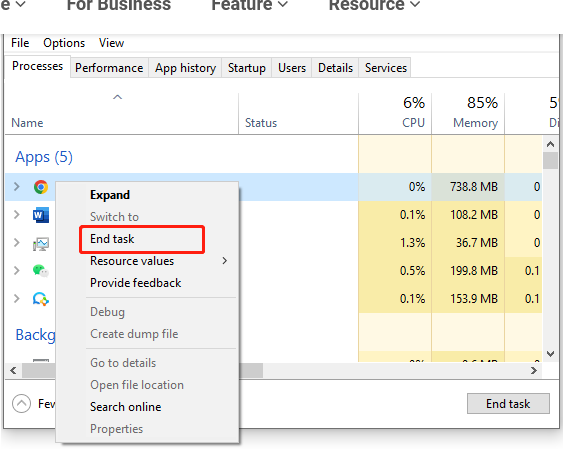
- Once all the QB Processes are closed, make an exit from the task manager and try logging in to the QB company data file.
Solution 2: Sign in to QuickBooks with Admin Rights
- To start, close the QuickBooks desktop application.
- Restart your system and then locate and hit right-click on the QuickBooks Desktop icon.
- Then, choose Run as administrator.
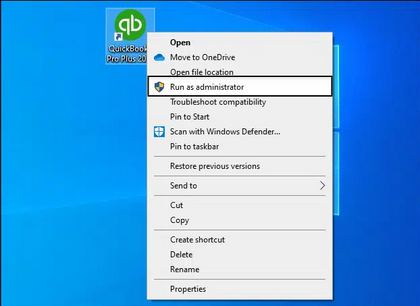
- After this, enter the valid login credentials if it’s prompted.
- Press the OK button and then try to open the company file in QuickBooks software.
Solution 3: Configure firewall and security software
Step 1: Add Firewall Port Exception for QuickBooks
- Navigate to the Windows Start menu.
- Enter “Windows Firewall” into the search bar and open Windows Firewall Settings.
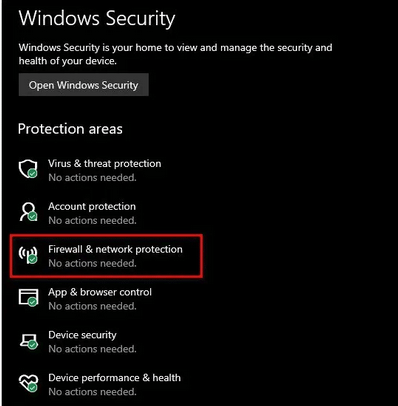
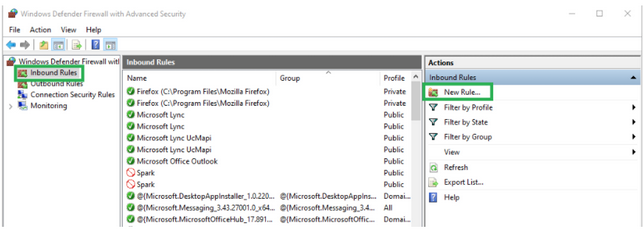
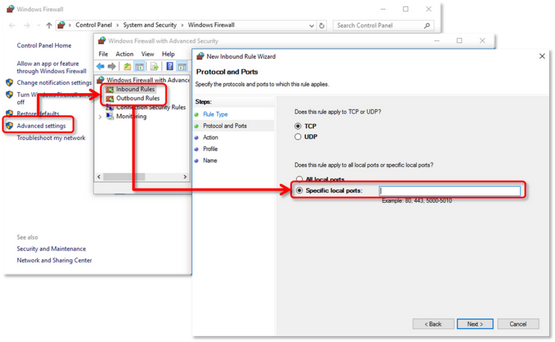
- Choose Firewall Advanced options from the left sidebar.
- Under Advanced Settings, you see the inbound and outbound rules.
- Hit right-click on Inbound Rules and choose the New Rule option.
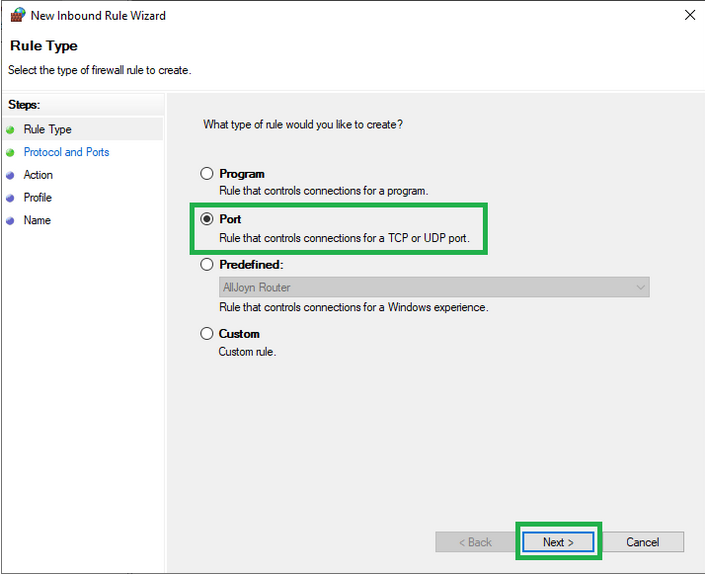
- After this, click on Port in the New Rule window and press the Next icon.
- Next, make sure that TCP is marked.
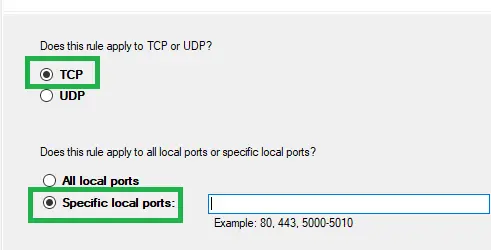
- Enter the particular ports in the Specific local ports field required for the QuickBooks year version you are using:
- Enter 8019, XXXXX for QuickBooks Desktop 2020 and later.
- Type 8019, XXXXX for QuickBooks Desktop 2019.
- Enter 8019, 56728, 55378-55382 for QuickBooks Desktop 2018.
- Type 8019, 56727, 55373-55377 for QuickBooks Desktop 2017.
QuickBooks Desktop 2019, 2020, and later versions use dynamic ports. Here’s how to get a dynamic port number:
- When you enter the port number, click Next.
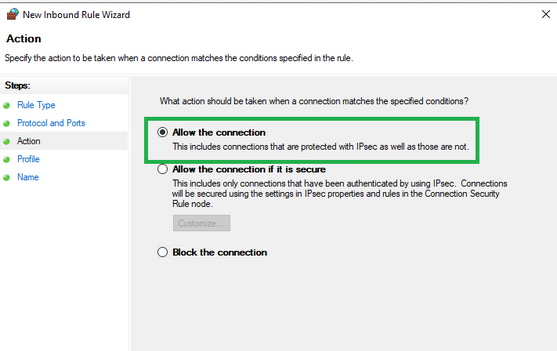
- Select Allow the Connection window and then choose Next.
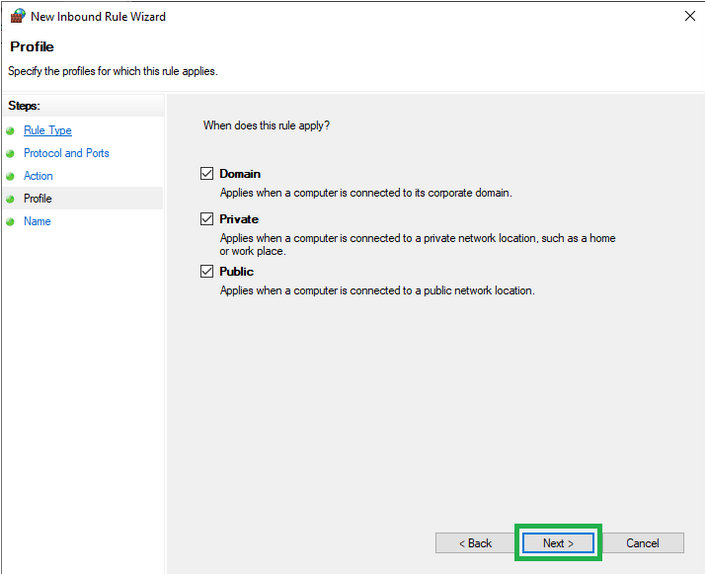
- If you’re prompted, ensure all profiles are tickmarked including Domain, Private and Public. Hit the Next tab again.
- Create a rule and give it a name: “QBPorts(year).”
- Once done, click Finish.
- Repeat the same steps to create outbound rules.
Step 2: Create Windows firewall exceptions for QuickBooks programs
QuickBooks uses executable files (.exe) to perform various accounting tasks. Follow these steps to create exceptions for each executable on the table:
- Head to the Windows Start menu and type Windows Firewall into the search bar, then the same.
- Now, choose the Advanced Settings option.
- Click right on Inbound Rules and then hit the New Rule tab.
- Select Program and then press Next.
- Afterward, select This Program Path and then click Browse.
- Locate and click on any one executable file from the table listed below. Then click Next.
- Moving ahead, choose Allow the Connection window and then hit the Next icon.
- If prompted, you need to review that all profiles are checkmarked. Later on, press the Next button.
- Create a rule and give it a name: “QBFirewallException(name.exe).”
- And lastly, repeat the same steps to create outbound rules.
Below is a list of some executable files, along with their locations:
| Executable files | Location |
| IntuitSyncManager.exe | C:\Program Files\Common Files\Intuit\Sync |
| QBCFMonitorService.exe | C:\Program Files\Common Files\Intuit\QuickBooks |
| AutoBackupExe.exe | C:\Program Files\Intuit\QUICKBOOKS YEAR |
| QBW32.exe | C:\Program Files\Intuit\QUICKBOOKS YEAR |
| QBLaunch.exe | C:\Program Files\Common Files\Intuit\QuickBooks |
| OnlineBackup.exe | C:\Program Files\QuickBooks Online Backup |
| FileManagement.exe | C:\Program Files\Intuit\QUICKBOOKS YEAR |
Solution 4: Make Use of QuickBooks File Doctor
QuickBooks File Doctor Tool is a file-repairing tool used to resolve common QuickBooks company File-associated errors such as data damage, connection errors, Windows problems, update errors, and network-related issues. You can fix all of them when you run this tool in your system. For this, you first have to download and install it from the tool hub. After a successful download, this will scan your company file and start diagnosing the errors you’re getting. Later, it will categorize the identified issues and take appropriate actions to resolve them.
Note: You have to wait for a while as it may take a few minutes to detect and rectify the issue.
QuickBooks File Doctor will start fixing the issues automatically and determine what may hinder the smooth functioning of your software. When the repair process is done, the QuickBooks File Doctor will provide you with a detailed report that outlines the problems available in your software. This report will help you to understand the issues and all the actions performed by this utility.
Solution 5: Copy the Company file to another location
- In the first place, open QuickBooks and the company file you want to move.
- Press the F2 or Ctrl + 1 keys to open the Product Information window.
- Go to the File Information section, and this will let you know where your company file is saved on your hard drive.
- Hover over the Start menu, type File Explorer into the search bar, and then open the same.
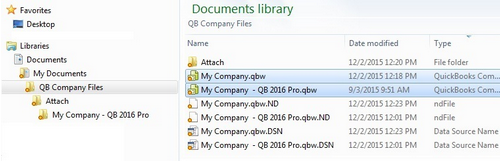
- Now, locate the folder having your company file with the file extension [Your company name].QBW.
- Hit right-click on your company file and then select the Copy option.
- After this, click right anywhere on your desktop or move your files to the new computer or another location on your hard drive, then choose Paste.
- Once done, hold down the Ctrl tab and open QuickBooks.
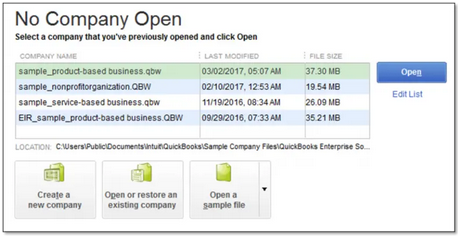
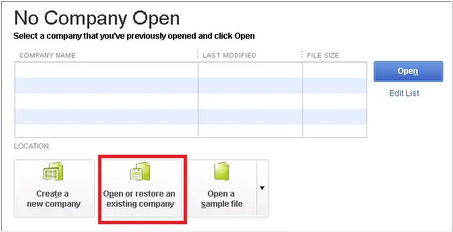
- This will direct you to the No Company Open window, and then select the Open or Restore an existing company option.
- Browse your computer and click on the company file you just copied to your desktop, then press Open.
Solution 6: Rename .ND and .TLG files
- To begin with, open the folder that holds your company file.
Default Location: C:\Users\Public\Public Documents\Intuit\QuickBooks\Company Files
- Now, locate the files with a similar file name as your company file but with extensions .ND and .TLG i.e. (Company_file.qbw.nd, Company_file.qbw.tlg)
- Hit right-click on .nd/.tlg file and choose the Rename option.
- After this, type the word “.old” at the end of the file extension and press the Enter key. For example,
- company_file.qbw.nd.OLD
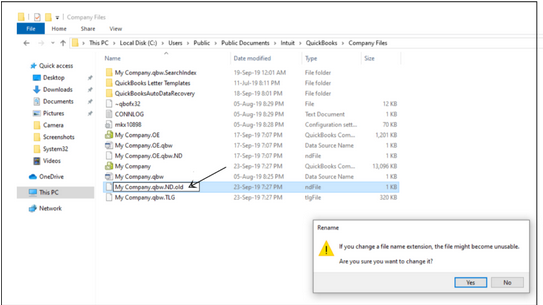
- company_file.qbw.tlg.OLD

- Reopen QuickBooks and then try to log in to your company file.
Solution 7: Eliminate any blank spaces in the filename
- Log out from the QuickBooks Desktop application wherever it is opened in your system.
- Now, hit the Windows Start menu and then select File Explorer.
- Right-click on the company file and choose the Rename option. The File must be named as [CompanyName].qbw or just [CompanyName].
- Click on the company file name and then press Enter key.
- Also, ensure that there is no space in it, and if there’s any, remove these spaces between the file extension and the company name.
- In the end, click Yes to confirm and open the QuickBooks company file.
Note: If this doesn’t help you out, then create a new QuickBooks company file from scratch.
Solution 8: Use a UNC path instead of a mapped drive
- In the first place, hit right-click on the QuickBooks icon, then press the Ctrl key on your keyboard.
- Now, select the Run as Administrator option from the drop-down list.

- After this, hold down the Ctrl key until the No Company Open window starts appearing on your screen.
Note: If you hold down the Ctrl key, this prevents QuickBooks Desktop from auto-opening a company file.
- Select Open or Restore Company, then Open a company file from the File menu and press the Next icon.
- In the left pane, click Network, and go to your company file location.
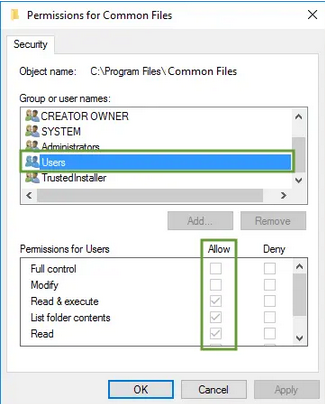
Note: If you are unable to locate the folder where the company file is stored, you may need to set the folder permissions.
- At last, choose the company file and then hit the Open tab.
Solution 9: Recreate the damaged folder
- Firstly, create a new folder on your C: drive.
- Next, open the folder with the company file.
- Search and right-click on the .qbw file. For Example: company_file.qbw
- After this, choose Copy from the drop-down list.
- Open a new folder and then Paste the .qbw file into this newly created folder.
- Also, make sure you’ve set Windows access permissions to share company files.
- Finally, launch QuickBooks Desktop and try accessing the File from the new location.
Solution 10: Repair QuickBooks Company File
To fix data damage in your QuickBooks company file, use the in-built Rebuild data tool. Here’s how:
- Navigate to File, Utilities, and then choose Rebuild Data.

- Press OK on the QuickBooks Information window.
- After this, QuickBooks will ask you to create a backup before it rebuilds your company file.
- Follow the on-screen instructions to save it and let the tool repair your File. It may take a few minutes.
- QuickBooks may seem stuck, but once you move your cursor, the tool starts working.
- When the tool finishes, hit the OK tab.
- Hover over File and choose Utilities, then select Verify Data again to check your File for any additional damage.
- If the verification doesn’t find any data damage, click OK and keep using your company file.
- However, if QuickBooks addresses an issue with your company file, select the Rebuild Now option.
Solution 11: Update QuickBooks Desktop & Windows to The Latest Release
You are always recommended to Update QuickBooks to the latest version at regular intervals. This helps you to improve data security, software performance, and gives access to all the services offered by Intuit. The outdated application doesn’t let you receive any new or critical security updates that may protect your software from vulnerable data breaches.
Whenever any update is available, QuickBooks will notify you in advance through email, in-product notifications, and the product page itself. There are two ways to update your software to the most recent version: Automatically and Manually.
For automatic updates, you just have to turn on the automatic updates tab, and when the Update is available on the status bar, your software will install them automatically. But if you don’t want to update your software automatically, you have the option to do it by yourself following the manual instructions.
Leave a Reply