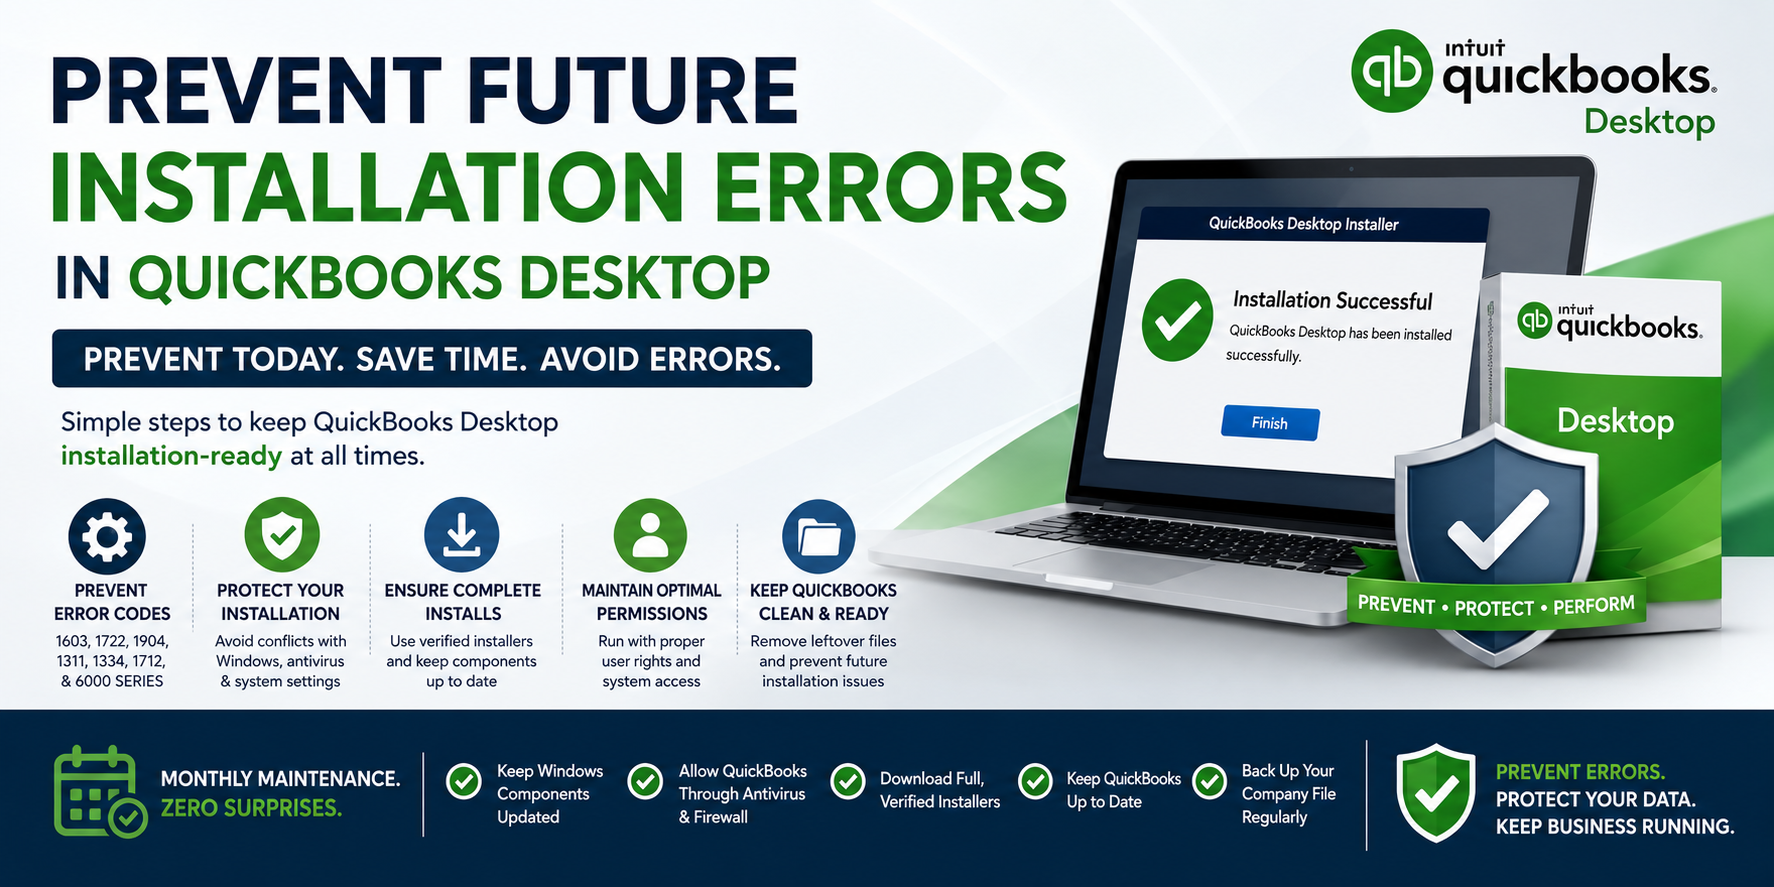
QuickBooks Desktop installation errors – error codes 1603, 1722, 1904, 1311, 1334, 1712, and the 6000 series – all come from a small, identifiable set of causes. Every cause has a corresponding prevention step that eliminates it before it can produce an error. Businesses that apply these prevention steps before every installation or update never encounter the majority of QuickBooks installation errors that fill Intuit’s community forums. The fixes that resolve a QuickBooks installation error after it appears are the same actions that would have prevented it if applied before starting.
Intuit’s own documentation and community support team responses confirm the root causes behind every major QuickBooks installation error:
- damaged or missing Windows software components (.NET Framework, MSXML, and Visual C++),
- antivirus software blocking the installer’s file write operations,
- incomplete installer downloads,
- incorrect Windows user permissions,
- leftover files from previous QuickBooks installations, and
- Windows updates that changed components without a matching QuickBooks update being applied.
Each of these causes is fully preventable. None require technical expertise – each prevention step is a specific, documented action that takes 2 to 20 minutes.
This article covers every prevention step in the order they should be applied, explains exactly why each one prevents specific error codes, and provides a monthly maintenance schedule that keeps QuickBooks installation-ready at all times.
The article also covers the five most common situations where installation errors recur – after Windows feature updates, after antivirus updates, after a computer migration, after a failed previous installation, and after an incorrect shutdown – and the specific prevention steps for each.
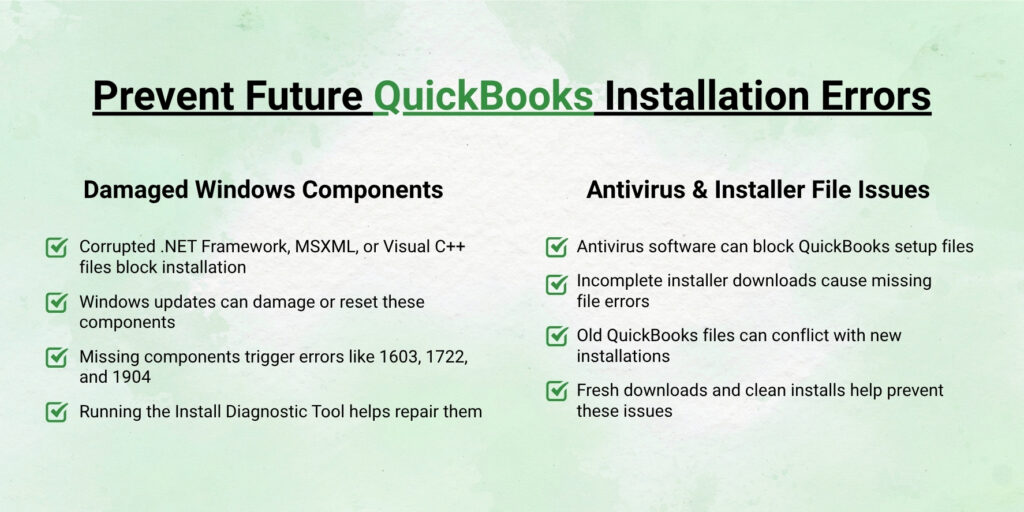
Table of Contents
Why Are QuickBooks Installation Errors Preventable?
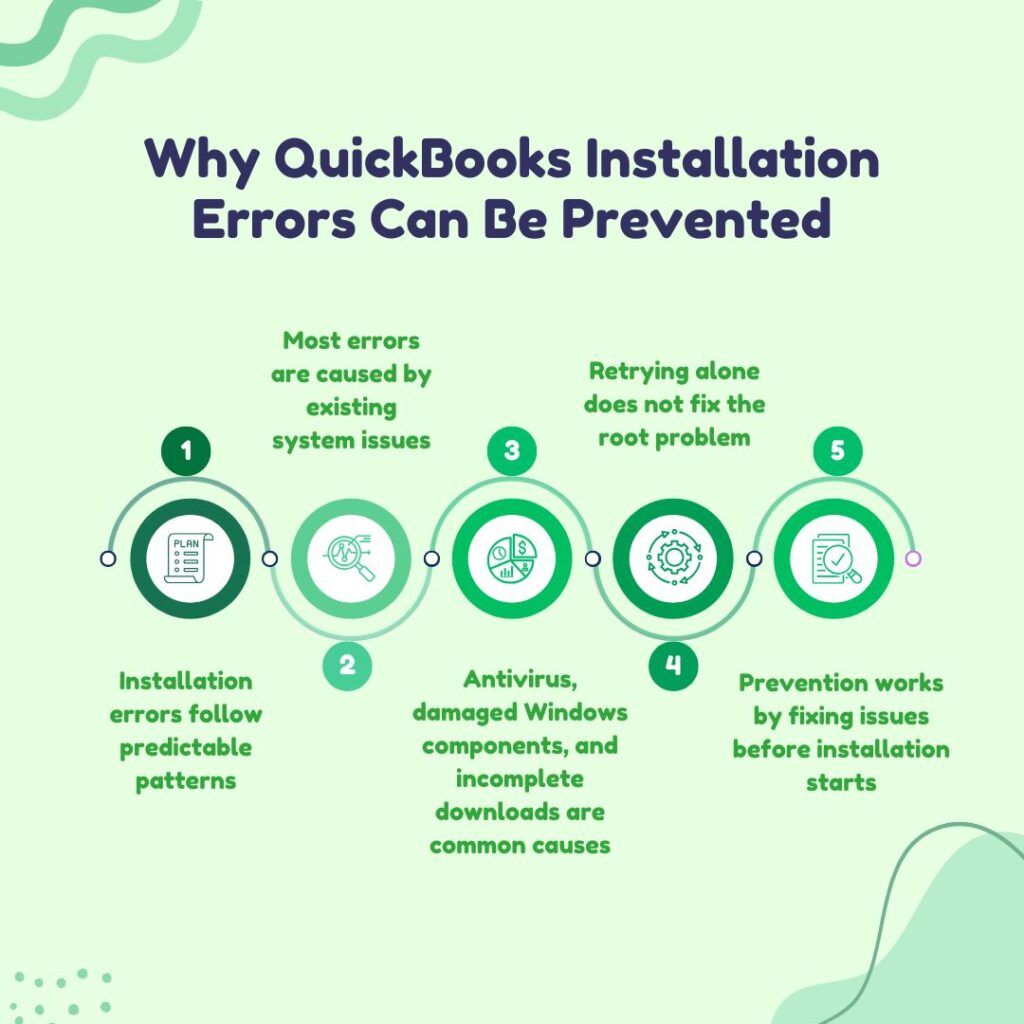
Installation Errors Follow a Predictable Pattern
Every QuickBooks installation error is caused by a specific condition on the computer that the installer encountered and could not handle. Error 1603 appears when the Windows Installer service cannot write a required file, most commonly because antivirus software intercepted the write or because a Windows component the installer was calling is damaged.
Error 1722 appears when a custom action – a small helper program embedded in the QuickBooks installer – fails to run, most commonly because antivirus blocked the helper program from executing from the Windows Temp folder. Error 1311 appears when the installer’s cabinet file – the compressed package containing all program files – is missing from the expected location because the installer download was incomplete.
All three of these errors, and all the other common QuickBooks installation error codes, share one characteristic: the cause existed on the computer before the installation started, and the installer could not work around it. No amount of retrying the installation fixes the error until the underlying cause is addressed. Prevention works by addressing the cause before the installation begins, rather than after the error has already stopped the process.
The Six Root Causes That All Prevention Steps Target
All QuickBooks installation errors trace back to one of six root causes. Understanding which root cause each prevention step addresses makes it clear why the step is necessary and what specific errors it prevents. The six root causes are:
- damaged or missing Windows software components (prevents errors 1603, 1722, 1712, and 1935),
- antivirus software intercepting installer operations (prevents errors 1603, 1722, 1334, and 1335),
- incomplete or corrupted installer downloads (prevents errors 1311, 1334, and 1335),
- insufficient Windows user permissions (prevents errors 1304, 1306, 1402, and 1334),
- leftover files from previous QuickBooks installations (prevents errors 1603, 1722, and the 6000 series), and
- Windows updates that changed components without a matching QuickBooks update (prevents errors 1712, 1603, and post-update startup failures).
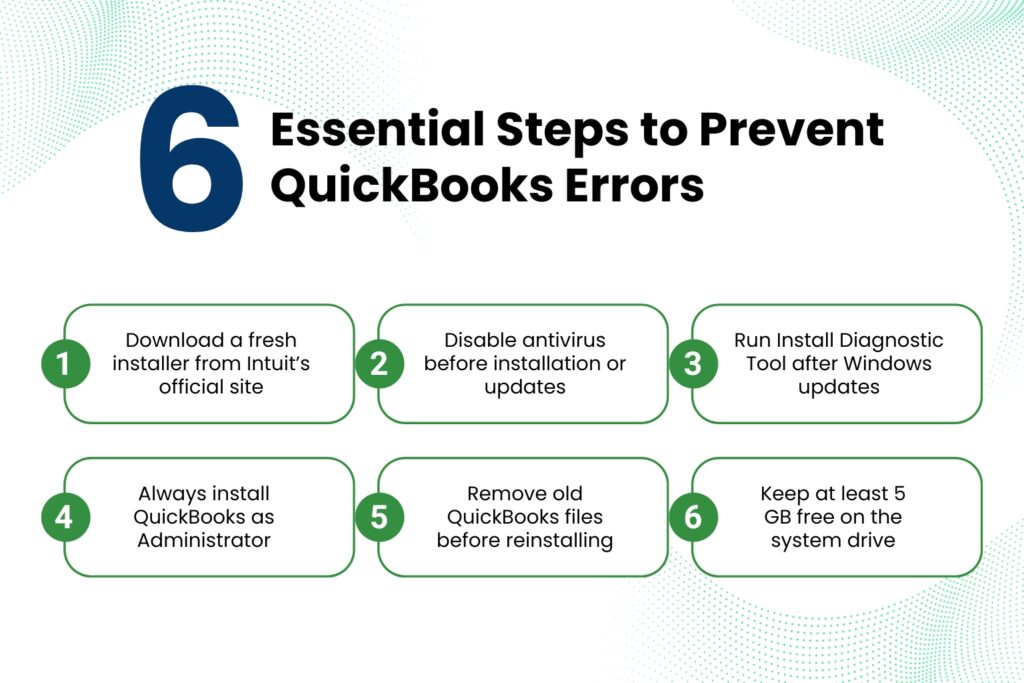
Prevention Step 1: Always Download the Installer Fresh From Intuit’s Official Site
What This Step Prevents?
Errors 1311, 1334, and 1335 are all caused by a corrupted or incomplete installer file. Error 1311 appears when the installer’s cabinet file – the compressed archive named Data1.cab that contains all program files – cannot be found at the expected path because the download was incomplete. Error 1335 appears when the cabinet file is found but is damaged, which happens when a download was interrupted partway through and the partial file was saved. Both errors are caused by reusing an installer file that was saved weeks or months earlier, downloaded from an unofficial source, or saved when the internet connection dropped during the download.
Intuit’s community support team specifically confirmed: downloading the QuickBooks installation files only from the official Intuit website ensures the installer is complete and unmodified. A fresh download from Intuit’s official Downloads & Updates page guarantees the file is complete and contains the latest maintenance release. An outdated installer saved on a USB drive or a shared network folder does not contain the current release and may have been damaged during storage.
Before every QuickBooks installation or update: go to Intuit’s official Downloads & Updates page. Select the country (United States), the QuickBooks Desktop product (Pro Plus, Premier Plus, or Enterprise), and the version year. Click Search. Click Get the latest updates. Save the downloaded installer file directly to the Desktop – not inside nested folders. A file path that is shorter prevents the Windows file path length limit of 260 characters from causing extraction failures.
Prevention Step 2: Disable Antivirus Real-Time Protection Before Every Installation or Update
What This Step Prevents?
Antivirus software real-time protection – the continuous background process that scans every file being written to the computer – is the most commonly documented cause of QuickBooks installation errors 1603 and 1722. Real-time protection intercepts the QuickBooks installer when it writes files to protected Windows directories and when it runs custom action executables from the Windows Temp folder. The antivirus classifies these operations as potentially suspicious – because programs writing to the Windows registry and running executables from Temp folders are behaviors that some malicious software also performs – and blocks them. The installer receives the block as a write failure and reports Error 1603 or 1722.
A real-world documented case from Intuit’s community forum showed that a Windows Defender update – installed automatically alongside a Windows system update – caused a QuickBooks Desktop R13P update patch to fail with errors 1712, 1603, and 1311 simultaneously. The fix was to install in Selective Startup mode, which disables all security software including Windows Defender. Disabling real-time protection before every QuickBooks installation and update and re-enabling it immediately after takes five minutes and eliminates the most common cause of QuickBooks installation failures.
Go to Windows Security > Virus & Threat Protection > Manage Settings. Toggle Real-Time Protection to Off. For third-party antivirus programs, find the Disable or Pause Protection option in the antivirus program’s system tray icon (the small icon visible in the bottom-right corner of the Windows taskbar). Disable it. Run the QuickBooks installation or update. After the installation or update completes, immediately re-enable real-time protection through the same path.
Prevention Step 3: Run the QuickBooks Install Diagnostic Tool After Every Windows Update
What This Step Prevents?
Windows updates change three shared Windows software components that QuickBooks depends on: Microsoft .NET Framework (a software layer that QuickBooks uses to run its setup screens and register program files), MSXML (Microsoft XML Core Services, which QuickBooks uses to read its license and configuration files during installation), and Microsoft Visual C++ Redistributable files (shared program libraries that both the installer and the installed program use). A Windows update that modifies these components can change them to a version incompatible with the current QuickBooks installation. The next time QuickBooks installs or updates, it calls these components and receives incompatible responses, producing errors 1712, 1603, or 1935.
Running the QuickBooks Install Diagnostic Tool after every Windows update, before the next QuickBooks installation or update is attempted, repairs any component incompatibilities the Windows update introduced. The tool downloads the correct versions of all three components from Microsoft’s servers and reinstalls them, restoring full compatibility. Intuit’s community support team recommended this exact approach in the documented R13P failure case: run the Install Diagnostic Tool after the Windows system update before retrying the QuickBooks installation.
After any Windows update that downloads and installs successfully: open the QuickBooks Tool Hub. Click Installation Issues in the left menu. Click QuickBooks Install Diagnostic Tool. Allow it to run for up to 20 minutes. Restart the computer when it finishes. This 20-minute investment prevents the most common cause of post-Windows-update QuickBooks installation failures.
Prevention Step 4: Install and Update QuickBooks With Administrator Rights Every Time
What This Step Prevents?
Errors 1304, 1306, 1402, and 1334 are all caused by the Windows user account running the installation not having sufficient permission to write to specific Windows folders. A Windows user account without administrator rights cannot write to C:\Program Files\Intuit, the Windows registry keys that QuickBooks uses, or the Config.Msi folder where the Windows Installer stores its temporary backup files during updates. Each blocked write produces a different error code depending on which folder was blocked, but all four errors resolve the same way: running the installation with administrator rights.
Intuit’s documentation confirms this requirement: the user must have administrator rights to install QuickBooks Desktop. A standard Windows user account – one that does not have administrator rights – cannot complete the QuickBooks installation. Even an account that was previously an administrator may have had its rights reduced by a Windows update or an IT department Group Policy change. Checking the account type and confirming it is set to Administrator before every QuickBooks installation prevents permission errors from stopping the process.
Before every installation: go to Settings > Accounts > Your Info. Confirm the account type shown is Administrator. If it shows Standard User, an administrator account must be used instead. To run the installer with administrator rights regardless of account type: right-click the installer file on the Desktop and select Run as administrator. Click Yes when Windows asks for permission. This applies to every QuickBooks installation and update, not just fresh installations.
Prevention Step 5: Remove All Previous QuickBooks Installations Completely Before Reinstalling
What This Step Prevents?
Errors 1603 and 1722 reoccur in subsequent installation attempts when a previous failed installation left behind corrupted files and orphaned registry entries. A standard Windows uninstall leaves these leftover items because it only removes what it can find in the installation record – and a failed installation often has an incomplete installation record. The next installation attempt finds these leftover items, tries to reconcile them with the new installation, encounters conflicts, and fails with the same error codes. The QuickBooks Clean Install Tool removes these leftover items before a new installation begins.
The QuickBooks Clean Install Tool automatically renames corrupted QuickBooks installation folders by adding .OLD to the end of each folder name, preventing the new installation from finding and using the corrupted data. Intuit confirms this removes all installation files, folders, and registry components tied to QuickBooks, ensuring no old data interferes with a fresh installation. Using this tool before every reinstallation – not just after a known failure – guarantees a clean starting environment.
Before any QuickBooks reinstallation: open Control Panel > Programs > Programs and Features. Right-click QuickBooks and select Uninstall. Complete the uninstall wizard. Download the QuickBooks Clean Install Tool from Intuit’s official support page. Run it. Select the QuickBooks version that was just uninstalled. Click Continue. The tool automatically renames all remaining QuickBooks folders with .OLD. Restart the computer after the tool finishes. Then run the fresh installer downloaded from Intuit.
Prevention Step 6: Keep at Least 5 GB of Free Space on the System Drive
What This Step Prevents?
Errors 1311 and 1335 can be caused by insufficient free space on the system drive – the C: drive where Windows is installed – during the installer’s cabinet file extraction step. The QuickBooks installer extracts its cabinet file to the Windows Temp folder before installing program files. The cabinet file unpacks to several gigabytes of data before the installer reads and places each program file in the correct location. A system drive with less than 5 GB of free space cannot hold the extracted files, causing the extraction to fail partway through and producing an error that the cabinet file cannot be found.
Intuit’s minimum system requirements specify 2.5 GB of available disk space for the QuickBooks Desktop program files alone. However, the extraction process requires space beyond this minimum – the Temp folder needs space for the unpacked cabinet file at the same time the program files are being written to the installation folder. Keeping at least 5 GB of free space on the system drive covers both the extraction space and the installation space requirements simultaneously.
Check free space before every installation: open File Explorer. Right-click the C: drive and select Properties. The Properties window shows free space. If free space is below 5 GB: press Windows + S and search for Disk Cleanup. Open it, select the C: drive, and click OK. Check the boxes next to Temporary Files, Temporary Internet Files, and Windows Update Cleanup. Click OK > Delete Files. This safely removes temporary files that accumulated from previous software installations and Windows operations.
Prevention Step 7: Verify the Company’s QuickBooks Subscription Is Current
What This Step Prevents?
A QuickBooks Desktop subscription that has lapsed – one where the annual renewal has not been paid – causes QuickBooks updates to fail during the license verification step. The update installer downloads the update package successfully but stops when it cannot verify the license against Intuit’s servers. The error in this situation is specifically a subscription or license validation failure, not a component or permission error. Confirming that the QuickBooks subscription is active before every update prevents this specific failure.
License verification failures also occur after a computer migration where the old computer’s license was deactivated without transferring the license to the new computer. Intuit allows one QuickBooks Desktop license to be installed on two computers as long as they are not used simultaneously. Transferring the license to a new computer requires logging in to the Intuit Customer Account Management Portal at camps.intuit.com and managing the installation seats from the Products & Services section. An unregistered installation on a new computer will pass through most installation steps but fail at the final activation step.
Prevention Step 8: Update the QuickBooks Tool Hub to the Latest Version
What This Step Prevents?
The QuickBooks Tool Hub is Intuit’s free all-in-one repair application that contains Quick Fix My Program, the Install Diagnostic Tool, QuickBooks File Doctor, the Database Server Manager, and other repair tools. The Tool Hub itself requires updates to maintain compatibility with the latest QuickBooks versions and Windows releases. An outdated Tool Hub version may have an Install Diagnostic Tool that downloads older versions of .NET Framework, MSXML, and Visual C++ that are not compatible with the current Windows environment. Updating the Tool Hub before every QuickBooks installation or update ensures the diagnostic and repair tools are current.
Intuit’s confirmed recommendation from the R13P update failure case was specifically to update the QuickBooks Tool Hub to version 1.6.0.8 as the first step before applying any other fix. The reason was that the older Tool Hub version did not include the latest Install Diagnostic Tool, which had been updated to handle the specific component changes the Windows system update introduced. The Tool Hub is a free download from Intuit’s official support page and takes five minutes to update.
Before every QuickBooks installation or major update: open the QuickBooks Tool Hub. Click the Help tab (the question mark icon) in the upper-right corner. Click Check for Updates. If an update is available, download and install it. The current Tool Hub version is shown in the title bar. Version 1.6.0.8 is the version Intuit specifically recommended in a documented support case.
Prevention Step 9: Install Windows Updates Before Installing QuickBooks
What This Step Prevents?
Windows updates include fixed versions of .NET Framework, MSXML, and Visual C++ that address known bugs in those components. Running a QuickBooks installation on a computer with pending Windows updates means the installation runs against older, potentially buggy component versions. A component bug that does not cause general Windows problems can specifically affect the QuickBooks installer because QuickBooks calls these components intensively during the registry-writing step – the step where error 1603, 1722, and 1712 most frequently appear. Installing all pending Windows updates before starting any QuickBooks installation ensures the components are at their most stable, most bug-free versions.
Before every QuickBooks installation: go to Windows Settings > Windows Update > Check for Updates. Install all available updates. Restart the computer after all updates are installed. Check for updates again to catch secondary updates that become available after the first round. After all updates are installed and the computer has fully restarted, proceed with the QuickBooks installation.
Prevention Step 10: Add QuickBooks to Antivirus Exclusions After Installation
What This Step Prevents?
Antivirus exclusions tell the antivirus program which files and folders to skip during real-time scanning. Adding QuickBooks to the exclusion list after installation prevents antivirus interference during future QuickBooks updates. Every QuickBooks update follows the same process as the original installation: it extracts files to the Windows Temp folder, writes program files to the installation directory, and updates registry entries. An antivirus program running without QuickBooks exclusions will scan each of these operations during the update and may block some of them, causing update errors.
The specific folders and files to add to antivirus exclusions are confirmed by Intuit’s documentation: the QuickBooks installation folder (C:\Program Files\Intuit\QuickBooks [Year]), the QuickBooks data folder (C:\ProgramData\Intuit\QuickBooks), the company file folder (wherever the .QBW file is stored), and the QuickBooks executable files QBW32.exe, QBDBMgrN.exe, and QBCFMonitorService.exe. Adding these exclusions after every QuickBooks installation, and verifying they are still present after every major Windows update, keeps QuickBooks update operations free from antivirus interference permanently.
Go to Windows Security > Virus & Threat Protection > Manage Settings > Exclusions > Add or Remove Exclusions. Add each of the following:
- C:\Program Files\Intuit\QuickBooks [Year]
- C:\ProgramData\Intuit\QuickBooks
- The folder where the company file (.QBW) is stored
- QBW32.exe (QuickBooks main program file, inside the installation folder)
- QBDBMgrN.exe (QuickBooks Database Server Manager, inside the installation folder)
- QBCFMonitorService.exe (QuickBooks Connection Monitor, inside the installation folder)
Monthly Maintenance Schedule: Keep QuickBooks Installation-Ready
Applying the prevention steps once is not sufficient – Windows updates, antivirus updates, and time all create new conditions that can produce installation errors. Following a monthly maintenance schedule keeps the computer in a state where QuickBooks installations and updates succeed the first time, every time.
| Maintenance Task | Frequency | Time Required | What It Prevents |
| Run the QuickBooks Install Diagnostic Tool | After every Windows update (at minimum monthly) | 15–20 min | Component compatibility errors (1603, 1722, 1712, 1935) |
| Verify antivirus exclusions are still in place | After every major Windows update | 5 min | Antivirus interference with QuickBooks file writes during updates |
| Update the QuickBooks Tool Hub to the latest version | Monthly or when Tool Hub prompts | 5 min | Outdated diagnostic tools providing wrong component versions |
| Check Windows Updates are fully installed | Before any QuickBooks installation or update | 10–30 min | Component bugs that Windows updates have already fixed |
| Confirm system drive has at least 5 GB free space | Monthly | 5 min | Cabinet file extraction failures during installation |
| Verify QuickBooks subscription is active | Before any major QuickBooks update | 5 min | License verification failures stopping update completion |
| Confirm Windows user account has Administrator rights | Before any QuickBooks installation or update | 2 min | Permission errors (1304, 1306, 1402, 1334) during installation |
| Download fresh QuickBooks installer from Intuit before any installation | Before every installation | 10–20 min (download time) | Cabinet file errors from incomplete or outdated installer files |
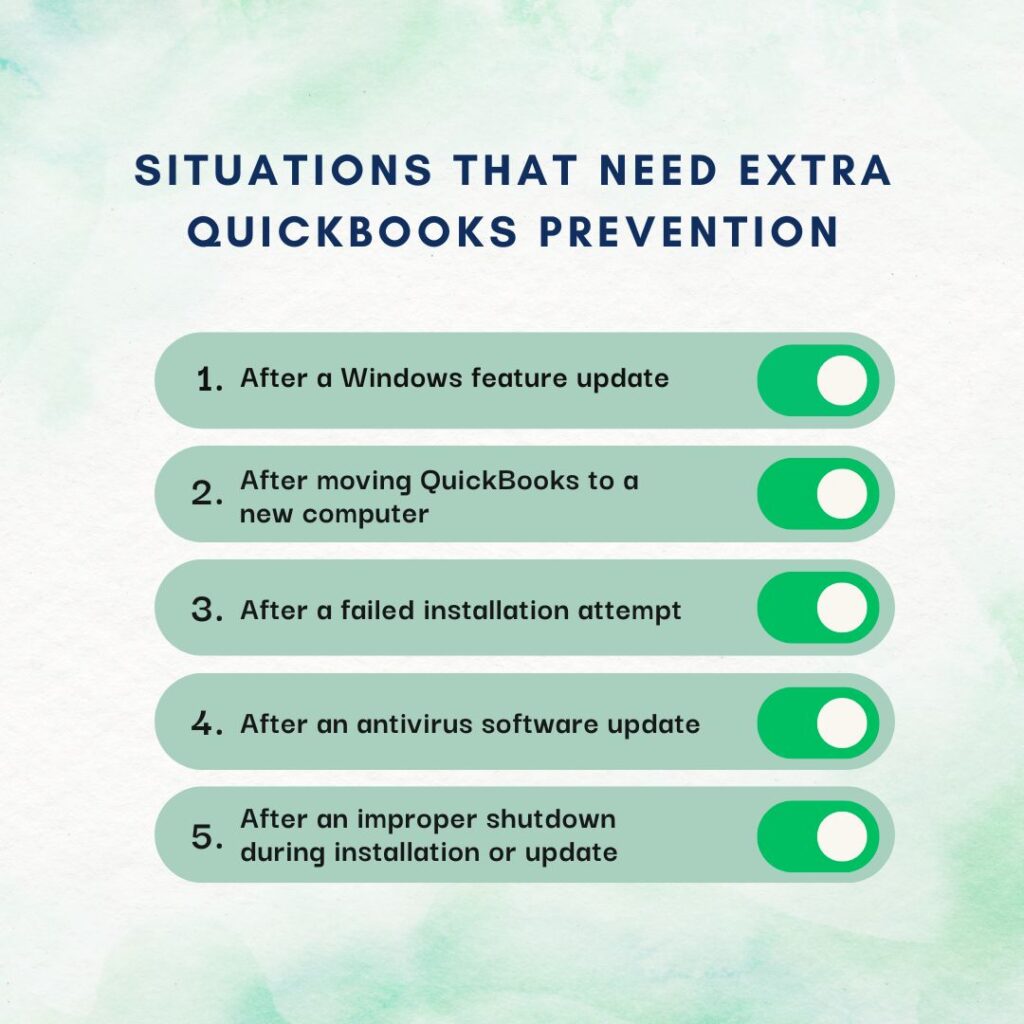
Five Specific Situations That Require Extra Prevention Steps
Situation 1: After a Windows Feature Update
A Windows feature update – a major version change like upgrading from Windows 11 22H2 to Windows 11 24H2 – replaces thousands of Windows system files and always changes .NET Framework, MSXML, and Visual C++ components. After every Windows feature update, run the Install Diagnostic Tool, verify antivirus exclusions are still present (Windows Defender updates alongside feature updates and sometimes resets exclusions), apply the latest QuickBooks maintenance release, and confirm the QuickBooks version is certified for the new Windows version. QuickBooks Desktop 2021 and older are not compatible with Windows 11 – no reinstall or repair fixes this incompatibility; upgrading to QuickBooks 2022 R3 or later is the only solution.
Situation 2: After Migrating to a New Computer
Moving QuickBooks to a new computer requires four specific prevention steps to avoid installation errors: confirm the new computer is 64-bit Windows 11 (QuickBooks 2022 and later require 64-bit Windows), download a fresh installer from Intuit for the version being installed, confirm the license is associated with the new computer in the Intuit Customer Account Management Portal at camps.intuit.com (a license allows installation on two computers simultaneously), and perform the installation in Selective Startup mode to prevent the new computer’s antivirus from interfering with the initial installation.
Situation 3: After a Failed Previous Installation
A failed previous installation always leaves behind partial files and incomplete registry entries that cause the same errors to reoccur in subsequent installation attempts. The mandatory prevention step is running the QuickBooks Clean Install Tool before retrying – not the standard Control Panel uninstall alone. The Clean Install Tool removes the partial installation data that causes the new installation to fail with the same error. Running the Install Diagnostic Tool after the Clean Install Tool and before the new installation ensures the component environment is ready for the fresh installation.
Situation 4: After an Antivirus Program Updates
Antivirus programs update their rule sets regularly, and new rules sometimes classify QuickBooks installer operations as suspicious and block them. After any antivirus program update, verify the QuickBooks exclusions are still in place in the antivirus settings – some antivirus programs reset custom exclusions after their own updates. The verification takes five minutes: go to the antivirus settings, find the Exclusions or Exceptions section, and confirm all QuickBooks folders and executable files are still listed. Re-adding any exclusions that were removed by the antivirus update prevents the next QuickBooks update from failing with errors 1603 or 1722.
Situation 5: After an Incorrect Shutdown During an Installation or Update
A power failure, computer crash, or forced shutdown during a QuickBooks installation or update leaves the installation in a partially completed state with both old and new files present at the same paths. The next installation attempt encounters these mixed-state files, cannot reconcile them, and fails with errors 1603, 1722, or the 6000 series. The prevention step is to run the QuickBooks Clean Install Tool immediately after any interrupted installation – before retrying. This removes the partial installation state and creates a clean starting point. Using an uninterruptible power supply (UPS – a battery backup device that keeps the computer running for several minutes after a power outage) during installations prevents power failure from interrupting the installation in the first place.
Conclusion
Preventing QuickBooks Desktop installation errors is a straightforward process when the root causes are understood. Antivirus real-time protection blocks file write operations during installation. Damaged Windows components cause installation steps to fail at the registry-writing stage. Incomplete downloads produce missing or corrupted installer files. Insufficient permissions block file and registry writes. Leftover files from failed installations cause new installations to inherit the same errors. Windows updates change components without matching QuickBooks updates. Each of these six root causes is addressed by a specific prevention step that takes 2 to 20 minutes to apply.
The most impactful prevention steps are: disabling antivirus real-time protection before every installation (prevents the most common cause of errors 1603 and 1722), running the Install Diagnostic Tool after every Windows update (prevents the most common cause of post-update installation failures), and running the QuickBooks Clean Install Tool before every reinstallation (prevents the most common cause of recurring installation errors). These three steps together cover five of the six root causes and eliminate the majority of QuickBooks installation errors before they have a chance to appear.
Intuit’s QuickBooks Tool Hub – available free from Intuit’s official support page – contains the Install Diagnostic Tool, Quick Fix My Program, QuickBooks File Doctor, and the Database Server Manager in one application. Keeping the Tool Hub installed on every computer running QuickBooks Desktop and updating it monthly ensures the most important diagnostic and repair tools are always current and available for both prevention and resolution.
Frequently Asked Questions
1. QuickBooks installation errors appear after every Windows update, not just occasionally. What is the permanent fix?
Recurring installation errors after every Windows update confirm that Windows updates are consistently changing the .NET Framework, MSXML, or Visual C++ components to versions incompatible with the current QuickBooks installation.
The permanent solution is a two-part routine applied after every Windows update, before the next QuickBooks update: first, run the Install Diagnostic Tool from the QuickBooks Tool Hub to repair any component changes the Windows update introduced; second, apply the latest QuickBooks maintenance release from Help > Update QuickBooks Desktop > Get Updates.
This combination closes the compatibility gap from both sides – the Install Diagnostic Tool repairs the Windows component side, and the QuickBooks maintenance release updates the QuickBooks side. Setting a recurring reminder to perform both steps the day after any Windows update installs automates the routine.
2. The antivirus exclusions were added after the last QuickBooks installation, but QuickBooks update errors appeared again. What happened?
Antivirus programs can reset custom exclusion lists during their own updates. This is a documented behavior where antivirus software, after updating its detection engine or rule set, reverts the Exclusions list to a default state that does not include previously added custom entries.
The result is that QuickBooks exclusions added after the original installation are silently removed the next time the antivirus program updates itself. Checking the antivirus exclusions list after every antivirus update – not just after Windows updates – catches this reset before it causes the next QuickBooks update to fail.
Some enterprise antivirus programs applied from a central management console can be configured to protect exclusion lists from local overrides; an IT administrator can configure this permanently.
3. QuickBooks installation errors appear only on some computers in the office but not others with the same hardware. Why?
Installation errors appearing on specific computers but not others with identical hardware confirms the problem is in the software environment of those specific computers, not in the hardware or the QuickBooks installer.
The most common causes of this pattern are: the affected computers have an older Windows update history with a component at a different version, the antivirus rules on those specific computers were updated at a different time, or those computers previously had a different version of QuickBooks installed that left behind registry entries.
Running the Install Diagnostic Tool on the affected computers and verifying their antivirus exclusions match the settings on the working computers brings them to the same software environment state. The Clean Install Tool applied on the affected computers removes any orphaned registry entries from previous QuickBooks installations that the working computers do not have.
4. A new employee’s computer cannot install QuickBooks. Every other computer in the office installs it without errors. What is specific to the new computer?
A new employee’s computer that cannot install QuickBooks while other office computers succeed is almost always missing the antivirus exclusions that were previously set up on the other computers. The other computers had QuickBooks exclusions added when QuickBooks was first installed on them.
The new computer has never had QuickBooks installed and therefore has no exclusions in place. The antivirus real-time protection on the new computer blocks the installer’s file write operations, producing errors 1603 or 1722.
Adding the QuickBooks installation folder (C:\Program Files\Intuit\QuickBooks [Year]) and the Windows Temp folder to the antivirus exclusions before installing QuickBooks on the new computer, then installing in Selective Startup mode, resolves the issue.
5. QuickBooks keeps needing the Install Diagnostic Tool to be run before every update. Is there a way to make the components stay compatible permanently?
The reason the Install Diagnostic Tool is needed repeatedly is that Windows updates continue changing the shared components (.NET Framework, MSXML, Visual C++) after each QuickBooks installation. The components QuickBooks installed get replaced by Windows, and the cycle repeats.
The closest approach to a permanent resolution is running the Install Diagnostic Tool as a scheduled monthly task rather than waiting for errors to appear. Setting a Windows Task Scheduler entry to run the Install Diagnostic Tool on the first Monday of each month keeps the components current without waiting for an error to prompt action.
An additional option is enabling automatic updates in QuickBooks (Help > Update QuickBooks Desktop > Options tab > check Mark All) which ensures the latest QuickBooks maintenance release, which includes component compatibility patches, is always applied before a compatibility gap has time to accumulate.